
Get the ad-free PDF of Ravelry!
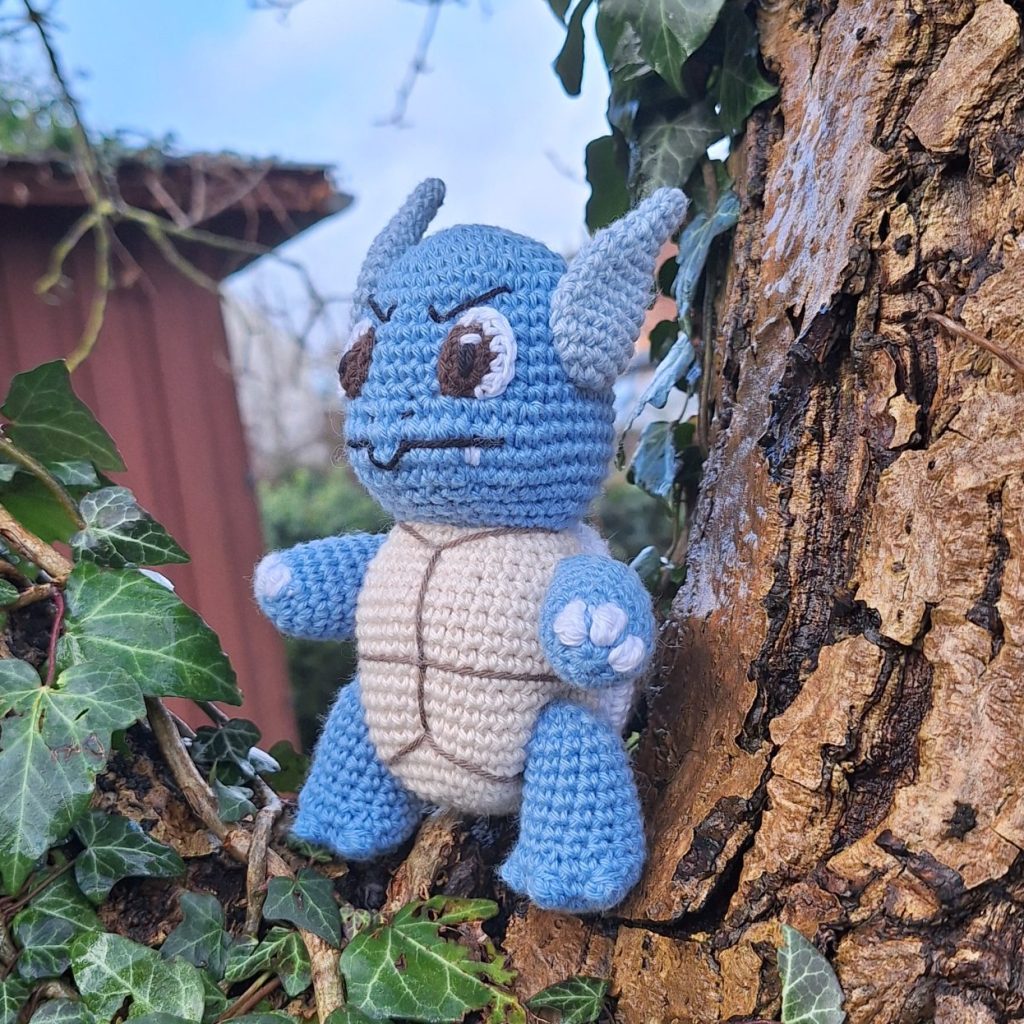
Dive into a delightful amigurumi project with this Wartortle crochet pattern! This charming Water-type Pokémon, known for its striking blue body and fun features, offers a wonderful crochet challenge. As the evolved form of Squirtle, Wartortle brings a touch of grace and toughness to the Pokémon trio, making it a fantastic addition to any Pokémon amigurumi collection.
Perfect for intermediate crocheters, this pattern captures Wartortle’s iconic details—from the swirly tail that symbolizes longevity to its large, fin-like ears that make it a formidable swimmer. Detailed instructions guide you through each step, ensuring your Wartortle comes to life with all the character and charm of the beloved Pokémon.
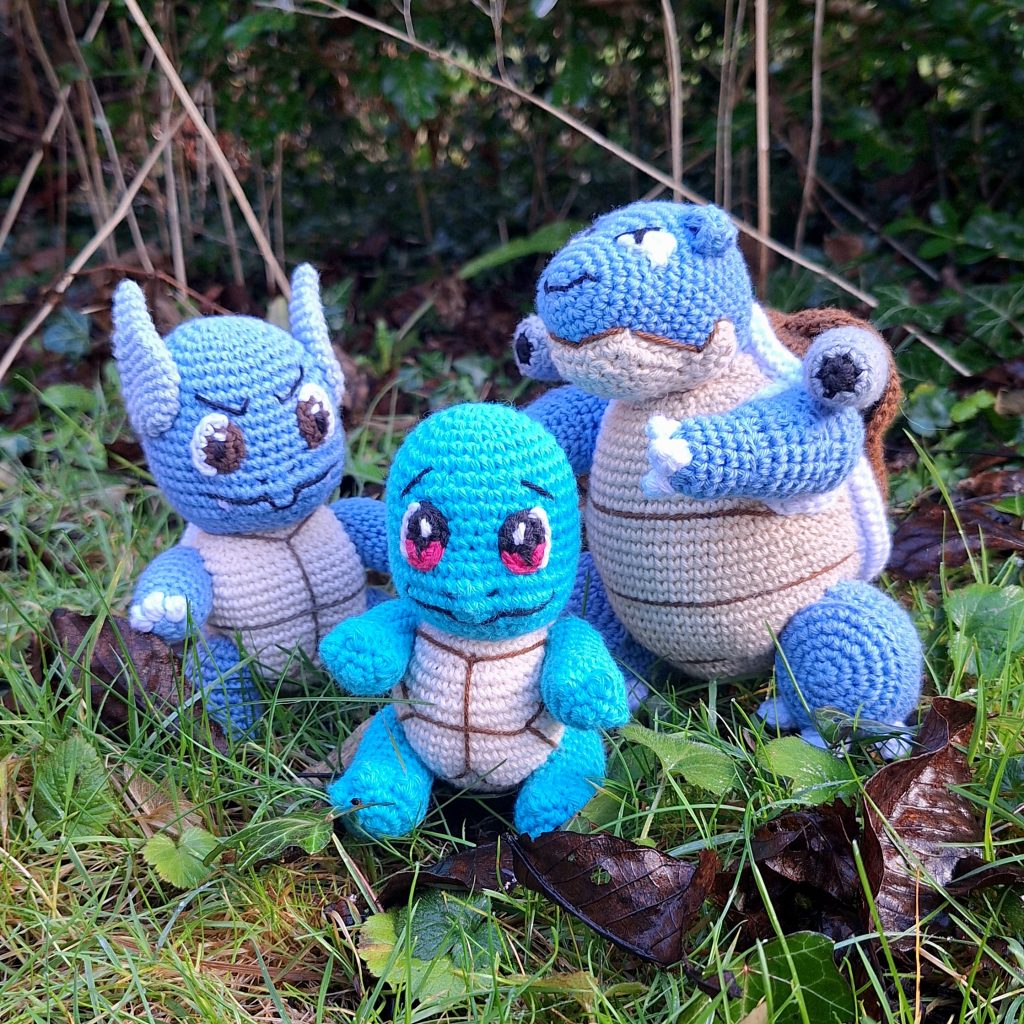
Ready to expand your Pokémon amigurumi-ensemble? After crocheting your Wartortle, why not explore the patterns for Squirtle and Blastoise? Together, they complete a dynamic Water-type evolution line that’s sure to enchant any Pokémon fan! So, grab your crochet hooks and let’s make a splash with Wartortle!
Supplies you'll need to crochet Wartortle
General supplies:
- Crochet hook 2,5 mm, I always use clover amour hooks for my projects!
- Sewing needle
- Stuffing
- Stitch marker
With Amigurumi you guage doesn’t matter much. Using smaller hook and yarn will make you finished Piece smaller, and bigger hook and yarn will make him bigger. Just make sure that your yarn and hook fits together and makes a tight fabric so the stuffing won’t show through!
In the following yarn and similar tension, your Wartortle will be about 15 cm/6 inches tall.
I reccomend Hobbii Rainbow cotton 8/4. This yarn is a 100% cotton and very nice to work with! With this yarn, I use a 2,5 mm hook (or a B-1 or C-2 should work too!). If Rainbow cotton is sold out, I can also recommend Friends cotton from Hobbii as a direct substitute.
- Blue for head and limbs
- Lighter blue and/or white for tail and ears
- Brown for the shell
- Tan/beige for the body
- White for claws, shell-edge and details
- A bit of black for details
Abbreviations in this crochet pattern
Rnd = round
mr = magic ring
sc = single crochet
hdc = half double crochet
inc = increase, 2 sc in the same stitch
dec = decrease, make 2 stitches into 1
ss = slip stitch
FLO = Front Loop Only
FO = Finish Off
Wartortle crochet pattern
Head
In blue
Rnd 1: 6sc in mr (6)
Rnd 2: inc x 6 (12)
Rnd 3: (sc, inc) x 6 (18)
Rnd 4: (sc, inc, sc) x 6 (24)
Rnd 5: (3sc, inc) x 6 (30)
Rnd 6: (2sc, inc, 2sc) x 6 (36)
Rnd 7: (5sc, inc) x 6 (42)
Rnd 8-13: sc around (42)
Rnd 14: 15sc, (sc, inc) x 6, 15sc (48)
Rnd 15: 20sc, (sc, inc) x 4, 20sc (52)
Rnd 16: sc around (52)
Rnd 17: 20sc, (sc, dec) x 4, 20sc (48)
Rnd 18: 15sc, (sc, dec) x 6, 15sc (42)
Rnd 19: 3sc, (2sc, dec, 2sc) x 6, 3sc (36)
Rnd 20: (2sc, dec, 2sc) x 6 (30)
Rnd 21: (3sc, dec) x 6 (24)
Rnd 22: (sc, dec, sc) x 6 (18)
Stuff
Rnd 23: (sc, dec) x 6 (12)
Rnd 24: dec x 6 (6)
FO.
Body
In tan/beige
Rnd 1: 6sc in mr (6)
Rnd 2: inc x 6 (12)
Rnd 3: (sc, inc) x 6 (18)
Rnd 4: (sc, inc, sc) x 6 (24)
Rnd 5: (3sc, inc) x 6 (30)
Rnd 6: (2sc, inc, 2sc) x 6 (36)
Rnd 7: 6sc, (sc, inc) x 3, 12sc, (sc, inc) x 3, 6sc (30)
Rnd 8-16: sc around (30)
Rnd 17: (7sc, dec, 4sc, dec, 6sc) x 2 (38)
Rnd 18: sc around (38)
Rnd 19: (6sc, dec, 4sc, dec, 5sc) x 2 (34)
Rnd 20: (7sc, dec, 6sc, dec) x 2 (30)
ss and FO with tail for sewing. Stuff the body firmly before finishing attaching to head in assembly.
Shell
In brown
Rnd 1: 6sc in mr (6)
Rnd 2: inc x 6 (12)
Rnd 3: (sc, inc) x 6 (18)
Rnd 4: (sc, inc, sc) x 6 (24)
Rnd 5: (3sc, inc) x 6 (30)
Rnd 6: (2sc, inc, 2sc) x 6 (36)
Rnd 7: 3sc, (2sc, inc, sc) x 3, 6sc, (2sc, inc, sc) x 3, 3sc (42)
Rnd 8: 3sc, (2sc, inc, 2sc) x 3, 6sc, (2sc, inc, 2sc) x 3, 3sc (48)
Rnd 9: sc around (48)
FO the brown.
Connect white yarn in a front loop (FLO) and continue to crochet around with the white.
Rnd 10: in FLO sc around (42)
Rnd 11: sc around (42)
Rnd 12: sc around going through both the regular white stitch and the brown back loop left from round 9 (42)
Now your white edge is folded down. FO the white with a tail for sewing.
Tail
In light blue.
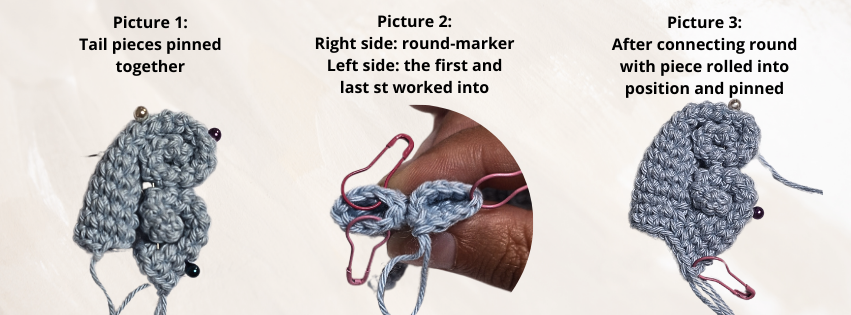
The tail is made in two separate pieces that are connected later on. These pieces are referred to as top- and bottom-pieces. Start by making the top piece
Top Piece
Rnd 1: 6sc in mr (6)
Rnd 2-17: sc around (6)
Rnd 18: 2inc, 4sc (8)
Rnd 19: sc, 2inc, 5sc (10)
Rnd 20-23: sc around (10)
ss and FO the top piece.
Bottom piece
Rnd 1: 6sc in mr (6)
Rnd 2-11: sc around (6)
Rnd 12: 2inc, 4sc (8)
Rnd 13: sc, 2inc, 5sc (10)
Leave the yarn tail. You can now roughly roll up the pieces to see how the finished tail-end will look (picture 1). The side with the increases goes against each other. Next step is connecting the two pieces.
When connecting the pieces, we will be leaving 2 stitches unworked on both pieces. These stitches are the ones placed directly above the increases made in each piece. In the bottom piece (with yarn attached) these stitches will be the 5th and 6th stitch. In the top piece it will be 2nd and 3rd after the slip stitch.
Mark these stitches to make sure they stay un-worked in both pieces. In picture 2 the stitches you are working into are marked!
Rnd 14: 4sc in bottom piece, continue and work in the top piece, 8sc in top-piece, switch to working in the bottom piece, 4sc in remaining 4 stitches (16)
The piece should now look something like picture 3 when you roll up the tail pieces.
Rnd 15: sc around (16)
Stuff the top- and bottom pieces lightly.
Rnd 16: dec, 6sc, inc, 7sc (16)
Rnd 17: sc around (16)
Rnd 18: dec, 14sc (15)
Rnd 19: dec, 5sc, inc, 5sc, dec (14)
Rnd 20: 6sc, inc, 5sc, dec (14)
Rnd 21: dec, 12sc (13)
Rnd 22: 2hdc, dec, 5sc, dec, 2hdc (11)
Rnd 23: 2hdc, dec, 3sc, dec, 2hdc (9)
Rnd 24: 3sc, ss, FO
Stuff the piece lightly.
Now curl the pieces, pin them together in the correct place and sew them together so the tail holds its shape. Also sew the hole created between the pieces in round 14 shut so stuffing doesn’t get out.
In the arms and legs, the fingers and toes are made with puff-stitches.
To make a puff-stitch do the following: (yarn over, hook through stitch, yarn over, hook back out of stitch, yarn over, pull through 2 loops on hook) x 3, (you will have 4 loops on hook after 3 repetitions), yarn over and pull through 4 loops.
Arms
In blue. Make all puff-st in white.
Rnd 1: 6sc in mr (6)
In the next round we are making the fingers. We are still increasing in every stitch to end up with a total of 12 stitches. This means that the following [ ] indicates that everything inside the parentheses should be made in 1 stitch.
Rnd 2: 2inc, ([sc, change to white, puff-st, change to blue]) x 3, inc (12 st total including 3 white puff-stitches)
Rnd 3: (3sc, inc) x 3 (15)
Rnd 4-9: sc around (15)
Rnd 10: (3sc, dec) x 3 (12)
Stuff the arm.
Rnd 11: dec x 6 (6)
FO leaving tail for sewing. Make 2.
Legs
In blue
Rnd 1: 6sc in mr (6)
Rnd 2: inc x 6 (12)
Rnd 3: (sc, inc) x 6 (18)
Puff-stitch is explained under the arms-section. Here they are made in blue, so no color-changes.
Rnd 4: 4sc, (sc, puff-stitch, sc) x 3, 5sc (18)
Rnd 5: sc around (18)
Rnd 6: 4sc, (sc, dec) x 3, 5sc (15)
Rnd 7-13: sc around (15)
Stuff firmly
Rnd 14: (dec, 3sc) x 3 (12)
Rnd 15: dec x 6 (6)
FO with tail for sewing. Make 2.
Ear-fins
Rnd 1: 6sc in mr (6)
Rnd 2: inc x 6 (12)
Rnd 3: (3sc, inc) x 3 (15)
Rnd 4-5: sc around (15)
Rnd 6: 6sc, dec, 7sc (14)
Rnd 7: 6sc, dec, 6sc (13)
Rnd 8: dec, 11sc (12)
Rnd 9: (dec, 4sc) x 2 (10)
Rnd 10: 3sc, 2dec, 3sc (8)
Rnd 11: 2sc, 2dec, 2sc (6)
Rnd 12-13: sc around (6)
Don’t stuff. Make 2.
Eyes
In brown yarn. We start by working around a chain. Start by chaining 4, the work starts in 2nd chain from hook.
Rnd 1: 2sc, 3sc in the last ch, turn to work on the opposite side of the chain, sc, inc (8)
FO the brown.
For Wartortles right eye: attach white at the top (away from the FO of brown), ss and sc in the first st, then continue making 4 sc along the side of the eye. FO the white.
For Wartortles left eye: attach white at the bottom (near the FO of brown), sc in the first st, then continue making 3 sc along the side of the eye, in the next st make a sc and a ss. FO the white.
In both eyes embroider a block long pupil and add a white highlight near the top of the pupil.
Assembly of your crochet Wartortle
Start by attaching the head to the body. The head sits straight on top of the body.
Next attach the shell to the back of the body. Make sure the head is facing the right way – the front can be located by the increases made in rnd 14-15. The shell stretches from rnd 5 of the body all the way up to where the head meets the body.
Next add the legs. The legs are placed on either side of the body from rnd 7-10 of the body. They should be placed either against the shell or with 1 st between the back of the leg and the shell. Be sure the toes point forward.
The arms are attached in a similar way. The are attached at rnd 14-18 angled slightly downwards. Again attach the arm close to the shell. Again be sure to have the white claws pointing upwards.
After assembling the tail as instructed in the tail part of the pattern, attach the tail on the back right below the shell.
Now we move on to the head. The eyes should be placed with the top of the eye placed on rnd 9 of the head and the bottom reaches down to between rnd 13-14. The eyes should be 4-5 stitches apart.
Embroider mouth, eyebrows and teeth onto the face. Embroider the body with brown to create the lines.
