

Get ready to crochet the adorable Togepi, the charming Fairy-type Pokémon known for its egg-like shell and delightful smile! This crochet pattern brings to life the sweet and endearing Togepi, capturing its iconic look and joyful spirit in a cute amigurumi piece.
This Togepi pattern uses regular amigurumi techniques and will be great for all skill levels who have made a few amigurumi pieces before. There are written guides to all steps that will help you create a beautiful crochet Togepi
Once completed, your crochet Togepi will be the perfect addition to brighten any space or delight any Pokémon fan. So grab your crochet hook, colorful yarn, and let’s start crafting this lovable Pokémon together!
Supplies you'll need to crochet Togepi
General supplies:
- Crochet hook 2,5 mm, I always use clover amour hooks for my projects!
- Sewing needle
- Stuffing
- Stitch marker
With Amigurumi you guage doesn’t matter much. Using smaller hook and yarn will make you finished Togepi smaller, and bigger hook and yarn will make him bigger. Just make sure that your yarn and hook fits together and makes a tight fabric so the stuffing won’t show through!
In the recommended yarn below, Togepi will be about 8 cm/3 inches tall.
I reccomend Hobbii Rainbow cotton 8/4. This yarn is a 100% cotton and very nice to work with! With this yarn, I use a 2,5 mm hook (or a B-1 or C-2 should work too!). If Rainbow cotton is sold out, I can also recommend Friends cotton from Hobbii as a direct substitute.
- pale yellow
- white
- a bit of red, blue and black for details on the shell and the face
Abbreviations in this crochet pattern
Rnd = round
mr = magic ring
sc = single crochet
dc = double crochet
inc = increase, 2 sc in the same stitch
dec = decrease, make 2 stitches into 1
ss = slip stitch
ch = chain
BLO = Back Loop Only
FO = Finish Off
Togepi crochet pattern
Body
In light yellow
Rnd 1: 6 sc in mr (6)
Rnd 2: inc x 6 (12)
Rnd 3: (sc, inc) x 6 (18)
Rnd 4: (sc, inc, sc) x 6 (24)
Rnd 5: (3sc, inc) x 6 (30)
Rnd 6: (2sc, inc, 2sc) x 6 (36)
Rnd 7: (5sc, inc) x 6 (42)
Rnd 8: (13sc, inc) x 3 (45)
Rnd 9-20: sc around (45)
Rnd 21: (13sc, dec) x 3 (42)
Rnd 22: (5sc, dec) x 6 (36)
Rnd 23: (2sc, dec, 2sc) x 6 (30)
Rnd 24: (3sc, dec) x 6 (24)
Rnd 25: (sc, dec, sc) x 6 (18)
Stuff
Rnd 26: (sc, dec) x 6 (12)
Rnd 27: dec x 6 (6)
FO.
Shell
In white
Rnd 1: 6 sc in mr (6)
Rnd 2: inc x 6 (12)
Rnd 3: (sc, inc) x 6 (18)
Rnd 4: (sc, inc, sc) x 6 (24)
Rnd 5: (3sc, inc) x 6 (30)
Rnd 6: (2sc, inc, 2sc) x 6 (36)
Rnd 7: (5sc, inc) x 6 (42)
Rnd 8: (3sc, inc, 3sc) x 6 (48)
Rnd 9-16: sc around (48)
make a ss. The next stitch will be the new beginning of the round.
In the next round we will make the spikes on the eggshell. This following is how you make 1 spike.
Spike: sc, (dc, ch, dc) in 1 stitch, sc, ss
A spike takes up 4 stitches of the base.
Rnd 17: spike x 12
FO with tail for sewing.
Big spike for head
In light yellow
Rnd 1: 6sc in mr (6)
Rnd 2: (2sc, inc) x 2 (8)
Rnd 3: (3sc, inc) x 2 (10)
Rnd 4: (4sc, inc) x 2 (12)
Rnd 5: (5sc, inc) x 2 (14)
Rnd 6: 7sc, ss, FO with tail for sewing.
Make 1.
Smaller spikes for head
In light yellow
Rnd 1: 6sc in mr (6)
Rnd 2: (2sc, inc) x 2 (8)
Rnd 3: (3sc, inc) x 2 (10)
Rnd 4: (4sc, inc) x 2 (12)
Rnd 5: 6sc, ss, FOwith tail for sewing.
Make 4.
Arms
In light yellow
Rnd 1: 4sc in mr (4)
Rnd 2: (sc, inc) x 2 (6)
Rnd 3: (sc, inc, sc) x 2 (8)
Rnd 4: (3sc, inc) x 2 (10)
ss and FO with tail for sewing.
Make 2
Feet
In light yellow
Rnd 1: 6sc in mr (6)
Rnd 2: (inc, 2sc) x 2 (8)
Rnd 3: (inc, 3sc) x 2 (10)
Rnd 4: (inc, 4sc) x 2 (12)
Rnd 5-8: sc around (12)
Rnd 9: (dec, 4sc) x 2 (10)
Stuff the piece lightly. It should still be able to easily be pushed flat.
Rnd 10: (dec, 3sc) x 2 (8)
Rnd 11: (dec, 2sc) x 2 (6)
FO with tail for sewing.
Make 2
Assembly of your crochet piece
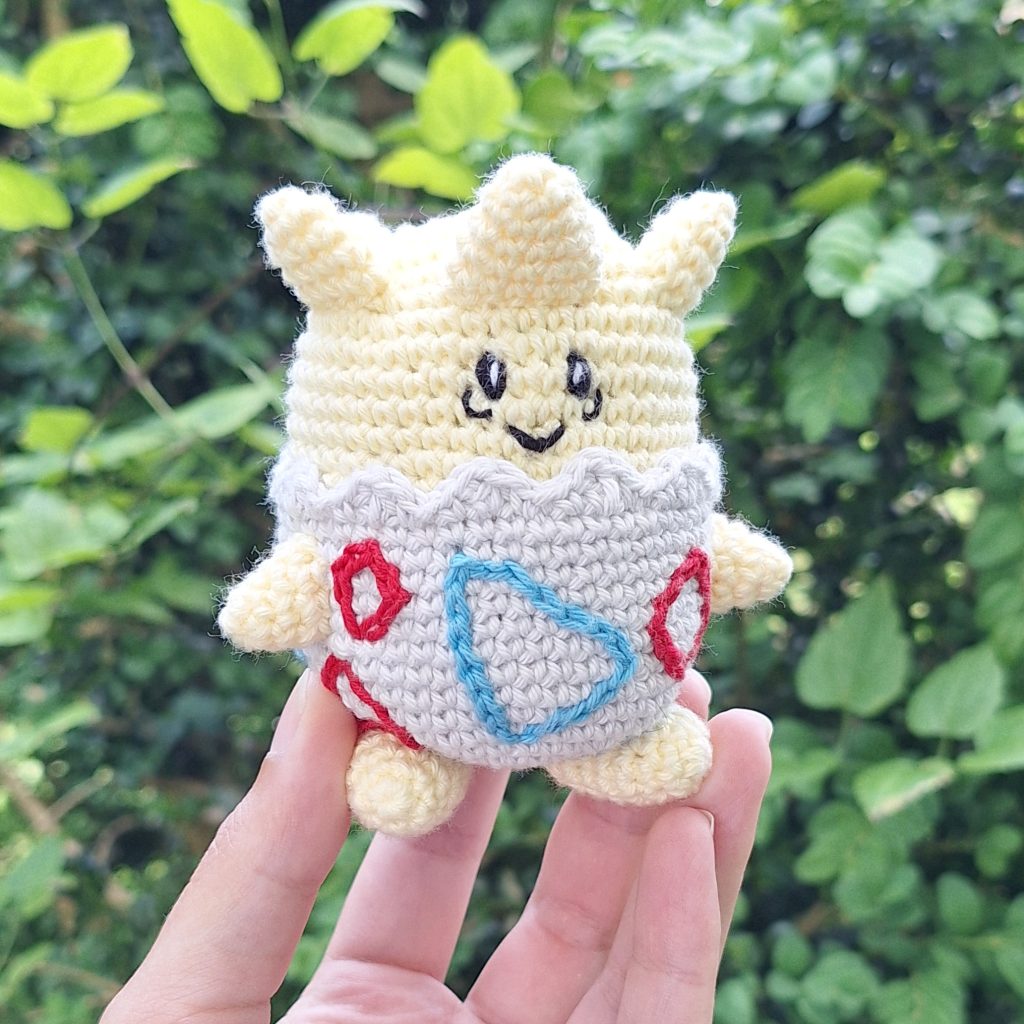
Start by adding the red and blue shapes to the shell. I did this using the chain stitch embroidery technique. You can also use your crochet hook to make slip stitches through the shell or sew on felt shapes. The method you choose is mostly a matter of preference. I used Togepi from my Pokédex in Pokémon GO to check the placement and colors of the shapes. This allows me to rotate the Pokémon and clearly see the sides and back of Togepi.
After adding the colorful shapes, we begin sewing. Start by placing the body into the shell. I positioned the magic ring (mr) from the beginning at the top of the head, as I think that side looks the neatest. Attach the shell to the body, ensuring it fits snugly around the body to avoid any “air bubbles” after sewing.
Next, we start working from the top down. Place the head-spikes, arms, and feet using pins. The largest spike goes on the front of the head. Make sure to align this with where you want the front of your shell to be.
The spikes on the head should sit around the rounds 6-8.
The arms should be positioned on either side a row below the spikes on the shell.
The feet are placed under the piece, with the heel positioned slightly back from the magic ring to help the piece balance better. If it’s important to you that Togepi stands, be sure to test this before attaching the feet. If it can’t stand on its own with the feet pinned on, it won’t stand after sewing either. If you wish, you can add black embroidery to the tips of the feet to create toes.
Lastly, embroider the face using black and white yarn. I split my yarn in half to make the lines around the eyes more precise.