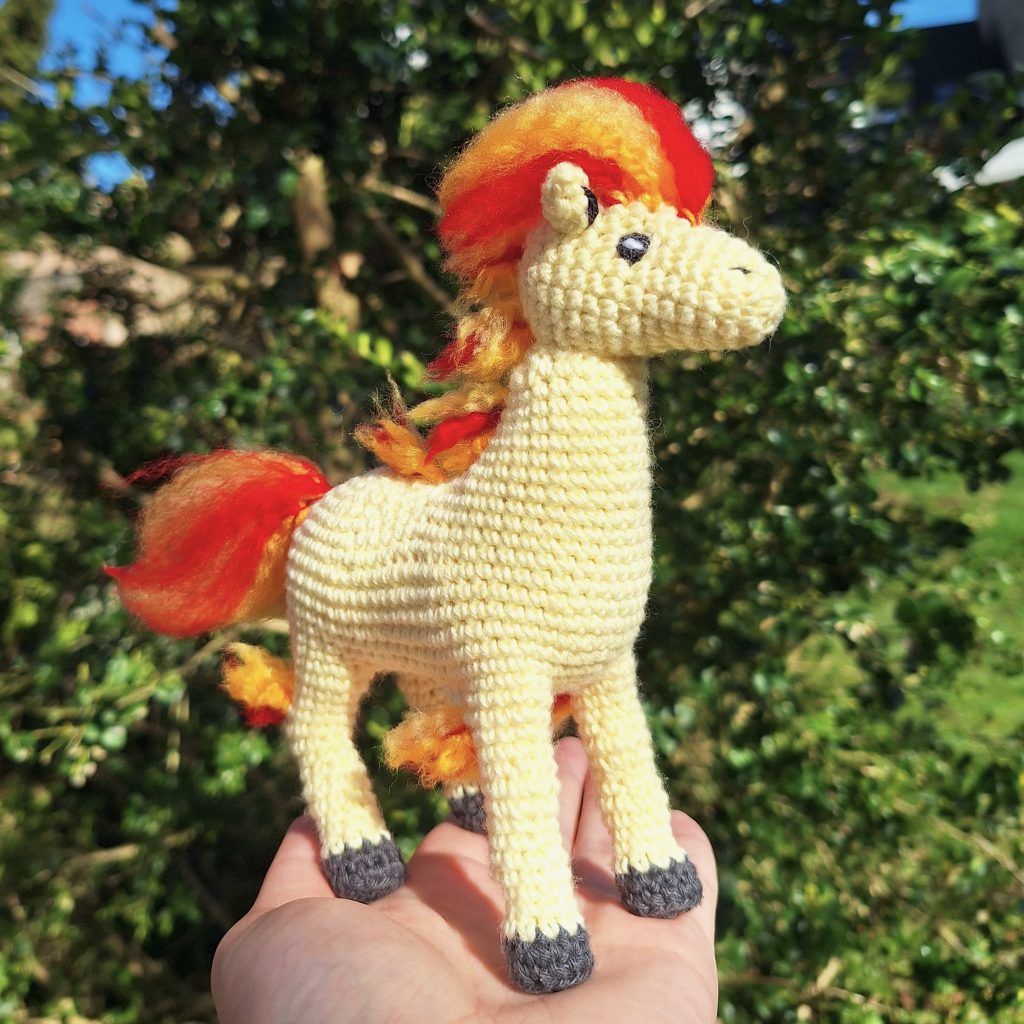
Get ready to stitch up some fiery fun with our Ponyta crochet pattern! This enchanting Fire-type Pokémon comes to life in yarn form with its majestic mane ablaze and its graceful stance captured in every stitch in this amigurumi Ponyta. With this free crochet pattern, you’ll embark on a crafting adventure that’s as thrilling as Ponyta’s fiery gallop!
While this pattern is tailored for those with intermediate to advanced crochet abilities, the Ponyta crochet pattern features step-by-step instructions accompanied by detailed photos and helpful tips to guide you through. From crafting Ponyta’s fiery mane to capturing its graceful form, you’ll embark on a crochet adventure that will test your skills and ignite your creativity.
Once you finish making your crocheted Ponyta, it’ll be a lovely symbol of your dedication and creativity. It’ll bring joy to Pokémon fans of all ages with its fiery charm and cool design. So, grab your crochet hooks and flame-colored yarn, and let’s embark on this fun crochet project together! With our Ponyta pattern, you can create something special and have a lot of fun along the way!
Supplies you'll need to crochet Ponyta
General supplies:
- Crochet hook 2,5 mm, I always use clover amour hooks for my projects!
- Sewing needle
- Stuffing
- Stitch marker
- A brush or comb to make the fire-look. I used a small brush for pets with great result!
With Amigurumi you guage doesn’t matter much. Using smaller hook and yarn will make you finished Ponyta smaller, and bigger hook and yarn will make him bigger. Just make sure that your yarn and hook fits together and makes a tight fabric so the stuffing won’t show through!
This crochet Ponyta is about 15 cm / 6 inches tall with the recommended yarn.
I reccomend Hobbii Rainbow cotton 8/4 for the body. This yarn is a 100% cotton and very nice to work with! With this yarn, I use a 2,5 mm hook (or a B-1 or C-2 should work too!). If Rainbow cotton is sold out, I can also recommend Friends cotton from Hobbii as a direct substitute.
For the fire along Ponytas body i suggest any acrylic yarn in the correct colors. Acrylic yarns tend to brush out nicely giving the right fire-effect to the finished piece. I used yarn in yellow, orange and red. If you have yarn-scraps in the correct colors, feel free to use them. We only need small pieces anyway!
I suggest these colors of Hobbii Rainbow cotton 8/4.
- 1 x Pastel yellow (53)
- A bit of dark gray for hooves
- A bit of black and white for the face details
Abbreviations in this crochet pattern
Rnd = round
mr = magic ring
sc = single crochet
inc = increase, 2 sc in the same stitch
dec = decrease, make 2 stitches into 1
ss = slip stitch
BLO = Back Loop Only
FO = Finish Off
ch = chain
Ponyta crochet pattern
Ponytas body is made from the bottom working upwards towards the neck. This means we will start by making the legs and later connecting them to form the rest of the body.
Front leg
Start in dark gray
Rnd 1: 6sc in mr (6)
Rnd 2: inc x 6 (12)
Rnd 3: in BLO, sc around (12)
Rnd 4: 3sc, dec, 2sc, dec, 3sc (10)
Change color to a light yellow in the last stitch of round 4. Also mark the back of the hoof with a stitch marker – the back of the hoof is the beginning of the round.
Rnd 5: sc around (10)
Rnd 6: sc, dec, 4sc, dec, sc (8)
Rnd 7: sc around (8)
Rnd 8: inc, 6sc, inc (10)
Rnd 9: sc around (10)
Rnd 10: (dec, 3sc) x 2 (8)
Rnd 11: sc around (8)
Rnd 12: 4sc, 2inc, 2sc (10)
Rnd 13: sc around (10)
Rnd 14: 6sc, dec, 2sc (9)
Rnd 15: sc around (9)
Rnd 16: 6sc, inc, 2sc (10)
Rnd 17: 2sc, inc, 4sc, inc, 2sc (12)
Rnd 18: sc around (12)
sc until you reach the back of the leg (in line with the stitch marker in the hoof). Keep the stitch marker in the hoof to assure you know the direction of the leg later on. Make a ss and FO.
Make 2 front legs.
The studyness of the leg pieces depends on your yarn and tension. If you are using a softer type of yarn, you might need to add wiring to the legs to make the Ponyta stand on its own. Wiring can easily be added later before the body is closed if needed.
Back leg
Start in dark gray
Rnd 1: 6sc in mr (6)
Rnd 2: inc x 6 (12)
Rnd 3: in BLO, sc around (12)
Rnd 4: 3sc, dec, 2sc, dec, 3sc (10)
Change color to a light yellow in the last stitch of round 4. Also mark the back of the hoof with a stitch marker – the back of the hoof is the beginning of the round.
Rnd 5: sc around (10)
Rnd 6: sc, dec, 4sc, dec, sc (8)
Rnd 7: sc around (8)
Rnd 8: inc, 6sc, inc (10)
Rnd 9: sc around (10)
Rnd 10: sc, dec, 5sc, dec (8)
Rnd 11: sc, inc, 2sc, dec, 2sc (8)
Rnd 12: sc, 2inc, 2sc, dec, sc (9)
Rnd 13: 2sc, 2inc, 5sc (11)
Rnd 14: 9sc, inc, sc (12)
Rnd 15: 2sc, dec, sc, dec, 3sc, inc, sc (11)
Rnd 16: 3sc, dec, 4sc, inc, sc (11)
Rnd 17: 8sc, inc, 2sc (12)
Rnd 18: 3sc, inc, 8sc (13)
Make extra sc until you reach the back of the leg (in line with the stitch marker in the hoof). Keep the stitch marker in the hoof to assure you know the direction of the leg later on. Make a ss and FO.
Make 2 back legs.
Body
The body is started as an oval. Later the legs will be crocheted into the piece.
The start of the body is worked around a chain. Start by chaining 20.
Rnd 1: sc in 2nd ch, 17sc, 3sc in the last chain, turn the work and continue working on the other side of the chain, 17 sc, inc (40)
Rnd 2: (inc, 17sc, inc, sc) x 2 (44)
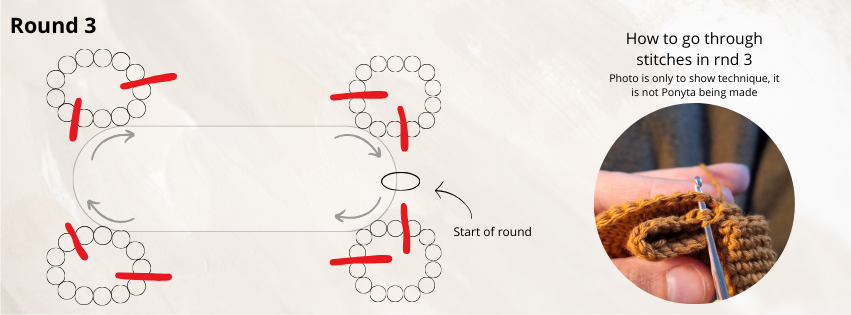
In the next 2 rnd we will be attaching the legs. In rnd 3 we will attach 4 stitches of each front leg and 5 stitches of each back leg. Be sure to position the legs pointing forward – mark the stitches you need to use if you find it easier.
These stitches are made through both a stitch in the leg and a stitch in the body-oval. First you go through the leg piece from the inside, and then normally through the body piece and finish your sc as normal (see picture).
For round 3, text in parenthesis will indicate that these stitches will be used to attach a leg.
Rnd 3: sc, (4sc attaching the 1st front leg), 10sc, (5sc attaching the 1st back leg), sc, inc, sc, (5sc attaching the 2nd back leg), 10sc, (4sc attaching the 2nd back leg), sc, inc (46 stitches made total)
This is a good time to make sure the legs are positioned correctly with the stitch marker in the hoof pointing backwards (the stitch marker in the body piece will be the front of the horse). If they are not alligned, undo round 3 and turn the legs as needed.
In round 4 you will finish attaching the legs. In this round you will use the remaining stitches of the legs that were not used in round 3. You will be going around the exterior of the entire piece, and therefore not be using the 4 or 5 stitches that attached each leg in rnd 3.
For round 4, text in parentheses will indicate that these stitches are worked in the remaining stitches of the legs.
Rnd 4: inc, sc, (8sc in remaining st of 1st front leg), 10sc, (8sc in remaining st of 1st back leg), sc, 2inc, sc, (8sc in remaining st of 2nd back leg), 10sc, (8sc in remaining st of 2nd front leg), inc, sc (64)
Now the legs are fully attached and you can continue working as normally.
Rnd 5-10: sc around (64)
If necessary make a few extra sc to move the start to the front between the front legs. Move the beginning of the round here.
Rnd 11: 10sc, dec, 8sc, dec, 20sc, dec, 8sc, dec, 10sc (60)
Rnd 12: 17sc, dec, (6sc, dec) x 3, 17sc (56)
In the next round we are splitting the work as we have to finish the back and the neck separately. We start by finishing off the back part of Ponyta.
Rnd 13: 16sc, dec, 20sc, dec, 3sc, ch 5, skip 26 stitches, sc in the 27th stitch
The sc in the 27th stitch is the last st of round 13. We are now working in a round that is 33 stitches including the chains. In the next round we will start to close up the back, when you reach the chain stitches, simply use them as normal stitches. This is also a good time to be sure your legs are stuffed firmly and has added wiring if needed to stand.
Rnd 14: (sc, dec, sc) x 7, sc, dec, 2sc (25)
Rnd 15: (3sc, dec) x 5 (20)
Rnd 16: (sc, dec, sc) x 5 (15)
Rnd 17: (sc, dec) x 5 (10)
Rnd 18: 4dec (6)
Last round finished early. FO closing the hole as neatly as possible.
Stuff the back half of Ponyta. Also stuff the front legs firmly and add wiring if necessary. Continue stuffing the neck as you go.
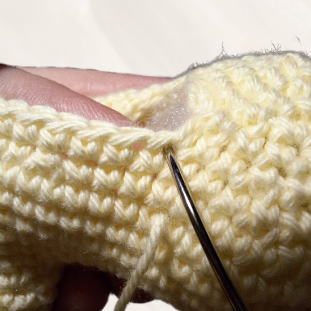
Now we will start working on the neck of the body. To avoid any holes forming, we will reuse a stitch on each side of the body. Attach your yarn on the left side of the body in the sc that is also used for the back of the horse. This is shown in the picture below. The same is done on the other side of the horse
Rnd 1: sc around (using the 2 stitches described above and the chain, this will give you 33 stitches)
Rnd 2: dec, 12sc, inc, 12sc, 3dec (30)
Rnd 3: dec, 24sc, 2dec (27)
Rnd 4: sc, dec, 19sc, dec, sc, dec (24)
Rnd 5: sc, dec, 18sc, dec, sc (22)
Rnd 6: 2sc, dec, 7sc, inc, 7sc, dec, sc (21)
Rnd 7: sc around (21)
Rnd 8: 2sc, dec, 7sc, inc, 6sc, dec, sc (20)
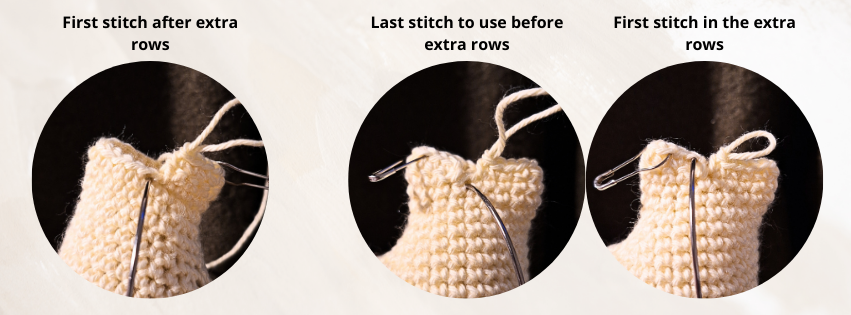
In the next round we are adding a bit of height to the back of the neck. This is done by adding a few rows instead of rounds. You will work across where the stitchmarker is, simply move it upwards as usual. After row C you have returned to the original start.
Rnd 9: A: 4sc, ss, ch1, turn
B: 7sc, ss, ch1, turn
C: 3sc
In round 10 you will find that round 9 has made some “gaps” in the piece. You should not pay attention to these gaps, but just pretend like they don’t exist. Simply use only the stitches that are looking normal – no adding extra stitches in the side of the rows. See pictures below.
Rnd 10: sc around (20)
ss and FO.
Head
In light yellow
Rnd 1: 6sc in mr (6)
Rnd 2: inc x 6 (12)
Rnd 3: (3sc, inc) x 3 (15)
Rnd 4-7: sc around (15)
Rnd 8: (2sc, inc) x 5 (20)
Rnd 9: 6sc, (sc, inc) x 4, 6sc (24)
Rnd 10-12: sc around (24)
Rnd 13: (sc, dec, sc) x 6 (18)
Rnd 14: (sc, dec) x 6 (12)
Stuff
Rnd 15: dec x 6 (6)
Ears
In light yellow
Rnd 1: 4sc in mr (4)
Rnd 2: (sc, inc) x 2 (6)
Rnd 3: sc around (6)
ss and FO. Make 2.
Assembly of your crochet Ponyta
There is very little sewing in this pattern. start by attaching the head to the body. Make sure the increases of rnd 9 is pointing upwards. Then attach the ears to each side of the head.
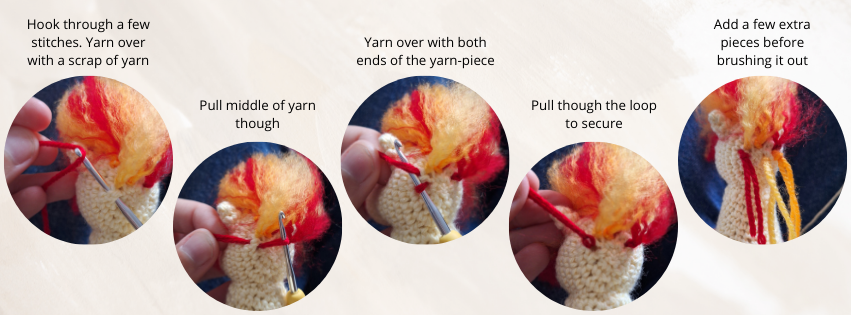
The next step is to add the fire. For this process acrylic yarn works the best. I used 3 colors, red, orange and yellow. You will use scrap lengths of this yarn, about 10 cm/4 inches should be fine. Attach 1 or 2 strands at a time “slip stitching” the strands to the head and body (see pictures). When a small cluster of strands is attached, brush it out with a metal comb – I recommend a small metal brush for pets. Start brushing the strand out starting at the tip, then slowly work your way up the strand until it is all brushed out. You can shape the fire afterwards using scissors.
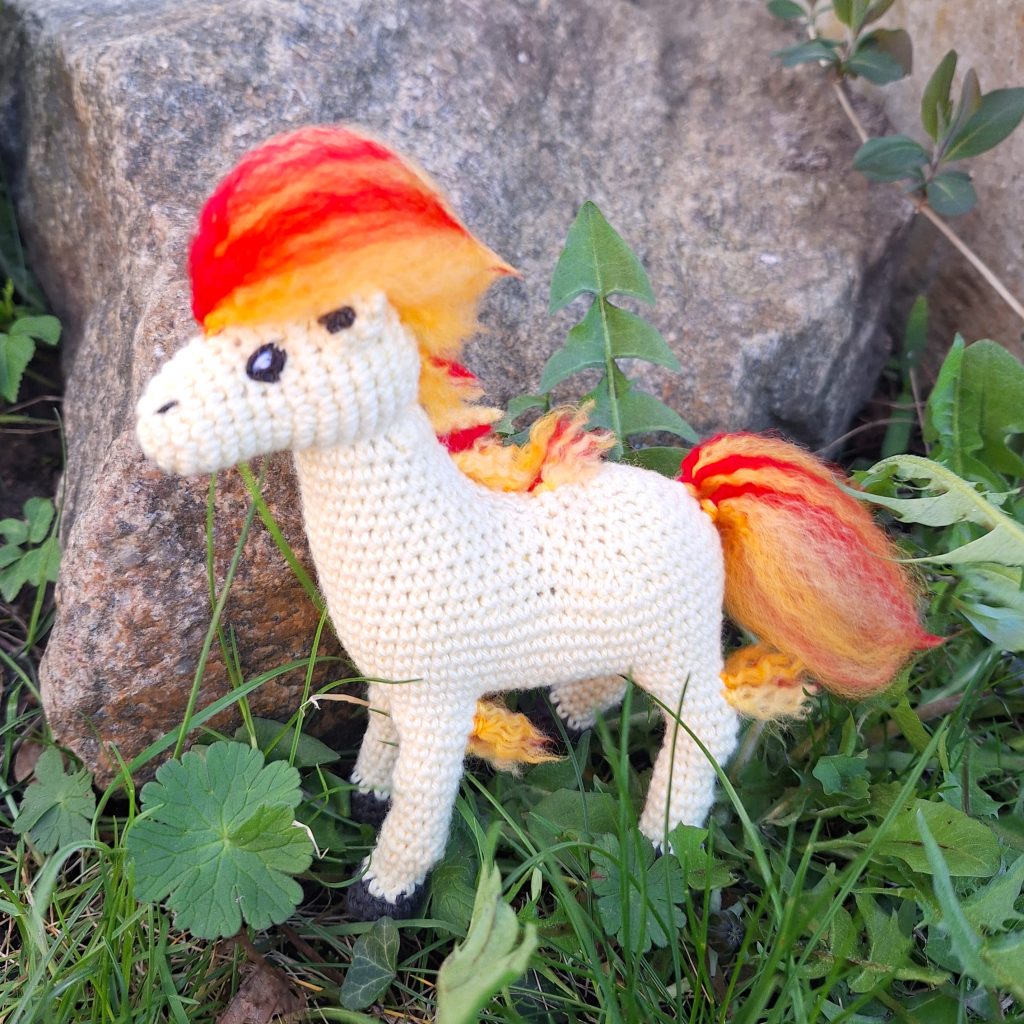
Add fire to the head, small clusters along the neck, back and back of each leg, and a large tail. To get the fire to shape nicely, I twisted the end of the fire on the head and the tail.
The process of adding and shaping the fire can be time consuming, so don’t rush through it. Don’t be afraid to redo some strands if it isn’t looking right.
Lastly, embroider eyes and nostrils onto the face and add markings inside the ears.