


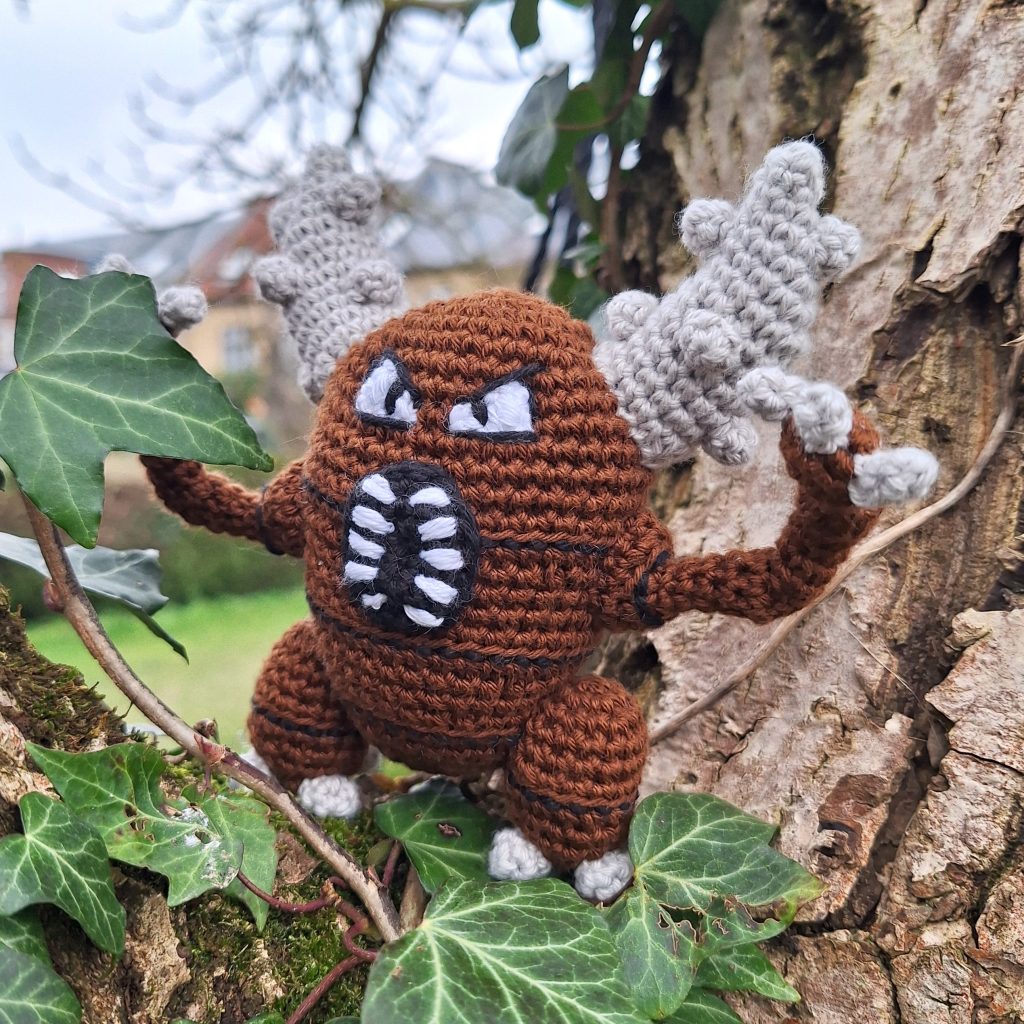
Meet Pinsir, the tough Bug-type Pokémon that’s like a little nature warrior! It’s got these big, strong horns it uses for battles and everyday tasks. Even though it looks tough, Pinsir is known for being super determined and strong. So cute, but don’t be fooled by its small size – it’s an amigurumi Pokémon powerhouse!
And with this free crochet pattern you get the chance to crochet your very own real life Pinsir! This pattern consists of many pieces and therefore quite a bit of sewing and patience! None of the techniques used are very advanced, but it does take patience to get the sewing and embroidery of this crochet pattern just right!
If you’re up for the challenge, this Pinsir crochet pattern is yours for free!
Supplies you'll need to crochet Pinsir
General supplies:
- Crochet hook 2,5 mm, I always use clover amour hooks for my projects!
- Sewing needle
- Stuffing
- Stitch marker
With Amigurumi you guage doesn’t matter much. Using smaller hook and yarn will make you finished Pinsir smaller, and bigger hook and yarn will make him bigger. Just make sure that your yarn and hook fits together and makes a tight fabric so the stuffing won’t show through!
With the recommended yarn, Pinsir will be about about 14 cm from bottom of his foot to the tip of his horn, or 5,5 inches. You will need the following yarn.
I reccomend Hobbii Rainbow cotton 8/4. This yarn is a 100% cotton and very nice to work with! With this yarn, I use a 2,5 mm hook (or a B-1 or C-2 should work too!). If Rainbow cotton is sold out, I can also recommend Friends cotton from Hobbii as a direct substitute.
- 1 x brown, either brown (07) or grey brown (05)
- about 10 grams of light grey (16)
- A bit of black and white for the eyes, mouth and detailing of Pinsir.
Abbreviations in this crochet pattern
Rnd = round
mr = magic ring
sc = single crochet
inc = increase, 2 sc in the same stitch
dec = decrease, make 2 stitches into 1
hdc = half double crochet
ss = slip stitch
BLO = Back Loop Only
FO = Finish Off chain
Pinsir crochet pattern
Body
In brown
Rnd 1: 6 sc in mr (6)
Rnd 2: inc x 6 (12)
Rnd 3: (sc, inc) x 6 (18)
Rnd 4: (sc, inc, sc) x 6 (24)
Rnd 5: (3sc, inc) x 6 (30)
Rnd 6: 6sc, (sc, inc, sc) x 3, 6sc, (sc, inc, sc) x 3 (36)
Rnd 7: 4sc, (3sc, inc) x 3, 6sc, (3sc, inc) x 3, 2sc (42)
Rnd 8-12: sc around (42)
Rnd 13: 41sc, ss (42)
Rnd 14: in BLO, sc around (42)
Rnd 15: 10sc, dec, 5sc, dec, 12sc, dec, 5sc, dec, 2sc (38)
Rnd 16-17: sc around (38)
Rnd 18: 37sc, ss (38)
Rnd 19: in BLO, sc around (38)
Rnd 20: (10sc, dec, 5sc, dec) x 2 (34)
Rnd 21: sc around (34)
Rnd 22: (8sc, dec, 5sc, dec) x 2 (30)
Make a ss. Next stitch is the beginning of next rnd.
Rnd 23: in BLO, sc around (30)
Rnd 24: (4sc, dec, 4sc) x 3 (27)
Rnd 25: (dec, 7sc) x 2, dec, 6sc, ss (24)
Rnd 26: in BLO, (sc, dec, sc) x 6 (18)
Stuff firmly.
Rnd 27: (sc, dec) x 6 (12)
Rnd 28: dec x 6 (6)
FO.
Horns
In light gray.
Rnd 1: 4sc in mr (4)
Rnd 2: inc, 3sc (5)
Rnd 3: inc, 4sc (6)
Rnd 4: 2inc, 4sc (8)
Rnd 5: sc, 2inc, 5sc (10)
Rnd 6: 2sc, 2inc, 6sc (12)
Rnd 7: 3sc, 2inc, 7sc (14)
Rnd 8: 4sc, 2inc, 8sc (16)
Rnd 9: 5sc, dec, 7sc, inc, sc (16)
Rnd 10: sc around (16)
Rnd 11: 6sc, inc, 9sc (17)
Rnd 12: sc around (17)
Rnd 13: 6sc, dec, 7sc, inc, sc (17)
Rnd 14: 5sc, 7hdc, 5sc (17)
ss, FO with tail for sewing.
Make 2.
Spikes for horns
In light gray.
Rnd 1: 5sc in mr (5)
Rnd 2: sc around (5)
ss and FO with a tail for sewing.
Make 12 in total, meaning 6 for each horn.
Legs
In brown.
Rnd 1: 6sc in mr (6)
Rnd 2: inc x 6 (12)
Rnd 3: (sc, inc) x 3 (15)
Rnd 4-5: sc around (15)
Rnd 6: 4sc, inc, 6sc, dec, sc, ss (15)
Rnd 7: in BLO, sc around (15)
Rnd 8: 4sc, dec, 6sc, inc, 2sc (15)
Rnd 9: sc around (15)
Rnd 10: sc, (sc, dec) x 3, 5sc (12)
Stuff firmly.
Rnd 11: dec x 6 (6)
FO with tail for sewing.
Make 2.
Claws for feet
In light grey.
Rnd 1: 4sc in mr (4)
Rnd 2: (inc, sc) x 2 (6)
Rnd 3: 3sc, ss, FO
The last rnd is finished early.
Make 6 claws in total. 3 for each leg.
Upper arm
In brown
Rnd 1: 8sc in mr (8)
Rnd 2: sc around (8)
Rnd 3: (2sc, dec) x 2 (6)
Rnd 4-6: sc around (6)
Rnd 7: inc x 6 (12)
Make a ss in next stitch. The following stitch is the first stitch of next rnd.
Rnd 8: in BLO, (inc, 3sc) x 3 (15)
Rnd 9: 11sc, ss, FO
The last rnd is finished early.
ss and FO with a tail for sewing.
Add some stuffing or wiring for support. I added a piece of pipecleaner.
Make 2
Lower arm
In brown
Rnd 1: 8sc in mr (8)
Rnd 2: sc around (8)
Rnd 3: (2sc, dec) x 2 (6)
Rnd 4-7: sc around (6)
ss and FO with a tail for sewing.
Add some stuffing or wiring for support. I added a piece of pipecleaner.
Hand
In brown.
The hand is worked around a chain. Start by chaining 5. Start the following rnd in the 2nd chain from the hook.
Rnd 1: 3sc, 3sc in last stitch, turn and continue on the other side of the chain, 2sc, inc (10)
Rnd 2: sc around (10)
Rnd 3: (3sc, dec) x 2 (8)
Stuff the piece.
Rnd 4: (2sc, dec) x 2 (6)
FO with a tail for sewing.
Claws for hands
In light grey.
Rnd 1: 3sc in mr (3)
Rnd 2: sc around (3)
Rnd 3: 2sc, ss (3)
FO with tail for sewing.
Tip: make the sc in rnd 1 loose so it’s easier to work in them in rnd 2.
Make 6 claws, 3 for each hand.
Mouth
In black
The mouth is worked around a chain. Start by chaining 5. Start the following rnd in the 2nd chain from the hook.
Rnd 1: 3sc, 3sc in last stitch, turn and continue on the other side of the chain, 2sc, inc (10)
Rnd 2: (inc, 3sc, inc) x 2 (14)
Rnd 3: (sc, inc, 4sc, inc) x 2 (18)
ss and FO.
Eyes
In white.
chain 5, start in 2nd chain from the hook.
Row 1: ss, sc, hdc, dc (4)
FO with a tail for sewing.
Make 2. Flip one over so you have both a left and a right eye.
Assembly of your crochet Pinsir
Start by adding black stitching below the rows with visible back loops on both the body, legs and upper arm. I used back stitches.
Now assemble the arms. For this part we will be attaching the hand to the lower arm, the lower arm to the upper arm and of course the claws to the hand. Make sure you lay out your pieces forming both a left and a right arm. I started by attaching the upper and lower arm. Use the yarntail from the lower arm and attach the piece to the closed end of the upper arm. Then attach the hand using the yarntail from the hand. The hand is attached with the end where you finished off, leaving the wider chain-start for the claws. Lastly attach the claws to the wide part of the hand.
Repeat with the other arm. Often check to see that you place the limbs correctly to form left and right arm.
Now assemble the legs. The end of the legs where you finished off, is the bottom of the leg. Attach the claws to the bottom of the leg, 2 in front and 1 in the back for each leg. Place them close to the bottom so they can help support Pinsir when he is standing.
Now pin horns, arms and legs to Pinsir. The horns are placed on each side of the head between rnd 7-11. The arms are placed between rnd 13-17. They should slightly cover the top row of black stitching but not touch the 2nd row of black stitching. The legs are placed at each side of the body 2 rows below the 2nd line of black stitching. Make sure the 2 claws are pointed forward. Now sew all the pieces to the body. For the legs, keep testing if Pinsir can stand on his own if this is important to you.
Attach the black mouthpiece between rnd 11-17. It should not touch the 2nd line of black stitching. Embroider 10 white teeth in the mouthpiece. Attach the eyes between rnd 7-9 and add black embroidery making up the pupils and the black definition around the eyes.
Lastly attach the small gray spikes to the horns. There are 3 rows of spikes on each horn. Towards the top place 2 spikes on each side of the horn (when looking straight at the piece from the front), in the middle the spikes are placed to one is in the front of the horn and one is in the back. At the bottom of the horn they are at the sides of the horn again. Repeat for the other horn.


