
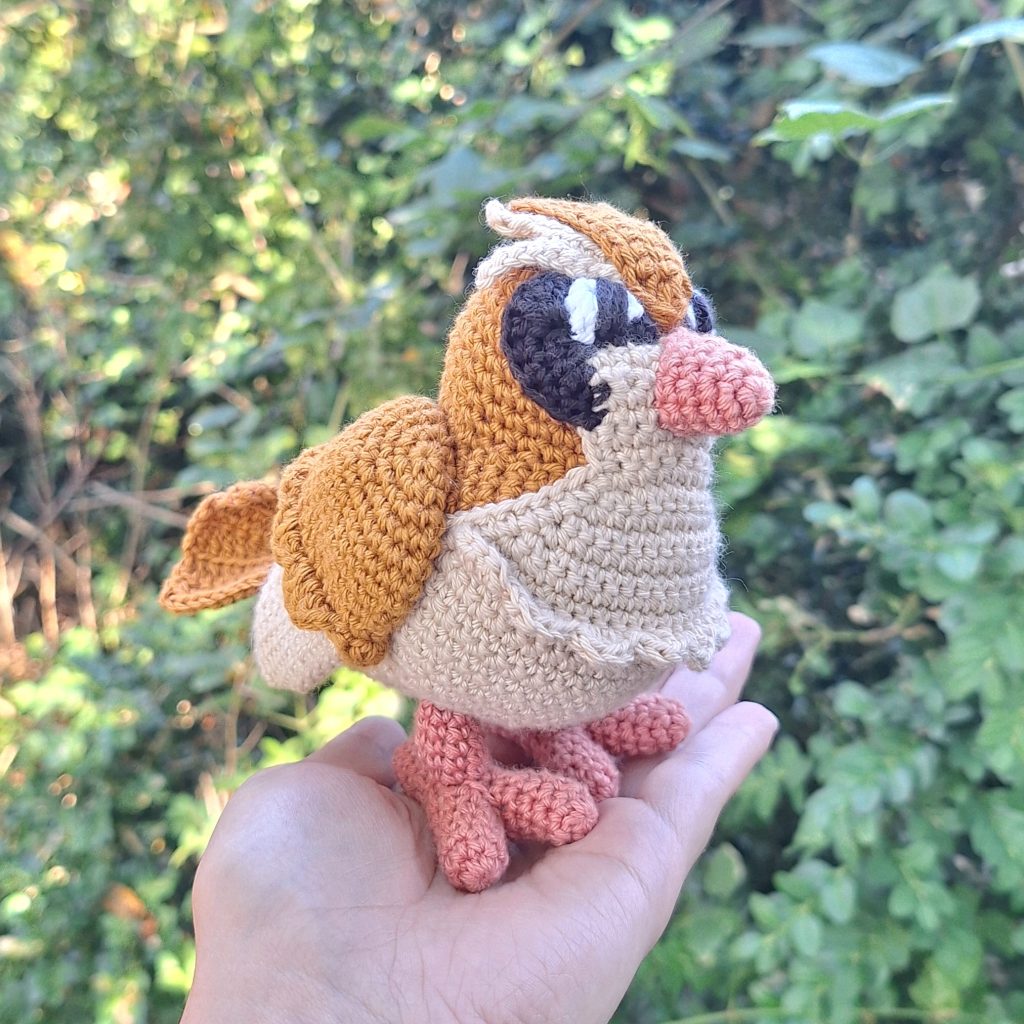

Take to the skies with our detailed Pidgey crochet pattern! This pattern brings to life the beloved Normal/Flying-type Pokémon, capturing Pidgey’s gentle charm and intricate features in a cute amigurumi form. With its carefully crafted feathers, rounded body, and small beak, this crochet pattern is designed to showcase Pidgey in all its adorable detail.
Perfect for intermediate to advanced crocheters, this pattern offers a rewarding challenge with its complex design elements. From the detailed structure to the color changes, you’ll find yourself immersed in creating an amigurumi Pidgey that truly stands out. Whether you’re a Pokémon enthusiast or a seasoned crocheter looking for your next project, this Pidgey pattern is sure to be a delightful and satisfying experience.
So, gather your yarn and get ready to craft this iconic Pokémon—Pidgey is ready to soar into your collection!
Supplies you'll need to crochet Pidgey
General supplies:
- Crochet hook 2,5 mm, I always use clover amour hooks for my projects!
- Sewing needle
- Stuffing
- Stitch marker
With Amigurumi you guage doesn’t matter much. Using smaller hook and yarn will make you finished Piece smaller, and bigger hook and yarn will make him bigger. Just make sure that your yarn and hook fits together and makes a tight fabric so the stuffing won’t show through!
For a smaller version, about 10 cm tall, or 4 inches, you will need the following yarn.
I reccomend Hobbii Rainbow cotton 8/4. This yarn is a 100% cotton and very nice to work with! With this yarn, I use a 2,5 mm hook (or a B-1 or C-2 should work too!). If Rainbow cotton is sold out, I can also recommend Friends cotton from Hobbii as a direct substitute.
- brown/ochre
- beige/tan
- dusty pink
- black
- white
Abbreviations in this crochet pattern
Rnd = round
mr = magic ring
sc = single crochet
hdc = half double crochet
dc = double crochet
inc = increase, 2 sc in the same stitch
dec = decrease, make 2 stitches into 1
ss = slip stitch
ch = chain
BLO = Back Loop Only
FLO = Front Loop Only
FO = Finish Off
Pidgey crochet pattern
Body
In brown
Rnd 1: 6 sc in mr (6)
Rnd 2: inc x 6 (12)
Rnd 3: (sc, inc) x 6 (18)
Rnd 4: (sc, inc, sc) x 6 (24)
Rnd 5: (3sc, inc) x 6 (30)
Rnd 6: (2sc, inc, 2sc) x 6 (36)
Rnd 7: 3sc, (2sc, inc, sc) x 3, 6sc, (2sc, inc, sc) x 3, 3sc (42)
Rnd 8: 3sc, (2sc, inc, 2sc) x 3, 6sc, (2sc, inc, 2sc) x 3, 3sc (48)
Rnd 9-17: sc around (48)
Rnd 18: 3sc, dec, 14sc, dec, 6sc, dec, 14sc, dec, 3sc (44)
Rnd 19: sc around (44)
Rnd 20: 5sc, dec, 8sc, dec, 10sc, dec, 8sc, dec, 5sc (40)
Rnd 21: sc around (40)
Rnd 22: 3sc, dec, 10sc, dec, 6sc, dec, 10sc, dec, 3sc (36)
Rnd 23: sc around (36)
Rnd 24: 3sc, dec, 8sc, dec, 6sc, dec, 8sc, dec, 3sc (32)
Rnd 25: sc around (32)
Rnd 26: (3sc, dec, 3sc) x 4 (28)
Rnd 27: sc around (28)
Rnd 28: (2sc, dec, 3sc) x 4 (24)
Rnd 29: (3sc, dec, 3sc) x 3 (21)
Rnd 30: (5sc, dec) x 3 (18)
Stuff.
Rnd 31: (2sc, dec, 2sc) x 3 (15)
Rnd 32: (3sc, dec) x 3 (12)
Finish stuffing.
Rnd 33: dec x 6 (6)
FO
Head
In brown
Rnd 1: 6 sc in mr (6)
Rnd 2: inc x 6 (12)
Rnd 3: (sc, inc) x 6 (18)
Rnd 4: (sc, inc, sc) x 6 (24)
Rnd 5: (3sc, inc) x 6 (30)
Rnd 6: (9sc, inc) x 3 (33)
Rnd 7-12: sc around (33)
Rnd 13: 20sc, ss, FO
The sc of round 13 goes toward the back of Pidgey under assembly. This helps the head tilt a little bit forward.
Wings
Start in brown
Rnd 1: 6 sc in mr (6)
Rnd 2: inc x 6 (12)
Rnd 3: (sc, inc) x 6 (18)
Rnd 4: (sc, inc, sc) x 6 (24)
Rnd 5: (3sc, inc) x 6 (30)
Rnd 6-8: sc around (30)
Rnd 9: (dec, 13sc) x 2 (28)
Rnd 10: sc around (28)
Rnd 11: (dec, 12sc) x 2 (26)
Change color to beige
Rnd 12: in BLO, sc around (26)
Rnd 13: (dec, 11sc) x 2 (24)
Rnd 14: sc around (24)
Rnd 15: (dec, 10sc) x 2 (22)
Rnd 16: sc around (22)
Rnd 17: (dec, 9sc) x 2 (20)
Rnd 18: sc around (20)
Rnd 19: (dec, 8sc) x 2 (18)
Rnd 20: sc around (18)
Rnd 21: (dec, 7sc) x 2 (16)
Rnd 22: sc around (16)
Rnd 23: (dec, 6sc) x 2 (14)
Rnd 24: (dec, 5sc) x 2 (12)
Rnd 25: (dec, 4sc) x 2 (10)
Rnd 26: (dec, 3sc) x 2 (8)
FO (don’t stuff the wings)
Make 2.
Ruffles along the wing. Make the ruffles brown. We are working in the remaining front loops from rnd 12.
We work with clusters that each take up 3 stitches in the wing. Be sure to start on the back-side of the wing (between the spots where decreases are placed in the wing)
Attach brown yarn in a front loop and repeat the following around the wing.
ss, (hdc, dc) in 1 stitch, (dc, hdc) in 1 stitch
Repeat the above 7 times. End with doing the following
ss, (hdc, dc) in 1 stitch, dc, (dc, hdc) in 1 stitch (this uses 4 stitches instead of 3)
and end with a slip stitch to FO. Repeat on both wings.
Belly-patch
In beige
This piece is worked in rows from face to tail end. Between rows you should always ch1, turn, unless stated otherwise. We are also using the decrease method sc2tog as this gives an even looking decrease from both sides.
To do a sc2tog: insert hook in next stitch, pull up a loop, insert hook in next stitch, pull up a loop, now there are 3 loops on the hook, yarn over and pull through all 3 loops to finish the stitch. The same technique can be applied to hdc2tog, just yarn over before inserting the hook each time and pull through 2 loops instead of 1, this will still leave you with 3 loops on the hook before finishing the stitch.
Start by chaining 13. Start working in the 2nd chain from the hook.
Row 1: 12sc (12)
Row 2: sc, sc2tog, 6sc, sc2tog, sc (10)
Row 3: 10sc (10)
Row 4: 4sc, sc2tog, 4sc (9)
Row 5: 9sc (9)
Row 6: 4sc, sc2tog, 3sc (8)
Row 7: inc, 6sc, inc (10)
Row 8: inc, 8sc, inc (12)
Row 9: inc, 10sc, inc (14)
Row 10: inc, 12sc, inc (16)
Row 11: inc, 14sc, inc (18)
Row 12: inc, 16sc, inc (20)
Row 13: inc, 18sc, inc (22)
Row 14: inc, 20sc, inc (24)
Row 15: worked in BLO, 24 sc (24)
Row 16: inc, 22sc, inc (26)
Row 17: inc, 24sc, inc (28)
Row 18-21: 28sc (28)
Row 22: inc, 26sc, inc (30)
Row 23: 30sc (30)
Row 24: 5sc, (sc2tog, 4sc) x 4, sc (26)
Row 25: (5sc, sc2tog) x 3, 5sc (23)
Row 26: 3sc, sc2tog, 13hdc, sc2tog, 3sc (21)
Row 27: 3sc, sc2tog, 4hdc, hdc2tog, 5hdc, sc2tog, 3sc (18)
Row 28: 3sc, sc2tog, 8hdc, sc2tog, 3sc (16)
Row 29: 3sc, 10hdc, 3sc (16)
Row 30: 3sc, sc2tog, 6hdc, sc2tog, 3sc (14)
Row 31: 14sc (14)
Row 32: 4sc, sc2tog, 2sc, sc2tog, 4sc (12)
Row 33: 4sc, 4hdc, 4sc (12)
Row 34-35: 12sc (12)
Row 36: 5sc, sc2tog, 5sc (11)
Row 37-38: 11sc (11)
Row 39: 2sc, sc2tog, 3sc, sc2tog, 2sc (9)
Row 40: sc, sc2tog, 3hdc, sc2tog, sc (7)
Row 41: sc, sc2tog, sc, sc2tog, sc (5)
Now we are going to sc along the entire piece to give it a nice edge. Make approximately 1 sc pr row up until the indent of the neck. Make a ss in the indent, make 2 sc and then change color to black and do the following: sc, 2hdc, 4dc in the corner of the beige piece.

Now work along the starting chain: dc, hdc, sc, ss, change color to beige, 2ss, change color to black, ss, sc, hdc, dc.
Make 4dc in the corner of the beige patch, 2hdc, sc, change color to beige, 2sc, ss in the indent of the neck, and continue sc along the edge with 1 sc pr row until the tail-end.
When reaching the last row of the belly-patch (the normal stitches), make 2 sc2tog, ss and FO.
Now we need to go back to the black pieces of the patch to widen them. We are working from the right-side of the piece (the same direction you just worked around the entire piece). Start by attaching black yarn to the first black stitch (closest to neck indent) and ss in the first black stitch. Work the following along the black of the piece: 2sc, 2hdc, 4dc in the next stitch, 2hdc, 2sc, ss. FO.
Move along to the next black piece. Attach the yarn in the first black stitch with a ss (work on the same side as before, first stitch is at the top of the head). Then do the following: 2sc, 2hdc, 4dc in the next stitch, 2hdc, 2sc, ss. FO.
To finish off the belly patch, we need to make the ruffles along the front of Pidgey. The ruffles are the same as we did on the wings. This is done in the remaining loops of row 15. Attach beige yarn with ss in the first st.
(hdc, dc) in 1 stitch, (dc, hdc) in 1 stitch, ss
Repeat the above 8 times. If needed make the ss in the same stitch as the last (dc, hdc). FO.
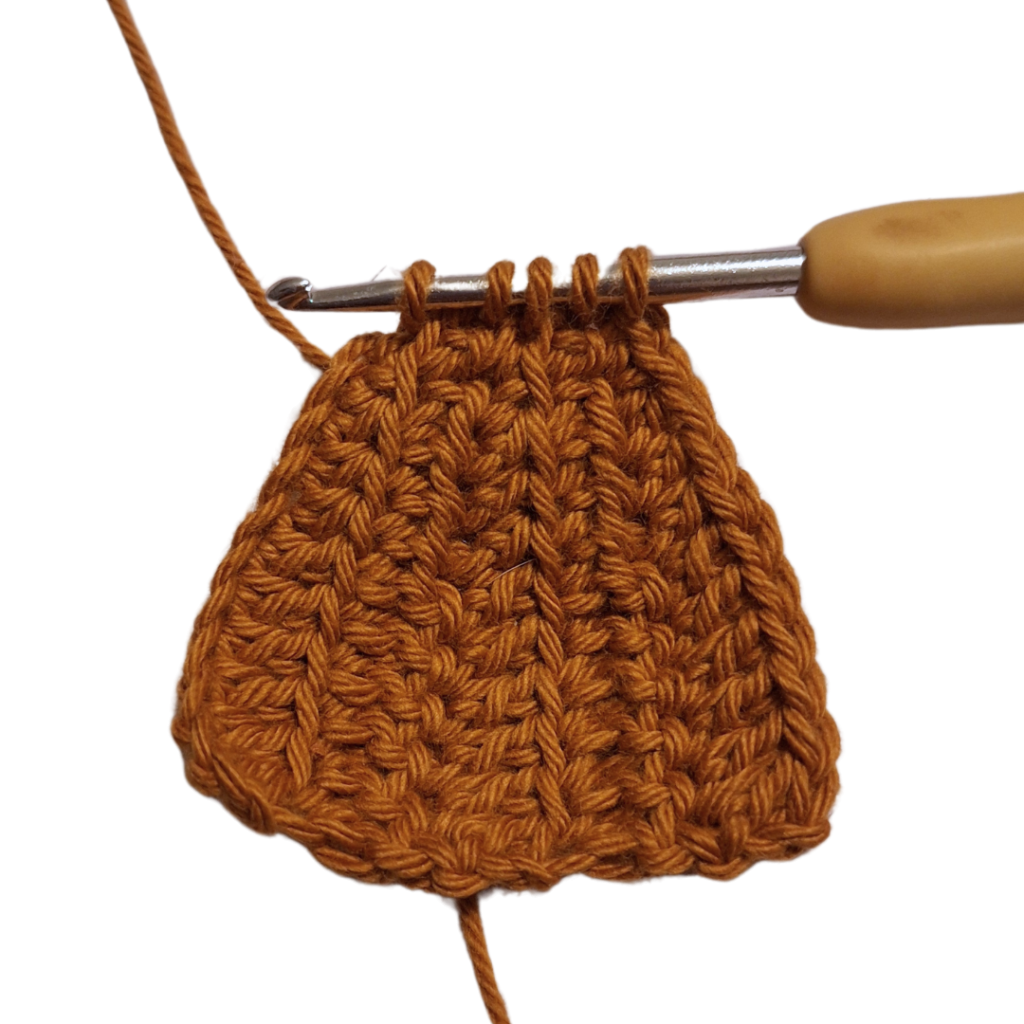
Tail feathers
In brown
Start by chaining 12. Start working in the 3rd chain from hook.
Row 1: 6dc, 3hdc, 2sc, ch1, turn
Row 2: work in FLO, 2sc, 3hdc, 6dc, ch2, turn
Row 3: work in FLO, 6dc, 3hdc, 2sc, ch1, turn
Row 4: work in FLO, 2sc, 3hdc, 6dc, ch2, turn
Row 5: work in FLO, 6dc, 3hdc, 2sc
Now make a sc4tog along the edge of the tail to get a neat finish. To do this insert your hook like if you’re making stitches along the edge, and pull up a loop on your hook. Do this 4 times so you end up with a total of 5 loops on your hook. Finally yarn over and pull through all 5 loops to finish the stitch. Make a ss to FO. Leave a tail for sewing.
Feet
In pink or peach color
The feet of Pidgey are worked from bottom up. We start by making the foot. The foot itself starts as 2 toes that are connected to form the remainder of the foot.
Toes
Rnd 1: 6sc in mr (6)
Rnd 2: (inc, 2sc) x 2 (8)
Rnd 3-6: sc around (8)
Make 2 toes. For the first toe, make a ss and FO. Don’t cut the yarn on the second toe. Continue working from the second toe as we connect the two pieces in the next round. We label these as toe1 and toe 2 where toe2 still has the yarn attached.
Rnd 7: Using the yarn from toe2, make 6 sc in toe 1 (2 stitches unused). Then move on to toe2, skip the first 2 stitches and make 6 sc in toe2. This will leave you with 12 stitches in the round and a gap between the toes in the middle. This gap should be sewed shut.
Rnd 8: (2sc, dec, 2sc) x 2 (10)
Rnd 9: sc around (10)
Rnd 10: (2sc, dec, sc) x 2 (8)
Rnd 11-13: sc around (8)
Stuff the piece – use the back of your hook or a pencil to push the stuffing into the piece.
Rnd 14: (dec, 2sc) x 2 (6)
FO.
Leg
Now we continue working on the leg. The leg can be made on its own, or made directly on top of the foot. To make it directly connected to the foot, make a round of 8 stitches with surface crochet in the middle of the foot. If you want the leg to be a separate piece, chain 8 and connect it with a ss to form a circle.
Rnd 1-5: sc around (8)
ss and FO. Stuff firmly before attaching the foot. For softer yarn, it might be necessary to add wire to the legs to make the Pidgey able to stand.
Make 2 feet.
Feathers for head (sides)
In beige
Worked in rows
Start by chaining 10. Start working in 2nd chain from hook.
Row 1: 9ss, ch1, turn
Row 2: in FLO, 5sc, ch 5, turn
Row 3: Start work in 2nd ch from hook, work in FLO, 9ss
Make 2
Feathers for head (middle)
In brown
Worked in rows
Start by chaining 11. Start working in 2nd chain from hook.
Row 1: 10ss, ch1, turn
Row 2: in FLO, 6sc, ch 6, turn
Row 3: Start work in 2nd ch from hook, work in FLO, 11ss, ch 1, turn
Row 4: in FLO, 6sc, ch 5, turn
Row 5: Start work in 2nd ch from hook, work in FLO, 10ss
You are now at the base of the piece. Work along the side of the piece as follows: sc, dc-inc, sc. make a ss and FO the piece.
Beak
In pink or peach color
Rnd 1: 5sc in mr (5)
Rnd 2: sc, 3inc, sc (8)
Rnd 3: sc, (inc, sc) x 3, sc (11)
Rnd 4: 5sc, inc, 5sc (12)
Rnd 5: sc around (12)
ss and FO. The top of the beak will be where the increases are.
Eyes
In white
Chain 2. Start work in 2nd chain from hook.
Row 1: inc, ch1, turn (2)
Row 2: 2sc, ch1, turn (2)
Row 3: inc, sc (3)
Make 2. Pupils are embroidered when assembling the piece.
Assembly of your crochet Pidgey
Start by attaching the head to the body. Be sure to attach the head on the wider side of the body. Orient the body by locating the decreases on rounds 7-8. The decreases are placed on the sides of the body. The head sits between round 3-15.
Next attach the belly patch. Align the placement around the tail-end and the neck-indent being around where the head meets the body. Be sure to pin the piece on to assure it goes on evenly on the sides!
Next attach the wings. Rounds 3-5 of the wing should be on top of the connection between head and body. There are about 7 stitches between the wings on the top of Pidgey closest to the head. The wings should go just a bit past the end of the body, angled down a bit.
Attach the tail feathers right above where the belly patch ends. Be sure to cover where the belly patch meets the body for a smooth transition.
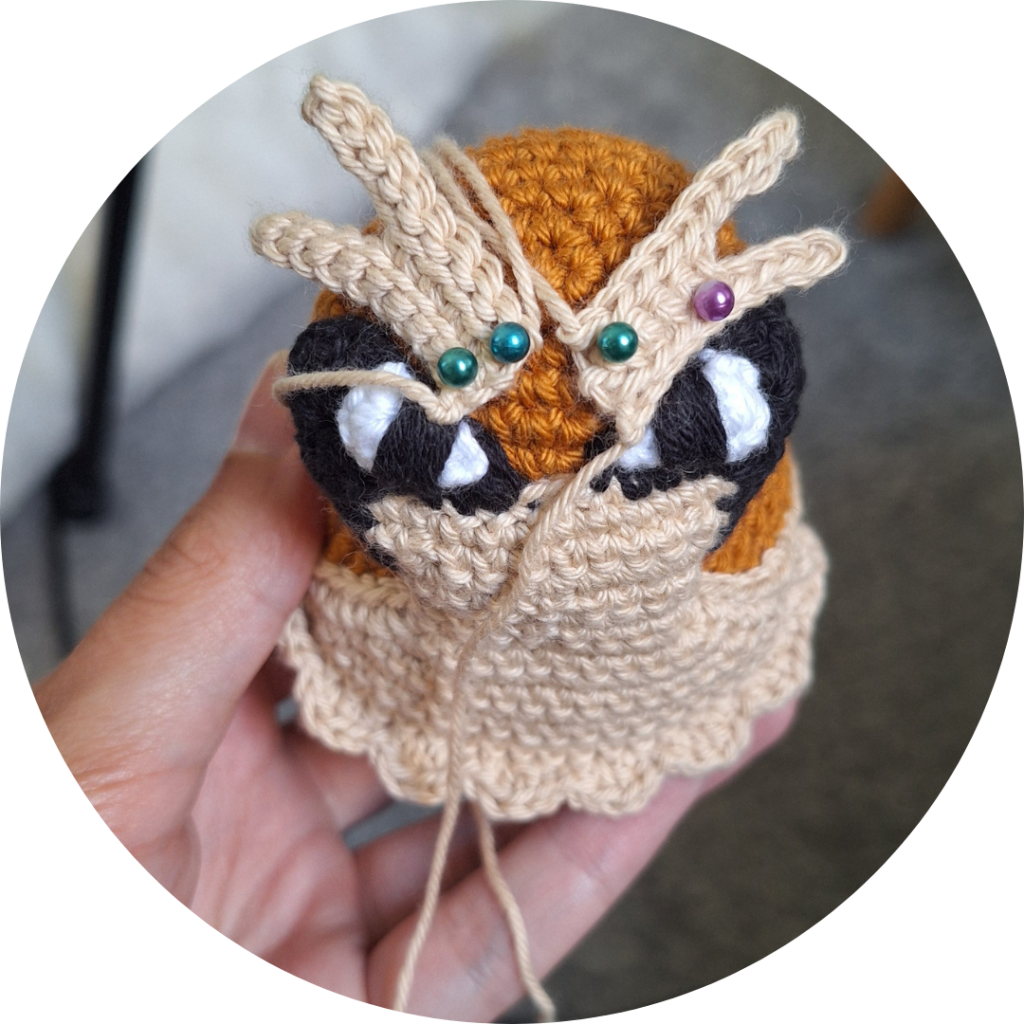
Move on to the facial details. Attach the white eyes on the black patches, leaving about a sc’s width of black below the eyes. Next pin the head feather on the head, starting with the beige pieces on the sides – these pieces start above the corner of the eye and follow the eye.
Lay the brown head feathers on top with the point going down between the eyes. The brown feather should touch the beige color of the belly patch. When you are happy with the placement, take away the brown piece, sew on the beige pieces and reattach the brown piece and sew it on. Don’t sew the individual feathers down, only the base of each piece should be sewn down.
Attach the beak. The beak is placed with the top right above the beige of the belly patch. The beak sits on 4-5 rows of the belly patch.
Sew on the feet to the belly of Pidgey. Place the feet so the Pidgey can balance on its own. For me this was right below the color change of the wings and about 3 sc between the legs.
Lastly, embroider a large pupil with black yarn. Embroider the pupil by going over the entire white of the eye multiple times to get the desired width.