


Get the ad-free PDF on Ravelry!
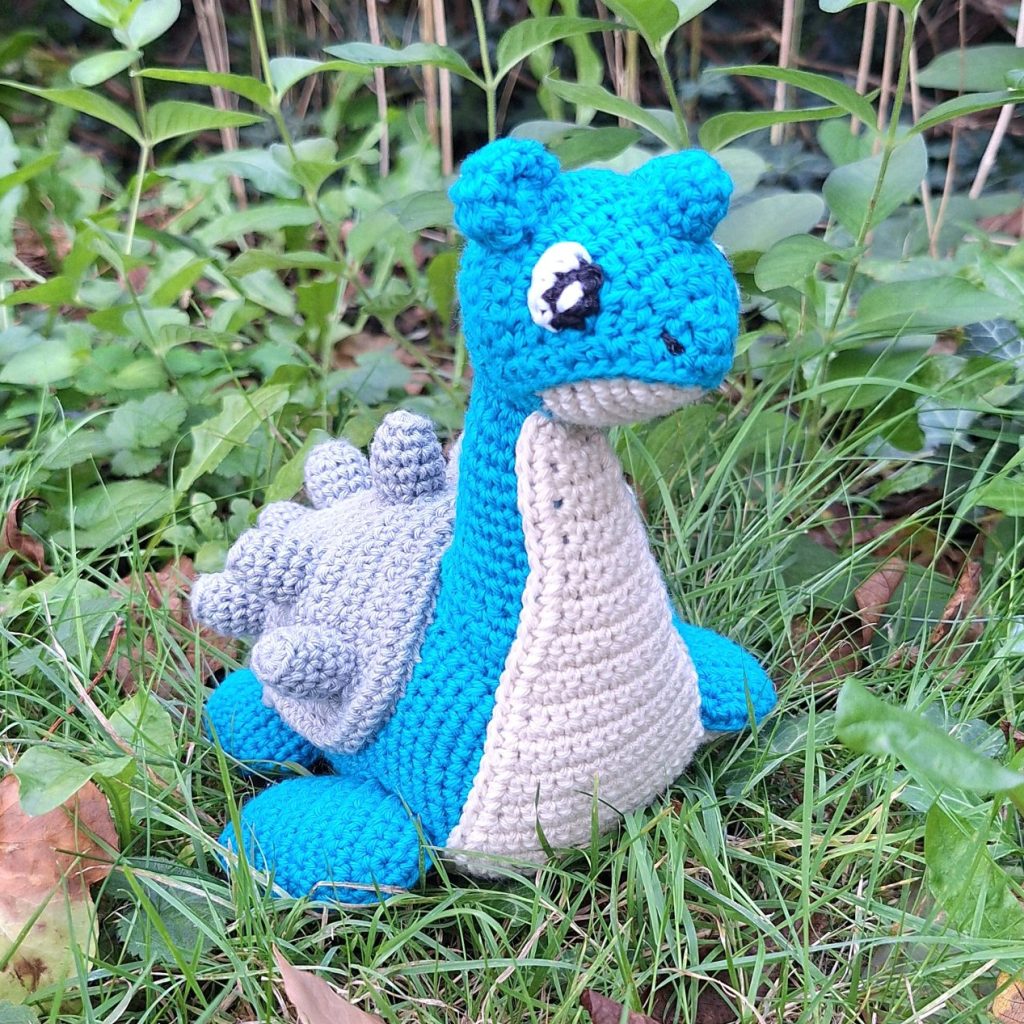
Are you ready for one of the most iconic (and adorable!) Pokémon out there! Known for its serene and gentle nature, Lapras, the Water/Ice-type Pokémon, captures the hearts of many with its majestic and friendly demeanor. This free crochet pattern is designed to reflect Lapras’s soothing presence, featuring its iconic blue skin, large, welcoming eyes, and the distinctive shell that makes it so recognizable, even in amigurumi form!
Perfect for most crocheters ready for a challenge! But be aware, this piece is quite large, so be sure to read the measurements of finished amigurumi below. Detailed instructions will guide you through crafting the serene curves and the unique shell of Lapras, ensuring your finished product is as graceful as the Pokémon itself.
Whether you’re adding to your Pokémon collection or looking for a unique gift for a Pokémon enthusiast, this Lapras crochet pattern is sure to provide a relaxing and satisfying crafting experience. Grab your yarn and crochet hook, and prepare to bring the gentle giant amigurumi of the seas to life!
Supplies you'll need to crochet Lapras
General supplies:
- Crochet hook 2,5 mm, I always use clover amour hooks for my projects!
- Sewing needle
- Stuffing
- Stitch marker
With Amigurumi you guage doesn’t matter much. Using smaller hook and yarn will make you finished Lapras smaller, and bigger hook and yarn will make it bigger. Just make sure that your yarn and hook fits together and makes a tight fabric so the stuffing won’t show through!
For a smaller version, about 15 cm tall and long, or 6 inches, you will need the following yarn.
I reccomend Hobbii Rainbow cotton 8/4. This yarn is a 100% cotton and very nice to work with! With this yarn, I use a 2,5 mm hook (or a B-1 or C-2 should work too!). If Rainbow cotton is sold out, I can also recommend Friends cotton from Hobbii as a direct substitute.
- 1 x blue
- 1 x gray
- 1 x beige/tan
- A bit of black and white for eyes
If you’d like a much bigger crochet Lapras, I got you! I also made a large version of the piece! She is about 38 cm tall and long, or 15 inches.
To make a giant and soft piece, you will need Hobbii Baby Snuggle yarn. This yarn is a chenille yarn, which means your piece will be huge and so fluffy! With this yarn I use a 6 mm hook (or a J-10 hook). You will need the same colors as above, but you will need more yarn.
- 2 x main color (but I would go for 3 to be safe from yarn chicken!)
- 2 x beige/tan (about 1,5 used)
- 1 x gray (80% of one ball was used)
- A bit of black and white for the eyes
If Baby Snuggle is unavailable other chenille yarn in the same thickness, like Honey Bunny, also from Hobbii, is a great substitute.
Abbreviations in this crochet pattern
Rnd = round
mr = magic ring
sc = single crochet
inc = increase, 2 sc in the same stitch
dec = decrease, make 2 stitches into 1 (can be invisible dec)
sc2tog = regular decrease (used when working in rows)
ss = slip stitch
ch = chain
BLO = Back Loop Only
FO = Finish Off
Lapras crochet pattern
Head
Work in beige color
Rnd 1: 4sc in mr (4)
Rnd 2: 4inc (8)
Rnd 3: (sc, inc) x 4 (12)
Rnd 4: (sc, inc, sc) x 4 (16)
Rnd 5: (3sc, inc) x 4 (20)
Rnd 6: (2sc, inc, 2sc) x 4 (24)
Rnd 7: (5sc, inc) x 4 (28)
Rnd 8: (13sc, inc) x 2 (30)
Rnd 9-10: sc around (30)
Change color to blue
Rnd 11-15: sc around (30)
Rnd 16: (3sc, dec) x 6 (24)
Rnd 17: (sc, dec, sc) x 6 (18)
Stuff the head
Rnd 18: (sc, dec) x 6 (12)
Rnd 19: 6dec (6)
FO
Patch for head
Work in blue color. The piece is worked in rows. Start by chaining 27. The work starts in the 2nd stitch from the hook.
Row 1: 26sc, ch1, turn (26)
Row 2: sc, sc2tog, 20sc, sc2tog, sc, ch1, turn (24)
Row 3: sc, sc2tog, 18sc, sc2tog, sc, ch1, turn (22)
Row 4: sc, sc2tog, 16sc, sc2tog, sc, ch1, turn (20)
Row 5: sc, sc2tog, 14sc, sc2tog, sc, ch1, turn (18)
Row 6: sc, sc2tog, 12sc, sc2tog, sc, ch1, turn (16)
Row 7: sc, sc2tog, 10sc, sc2tog, sc, ch1, turn (14)
Row 8: sc, sc2tog, 8sc, sc2tog, sc, ch1, turn (12)
Row 9: sc, sc2tog, 6sc, sc2tog, sc, ch1, turn (10)
Row 10: sc, 4sc2tog, sc, ch1, turn (6)
Row 11: sc2tog, 2hdc, sc2tog, ch1, turn (4)
Row 12: 2dec (2). FO.
Connect yarn at a corner (at one end of the starting chain) and sc around the edge of the piece. Do not sc along the starting chain. FO leaving tail for sewing.
Body
Work in blue color
Rnd 1: 6sc in mr (6)
Rnd 2: inc x 6 (12)
Rnd 3: (sc, inc) x 6 (18)
Rnd 4: (sc, inc, sc) x 6 (24)
Rnd 5: (3sc, inc) x 6 (30)
Rnd 6: (2sc, inc, 2sc) x 6 (36)
Rnd 7: 6sc, (sc, inc) x 3, 12sc, (sc, inc) x 3, 6sc (42)
Rnd 8: 6sc, (sc, inc, sc) x 3, 12sc, (sc, inc, sc) x 3, 6sc (48)
Rnd 9: sc around (48)
Rnd 10: 3sc, (2sc, inc, 3sc) x 3, 6sc, (2sc, inc, 3sc) x 3, 3sc (54)
Rnd 11-23: sc around (54)
Now we recenter the beginning of the round to account for drift. This is done by crocheting to the bottom of the piece. The body is wider than it is tall, so crochet until the middle of one of the longer sides. This will normally be 1-2 stitches – you might also need to take out a few stitches. Move you stitchmarker to the new beginning of the round and move on like normal. This is done a few times through the body, so use an extra stitchmarker to mark where the bottom of the body is. You will use the stitchmarker to easily recenter the work as you go.
Rnd 24: 14sc, dec, 10sc, dec, 10sc, dec, 14sc (51)
Rnd 25: 19sc, dec, 9sc, dec, 19sc (49)
Rnd 26: 13sc, dec, 8sc, dec, 9sc, dec, 13sc (46)
Rnd 27: 16sc, dec, 10sc, dec, 16sc (44)
Rnd 28: 12sc, dec, 7sc, dec, 7sc, dec, 12sc (41)
Recenter the beginning of the round.
Rnd 29: 14sc, dec, 9sc, dec, 14sc (39)
Rnd 30: 11sc, dec, 5sc, dec, 6sc, dec, 11sc (36)
Rnd 31:sc around (36)
Rnd 32: 6sc, dec, 9sc, dec, 9sc, dec, 6sc (33)
Rnd 33: 9sc, dec, 4sc, dec, 5sc, dec, 9sc (30)
Rnd 34: (6sc, dec) x 3, 6sc (27)
Rnd 35: 6sc, dec, 7sc, dec, 6sc, dec, 4sc (24)
Rnd 36: 5sc, dec, 4sc, dec, 4sc, dec, 5sc (21)
Rnd 37: sc around (21)
Recenter the beginning of the round.
Rnd 38: 6sc, dec, 2sc, dec, 1sc, dec, 6sc (18)
Rnd 39: sc around (18)
Rnd 40: 6sc, dec, 2sc, dec, 6sc (16)
Stuff the body. If you don’t want the piece to be slightly front heavy, add some weight or weighted stuffing to the back of the body.
Rnd 41: (4sc, dec) x 2 4sc (14)
Rnd 42: 4sc, dec, 2sc, dec, 4sc (12)
Rnd 43: 2sc, (dec, sc) x 3, 1sc (9)
Rnd 44: (sc, dec) x 3 (6)
FO.
Neck
The neck is crocheted directly onto the head with surface crochet. We will be making a circle of ss to start the neck. The circle contains 14 ss and should begin at the point furthest back, at rnd 17 of the head and up to rnd 12. (Video tutorial for surface ss – make the stitches so they form a circle on the head instead of around it)
Rnd 1: 14sc in the ss made in surface crochet (14)
Rnd 2: (2sc, inc) x 4, 2sc (18)
Rnd 3: dec, sc, (3sc, inc) x 3, 3sc (20)
Rnd 4: dec, 8sc, inc, 9sc (20)
Rnd 5: dec, 4sc, inc, 3sc, inc, 4sc, inc, 4sc (22)
Rnd 6: sc around (22)
Rnd 7: 9sc, inc, 10sc, dec (22)
Rnd 8: 3sc, inc, 6sc, inc, 7sc, inc, 3sc (25)
Rnd 9: dec, 11sc, inc, 11sc (25)
Rnd 10: 4sc, inc, 7sc, inc, 7sc, inc, 4sc (28)
Now we make short rows to make the front of the neck longer, this is done by making part of a round and make a few rows. When going over a turn, the first st is the ss made right before the turn.
Rnd 11: A: 23sc, ss, ch1, turn
B: 19sc, ss, ch1, turn
C: 5sc, inc, 8sc, inc, ss, ch1, turn
D: 13sc, ss, ch1, turn
E: 5sc, inc, 2sc, inc, 13sc (32)
Rnd 12: dec, 14sc, inc, 15sc (32)
ss and FO. Stuff before sewing it onto the body when assembling.
Front flipper
The flippers are made up of 2 pieces to give a clean line between the colors. This part will be made in beige.
Rnd 1: 4sc in mr (4)
Rnd 2: (sc, inc) x 2 (6)
Rnd 3: (sc, inc, sc) x 2 (8)
Rnd 4: (sc, 2inc, sc) x 2 (12)
Rnd 5: (2sc, inc, 3sc) x 2 (14)
Rnd 6: (3sc, inc, 3sc) x 2 (16)
Rnd 7: (3sc, inc, 4sc) x 2 (18)
Rnd 8: (4sc, inc, 4sc) x 2 (20)
Rnd 9-14: sc around (20)
Rnd 15: (4sc, dec, 4sc) x 2 (18)
Rnd 16: (3sc, dec, 4sc) x 2 (16)
Stuff lightly.
Rnd 17: (2sc, 2dec, 2sc) x 2 (12)
Rnd 18: 6dec (6)
FO. Make 2.
Front flipper cover
The flipper cover is worked in rows. Between rows, be sure to ch1, turn to turn the work.
Work in blue color. Start by chaining 6. The work starts in the 2nd stitch from the hook.
Row 1: 5sc (5)
Row 2: inc, 3sc, inc (7)
Row 3: inc, 5sc, inc (9)
Row 4: inc, 7sc, inc (11)
Row 5-11: 11sc (11)
Row 12: 4sc, sc2tog, 5sc (10)
Row 13: 4sc, sc2tog, 4sc (9)
Row 14: 2sc, sc2tog, sc, sc2tog, 2sc (7)
Row 15: sc, sc2tog, sc, sc2tog, sc (5)
Row 16: sc, sc2tog, 2sc (4)
Row 17: sc, sc2tog, sc (3)
Row 18: sc2tog, sc (2)
Row 19: sc2tog (1)
continue to sc around the entire piece. FO when you reach the tip again. Leave a tail for sewing.
Back flipper
The flippers are made up of 2 pieces to give a clean line between the colors. This part will be made in beige.
Rnd 1: 4sc in mr (4)
Rnd 2: (sc, inc) x 2 (6)
Rnd 3: (sc, inc, sc) x 2 (8)
Rnd 4: (sc, 2inc, sc) x 2 (12)
Rnd 5: (2sc, inc, 3sc) x 2 (14)
Rnd 6: (3sc, inc, 3sc) x 2 (16)
Rnd 7-10: sc around (16)
Rnd 11: (2sc, 2dec, 2sc) x 2 (12)
Stuff lightly
Rnd 12: 6dec (6)
FO. Make 2.
Back flipper cover
The flipper cover is worked in rows. Between rows, be sure to ch1, turn to turn the work.
Work in blue color. Start by chaining 5. The work starts in the 2nd stitch from the hook.
Row 1: 4sc (4)
Row 2: inc, 2sc, inc (6)
Row 3: inc, 4sc, inc (8)
Row 4: 3sc, inc, 4sc (9)
Row 5-7: 9sc (9)
Row 8: 3sc, sc2tog, 4sc (8)
Row 9: 3sc, sc2tog, 3sc (7)
Row 10: sc, sc2tog, sc, sc2tog, sc (5)
Row 11: sc2tog, sc, sc2tog (3)
Row 12: sc2tog, sc (2)
Row 13: sc2tog (1)
continue to sc around the entire piece. FO when you reach the tip again. Leave a tail for sewing.
Belly patch
The belly patch is worked in rows. Between rows, be sure to ch1, turn to turn the work.
Work in beige color. Start by chaining 5. The work starts in the 2nd stitch from the hook.
Row 1-3: 4sc (4)
Row 4: sc, inc, 2sc (5)
Row 5-6: 5sc (5)
Row 7: 2sc, inc, 2sc (6)
Row 8: 6sc (6)
Row 9: 2sc, inc, 3sc (7)
Row 10: 7sc (7)
Row 11: 3sc, inc, 3sc (8)
Row 12: inc, 6sc, inc (10)
Row 13: 10sc (10)
Row 14: inc, 8sc, inc (12)
Row 15-16: 12sc (12)
Row 17: inc, 10sc, inc (14)
Row 18-19: 14sc (14)
Row 20: inc, 12sc, inc (16)
Row 21-22: 16sc (16)
Row 23: inc, 14sc, inc (18)
Row 24-39: 18sc (18)
Row 40: sc, sc2tog, 12sc, sc2tog, sc (16)
Row 41-44: 16sc (16)
Row 45: sc, sc2tog, 10sc, sc2tog, sc (14)
Row 46-48: 14sc (14)
Row 49: sc, sc2tog, 8sc, sc2tog, sc (12)
Row 50-51: 12sc (12)
Row 52: sc, sc2tog, 6sc, sc2tog, sc (10)
Row 53-54: 10sc (10)
Row 55: sc, sc2tog, 4sc, sc2tog, sc (8)
Row 56: 8sc (8)
Row 57: sc, sc2tog, 2sc, sc2tog, sc (6)
Row 58: 2sc, sc2tog, 2sc (5)
Row 59: 2sc, sc2tog, sc (4)
Row 60: sc, sc2tog, sc (3)
Row 61: sc2tog, sc (2)
Row 62: sc2tog (1)
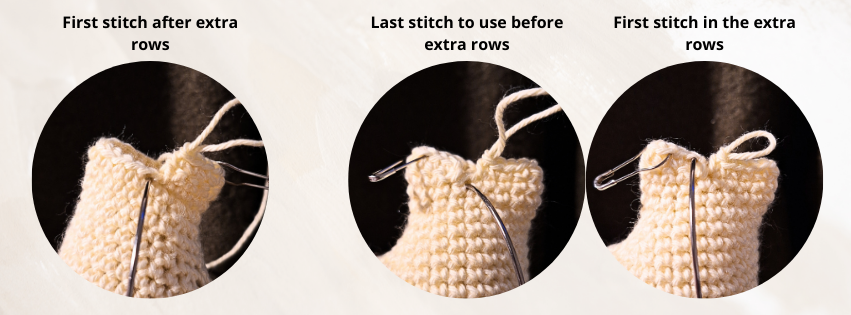
continue and sc around the entire piece. The following will be a guide for stitchplacement along the edge. The baseline is 1 stitch pr row. Start by making 25sc, (sc2tog, sc) x 5, ca. 22 sc to the top of the neck, inc in the corner, 2sc along the top/starting chain, inc in the corner, ca. 22 sc along the neck, (sc, sc2tog) x 5, ca. 25sc to the back. ss in the first sc made and FO leaving a long tail for sewing.
Shell
The shell is worked in rows. Between rows, be sure to ch1, turn to turn the work. The shell is worked front-to-back.
Work in gray color. Start by chaining 27. The work starts in the 2nd stitch from the hook.
Row 1: 26sc (26)
Row 2:inc, 24sc, inc (28)
Row 3-8: 28sc (28)
Row 9: sc, sc2tog, 22sc, sc2tog, sc (26)
Row 10: sc, sc2tog, 20sc, sc2tog, sc (24)
Row 11: sc, sc2tog, 18sc, sc2tog, sc (22)
Row 12: sc, sc2tog, 16sc, sc2tog, sc (20)
Row 13-14: 20sc (20)
Row 15: inc, 18sc, inc (22)
Row 16: 22sc (22)
Row 17: inc, 20sc, inc (24)
Row 18: 24sc (24)
Row 19: sc, sc2tog, 18sc, sc2tog, sc (22)
Row 20: sc, sc2tog, 16sc, sc2tog, sc (20)
Row 21: sc, sc2tog, 14sc, sc2tog, sc (18)
Row 22: sc, sc2tog, 2sc, sc2tog, 4sc, sc2tog, 2sc, sc2tog, sc (14)
Row 23: (sc, sc2tog) x 2, 2sc, (sc2tog, sc) x 2 (10)
Row 24: 10sc (10)
Row 25: (sc, sc2tog) x 3, sc (7)
Row 26: (sc, sc2tog) x 2, sc (5)
Keep the yarn attached. We will now crochet around the piece and make the rounded edge of the shell.
Rnd 1: sc around the entire piece, including the 5 st of row 26. Make approximately 1sc pr. row
Rnd 2: sc around in FLO
Rnd 3-4: sc around
in the next round, we will fold the edge over to create the rounded effect. This is done by working through both the stitch from rnd 4 and the back loop left in round 2. To work the stitch, put hook through normal stitch, continue and put hook through back loop from round 2, finish the stitch like normal.
Rnd 5: ss around going through regular stitch and back loop from rnd 2.
FO leaving long tail for sewing.
Shell spikes
Work in gray color
Rnd 1: 8sc in mr (8)
Rnd 2: sc around in BLO (8)
Rnd 3: (3sc, inc) x 2 (10)
Rnd 4-5: sc around (10)
ss and FO. Make 9.
Ears
Work in blue color
Rnd 1: 6sc in mr (6)
Rnd 2-9: sc around (6)
Rnd 10: 4sc, 2inc (8)
ss, FO leaving tail for sewing.
To form the ear, fold the piece around itself to form a swirl. The roll should have the increases made on the last round towards the center of the ear. Make 2.
Horn
Work in blue color
Rnd 1: 6sc in mr (6)
Rnd 2: (inc, 2sc) x 2 (8)
Rnd 3-4: sc around (8)
ss and FO with tail for sewing.
Eye
Work in black color
Row 1: 2sc in mr, ch1, turn (2)
Row 2: inc, sc, ch1, turn (3)
change color to white
Row 3: 2sc, in the last stitch sc, ss and FO
Make 2.
Assembly of your crochet Lapras
Start by attaching the head-patch and flipper covers. The head patch goes on top of the head – align it with the front of the nose and sew in place. For the flippers, simply attach the covers on one side of the flipper – the covers may need a good stretch to fit nicely over the flipper itself..
Now place the neck to the body. The neck sits on the round front of the body on rounds 5-17 on the body. Before sewing in place, make sure the belly patch fits. If not, make adjustments to the placement of the neck – be aware that the belly patch might need to be stretched a bit. When placement is certain, attach the neck. Remember to stuff it firmly before closing the hole. Next sew on the belly patch. The belly starts right underneath the head, and goes all the way to the tail.
Next attach the flippers. The front of the front flippers sit on round 10 of the body and sit on a slight angle towards the body. About half of the flipper should lie against the body, add stitches along the inside of the flipper if needed.
The front of the back flippers sit on 25 of the body. Again half of the flipper should lie against the body to get the angle of the flipper right.
Attach the shell to the back of the piece. The broad edge with the starting chain sits against the neck, the sides can also be pulled a bit forward to get a more rounded look of the shell. Sew the shell to the body, add light stuffing before sewing it shut.
Add the shell spikes to the shell. These should form a hexagon toward the back with one spike in the middle and a spike on both the left and right “shoulder” of Lapras.
Lastly we attach the facial details. Add the ears to the top of the head. They should sit on rows 2-3 of the face-patch with around 5 stitches between them. Add the horn on rows 5-7 of the face-patch centered between the ears. The eyes sit on the same rows as the horn, with 3 stitches between eye and horn in the closest spot. The white of the eye should face the ears.
Embroider a white highlight in the eye and nostrils to finish of the piece.
And now your Lapras is finished!