Get the ad-free PDF on Ravelry!
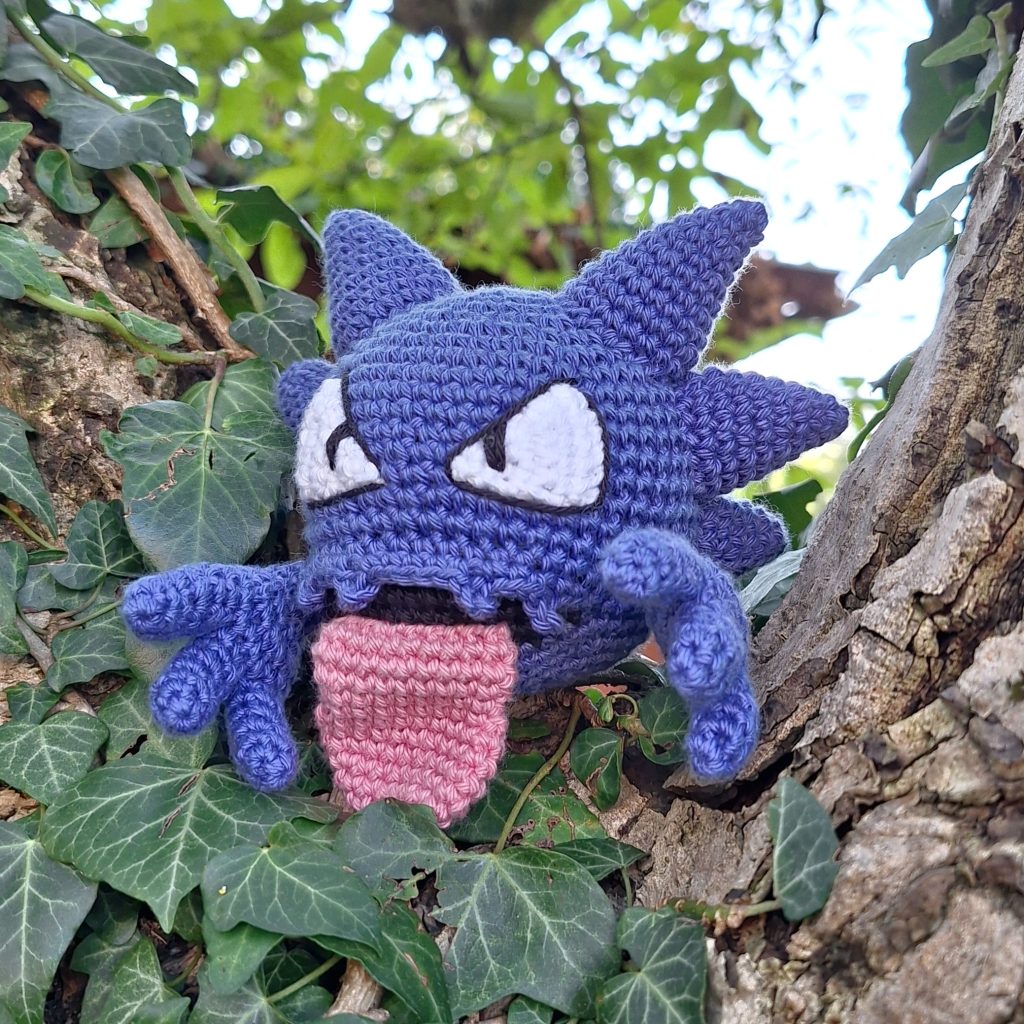
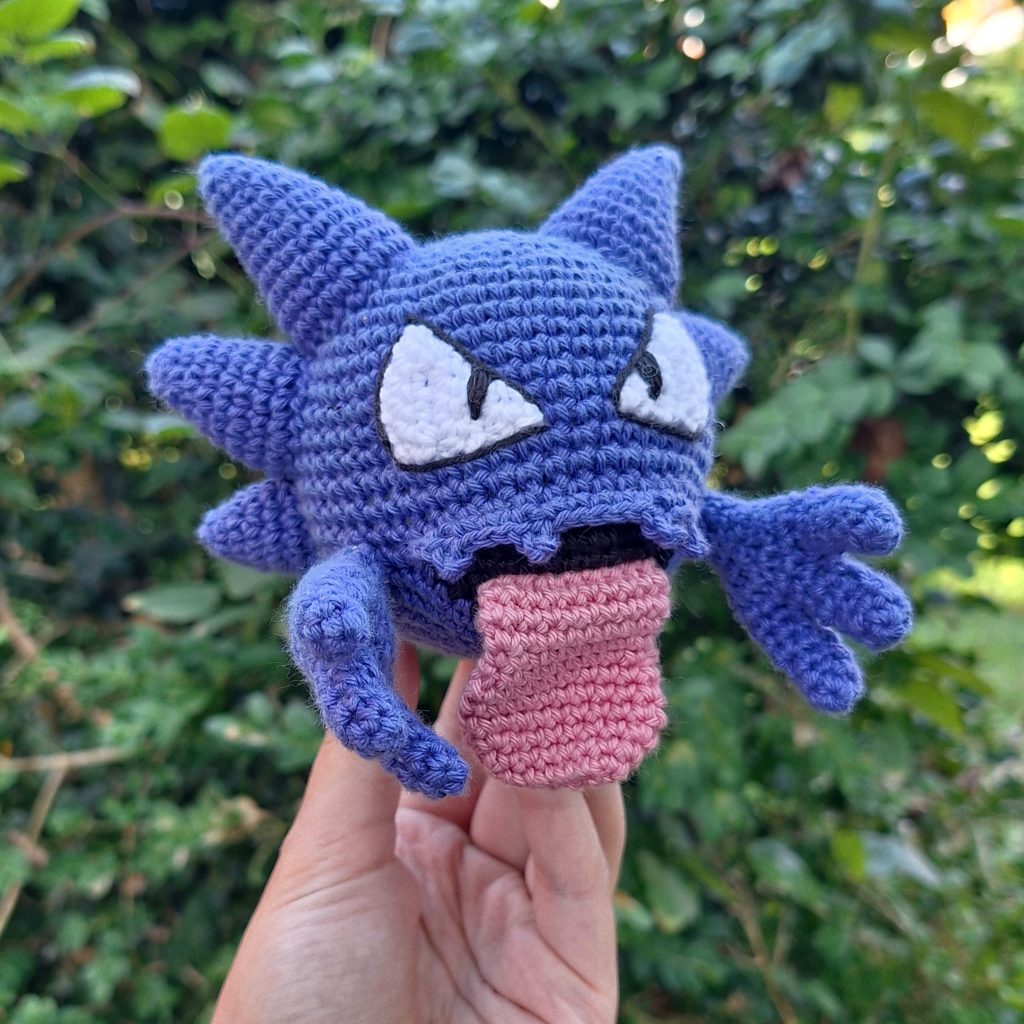
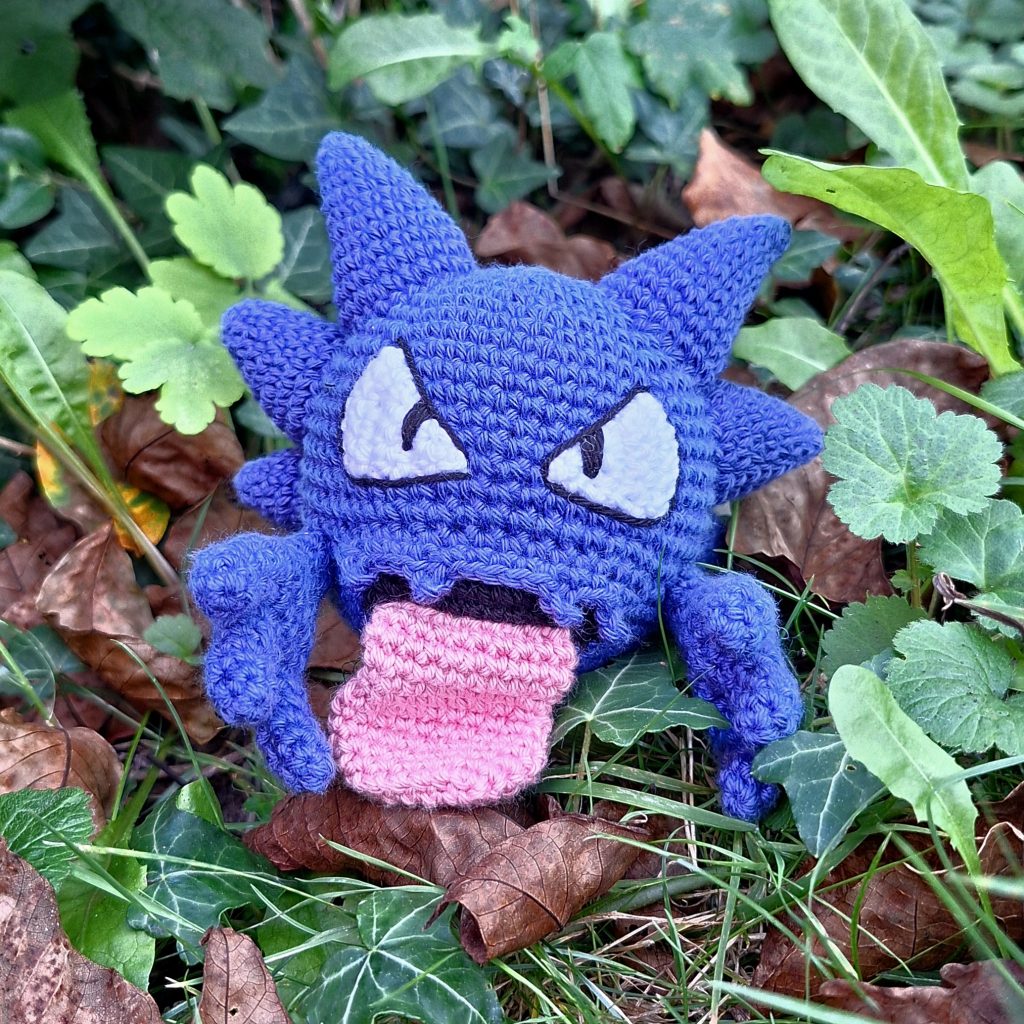
Get ready to crochet one of the spookiest Pokémon around—Haunter! Known for its mischievous grin and ghostly, floating hands, Haunter is a Ghost/Poison-type Pokémon that lurks in the shadows, waiting to prank the unsuspecting. Haunter has a rich history in Pokémon lore, often haunting old buildings or caves and known for licking its victims to cause paralysis. It may look playful, but its eerie nature gives it a spooky edge that Pokémon fans love.
This crochet pattern captures all of Haunter’s haunting details, from its signature grin to its floating hands, making it a perfect project for intermediate amigurumi crafters. Whether you’re crafting it for a Halloween display or adding it to your ghostly Pokémon-amigurumi collection, this Haunter will surely add a dash of creepiness and fun. Gather your purple yarn and get ready to bring Haunter’s spooky charm to life!
Supplies you'll need to crochet Haunter
General supplies:
- Crochet hook 2,5 mm , I always use clover amour hooks for my projects!
- Sewing needle
- Stuffing
- Stitch marker
With Amigurumi you guage doesn’t matter much. Using smaller hook and yarn will make you finished Piece smaller, and bigger hook and yarn will make him bigger. Just make sure that your yarn and hook fits together and makes a tight fabric so the stuffing won’t show through!
The Haunter will be about 10cm tall in the suggested yarn below.
I reccomend Hobbii Rainbow cotton 8/4. This yarn is a 100% cotton and very nice to work with! With this yarn, I use a 2,5 mm hook (or a B-1 or C-2 should work too!). If Rainbow cotton is sold out, I can also recommend Friends cotton from Hobbii as a direct substitute.
- Purple
- Black
- Pink
- White
Abbreviations in this crochet pattern
Rnd = round
mr = magic ring
sc = single crochet
inc = increase, 2 sc in the same stitch
dec = decrease, make 2 stitches into 1
ss = slip stitch
ch = chain
BLO = Back Loop Only
FO = Finish Off
Haunter crochet pattern
Mouth
In black. The mouth is crocheted into the body later. The mouth is made around a chain.
Start by chaining 15. The work starts in the 2nd stitch.
Rnd 1: 13sc, 3sc in last stitch, turn the work and work on the other side of the chain, 12sc, inc (30)
Rnd 2: (14sc, inc) x 2 (32)
FO.
Body
In purple
Rnd 1: 6 sc in mr (6)
Rnd 2: inc x 6 (12)
Rnd 3: (sc, inc) x 6 (18)
Rnd 4: (sc, inc, sc) x 6 (24)
Rnd 5: (3sc, inc) x 6 (30)
Rnd 6: (2sc, inc, 2sc) x 6 (36)
Rnd 7: (5sc, inc) x 6 (42)
Rnd 8: (3sc, inc, 3sc) x 6 (48)
Rnd 9: (7sc, inc) x 6 (54)
Rnd 10-17: sc around (54)
Rnd 18: 19sc, align mouth by putting wrong-sides together and make 16 sc through both layers, 19sc in the body (54)
Rnd 19: 19sc, 16sc in the remaining stitches of the black mouth – this also makes you skip the 16 purple stitches that connect the mouth in rnd 18! – 19sc (54 – and the mouth is fully attached)
Rnd 20: sc around (54)
Rnd 21: (7sc, dec) x 6 (48)
Rnd 22: (3sc, dec, 3sc) x 6 (42)
Rnd 23: (5sc, dec) x 6 (36)
Rnd 24: (2sc, dec, 2sc) x 6 (30)
Rnd 25: (3sc, dec) x 6 (24)
Rnd 26: (sc, dec, sc) x 6 (18)
Rnd 27: (sc, dec) x 6 (12)
Rnd 28: dec x 6 (6)
Stuff and FO
Now make the teeth for the mouth. These are crocheted into the 16 purple stitches connecting the mouth in rnd 18.
To make the teeth, do the following
Tooth = (sc, ch 3, ss in 2nd ch, sc in 3rd ch). The stitch after a tooth is worked like normal.
Turn the head upside down and connect the yarn so you’re ready to crochet in the same direction you as you did, when making the head
sc in first st, tooth, 2sc, tooth, 5sc, tooth, 2sc, tooth, sc, ss in last st and FO.
(If the teeth line up weird, feel free to redo and move them to fit your vision better)
Tail
In purple
Rnd 1: 4sc in mr (4)
Rnd 2: (inc, sc) x 2 (6)
Rnd 3: sc around (6)
Rnd 4: (inc, sc) x 3 (9)
Rnd 5: sc around (9)
Rnd 6: 2sc, (inc, sc) x 3, sc (12)
Rnd 7: sc around (12)
Rnd 8: 2sc, (sc, inc, sc) x 3, sc (15)
Rnd 9: sc around (15)
Rnd 10: 2sc, (inc, 3sc) x 3, sc (18)
Rnd 11: sc around (18)
Rnd 12: 2sc, (2sc, inc, 2sc) x 3, sc (21)
Rnd 13: 2sc, (3sc, inc, 2sc) x 3, sc (24)
Rnd 14: dec, 4sc, (inc, 3sc) x 4, 2sc (27)
Rnd 15: dec, (2sc, inc, sc) x 6, sc (32)
Rnd 16: sc, (2sc, inc, 2sc) x 6, sc (38)
Rnd 17: dec, 8sc, (2sc, inc, 2sc) x 4, 8sc (41)
make 7sc, ss and FO with a tail for sewing.
Hands
In purple. The hands are made by making each individual finger, and then connecting three fingers to form the hand. Start by making 3 fingers.
Finger
Rnd 1: 4sc in mr (4)
Rnd 2: (inc, sc) x 2 (6)
Rnd 3: sc around (6)
Rnd 4-5: sc, inc, 2sc, dec (6)
Rnd 6: sc around (6)
ss and FO 2 of the fingers. Leave the yarn attached to the third one and continue with round 7 to connect the fingers.
Start by finding the top of the fingers. The top is the stitch above where you made the decrease in round 5. The top stitches are thus that stitch and one stitch on either side, 3 stitches total.
The finger with the yarn still attached is 1st and the other 2 are 2nd and 3rd.
Rnd 7: work in 1st, 1 sc, work in top stitches of 2nd, 3sc, work 3rd finger starting with top stitches, 6sc, work in remaining stitches of 2nd, 3sc, work in remaining stitches of 1st, 5sc (18 stitches total and all fingers connected)
Rnd 8: sc around (18)
Rnd 9: 8sc, (dec, sc) x 3, sc (15)
Rnd 10: 6sc, (dec, sc) x 3 (12)
Rnd 11: (dec, 4sc) x 2 (10)
Stuff the hand, be careful not to overstuff!
Rnd 12: (dec, 3sc) x 2 (8)
Rnd 13: sc around (8)
Rnd 14: (dec, 2sc) x 2 (6)
Make 2 hands.
Big spikes
In purple
Rnd 1: 4sc in mr (4)
Rnd 2: (sc, inc) x 2 (6)
Rnd 3: (sc, inc, sc) x 2 (8)
Rnd 4: (3sc, inc) x2 (10)
Rnd 5: (2sc, inc, 2sc) x 2 (12)
Rnd 6: (5sc, inc) x 2 (14)
Rnd 7: (3sc, inc, 3sc) x 2 (16)
Rnd 8: (7sc, inc) x 2 (18)
Rnd 9: (4sc, inc, 4sc) x 2 (20)
Rnd 10: (9sc, inc) x 2 (22)
Rnd 11: (5sc, inc, 5sc) x 2 (24)
ss, FO. Make 2.
Medium spikes
In purple
Rnd 1: 4sc in mr (4)
Rnd 2: (sc, inc) x 2 (6)
Rnd 3: (sc, inc, sc) x 2 (8)
Rnd 4: (3sc, inc) x2 (10)
Rnd 5: (2sc, inc, 2sc) x 2 (12)
Rnd 6: (5sc, inc) x 2 (14)
Rnd 7: (3sc, inc, 3sc) x 2 (16)
Rnd 8: (7sc, inc) x 2 (18)
Rnd 9: (4sc, inc, 4sc) x 2 (20)
ss, FO. Make 2.
Small spike
In purple
Rnd 1: 4sc in mr (4)
Rnd 2: (sc, inc) x 2 (6)
Rnd 3: (sc, inc, sc) x 2 (8)
Rnd 4: (3sc, inc) x2 (10)
Rnd 5: (2sc, inc, 2sc) x 2 (12)
Rnd 6: (5sc, inc) x 2 (14)
Rnd 7: (3sc, inc, 3sc) x 2 (16)
ss, FO. Make 2.
Tongue
In pink.
The tongue is worked around a chain. Start by chaining 7. The work starts in 2nd chain from the hook.
Rnd 1: 5sc, 3sc in the last chain, turn to work on other side of chain, 4sc, inc (14)
Rnd 2: (6sc, inc) x 2 (16)
Rnd 3: (6sc, 2inc) x 2 (20)
Rnd 4-6: sc around (20)
Rnd 7: (8sc, dec) x 2 (18)
Rnd 8: sc around (18)
Rnd 9: (8sc, inc) x 2 (20)
Rnd 10-11: sc around (20)
ss and FO. Don’t stuff. If you find it needed, flatten the piece and sew a few stitches to keep the tongue flat.
Eyes
In white
The eyes are worked in rows. Start by chaining 2. The work starts in 2nd chain from the hook.
Row 1: inc, ch1, turn (2)
Row 2: inc, sc, ch1, turn (3)
Row 3: 2sc, inc, ch1, turn (4)
Row 4: inc, 3sc, ch1, turn (5)
Row 5: 4sc, inc, ch1, turn (6)
Row 6: 6sc (6)
Make 2 eyes.
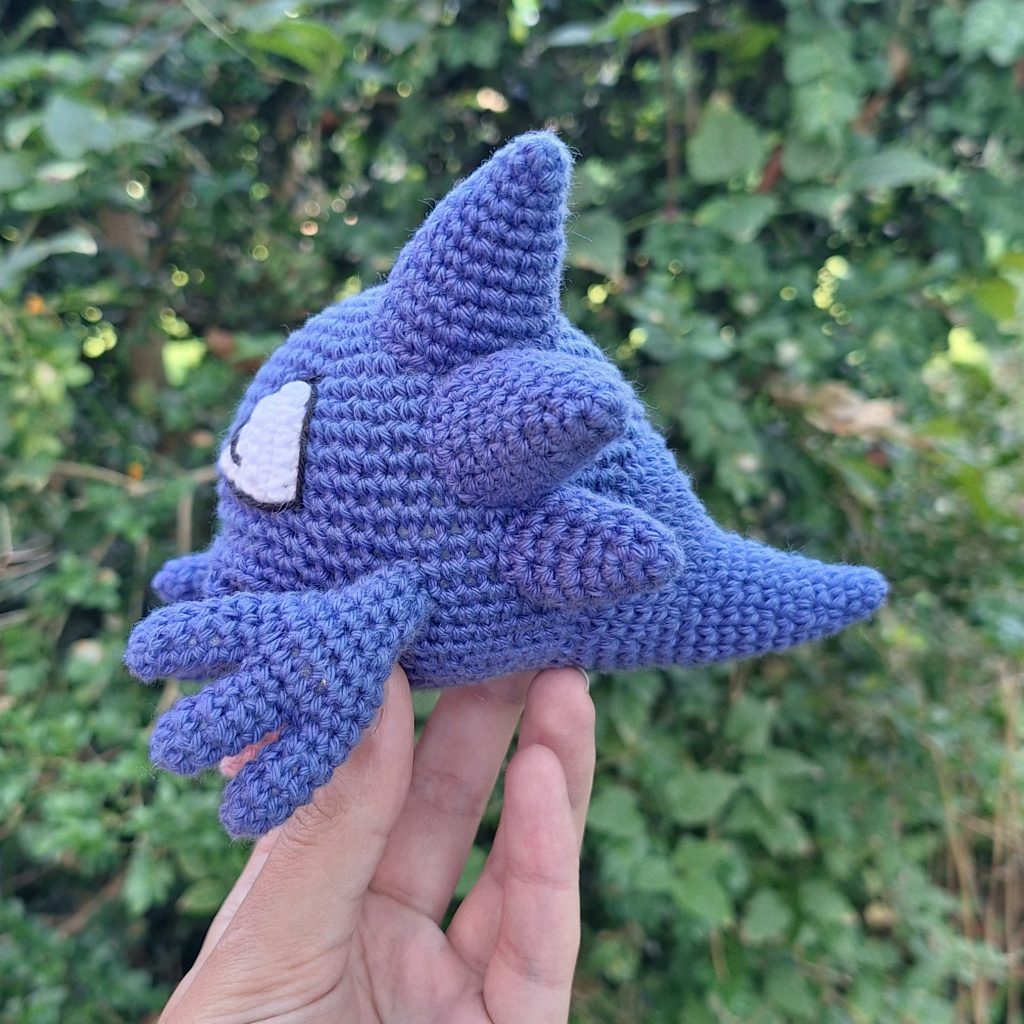
Assembly of your crochet Haunter
I recommend using pins to pin everything together before starting the sewing process. In this way, you are sure everything will fit nicely on Haunter.
Attach the tail at the back of Haunter. Place the tail with the flat part facing downwards. The tail should be placed with the top around round 12 reaching down to round 24 or 25.
Attach the spikes on either side of the head with the biggest spikes on top and the smallest on the bottom. Make sure to place the spikes on a diagonal like pictured at the top of the pattern. The top spike starts at round 3 or 4.
Attach the tongue inside the middle of the mouth. If needed, add a few extra stitches to secure the position and pose of the tongue.
Attach the hands on either side of the mouth. The hands should have the palms facing each other or facing slightly upwards depending on what look you want.
Lastly attach the eyes two rounds above the top of the mouth with the flat edge being toward the mouth. Embroider long pupils and add black embroidery around the edge of the eyes if you’d like.