

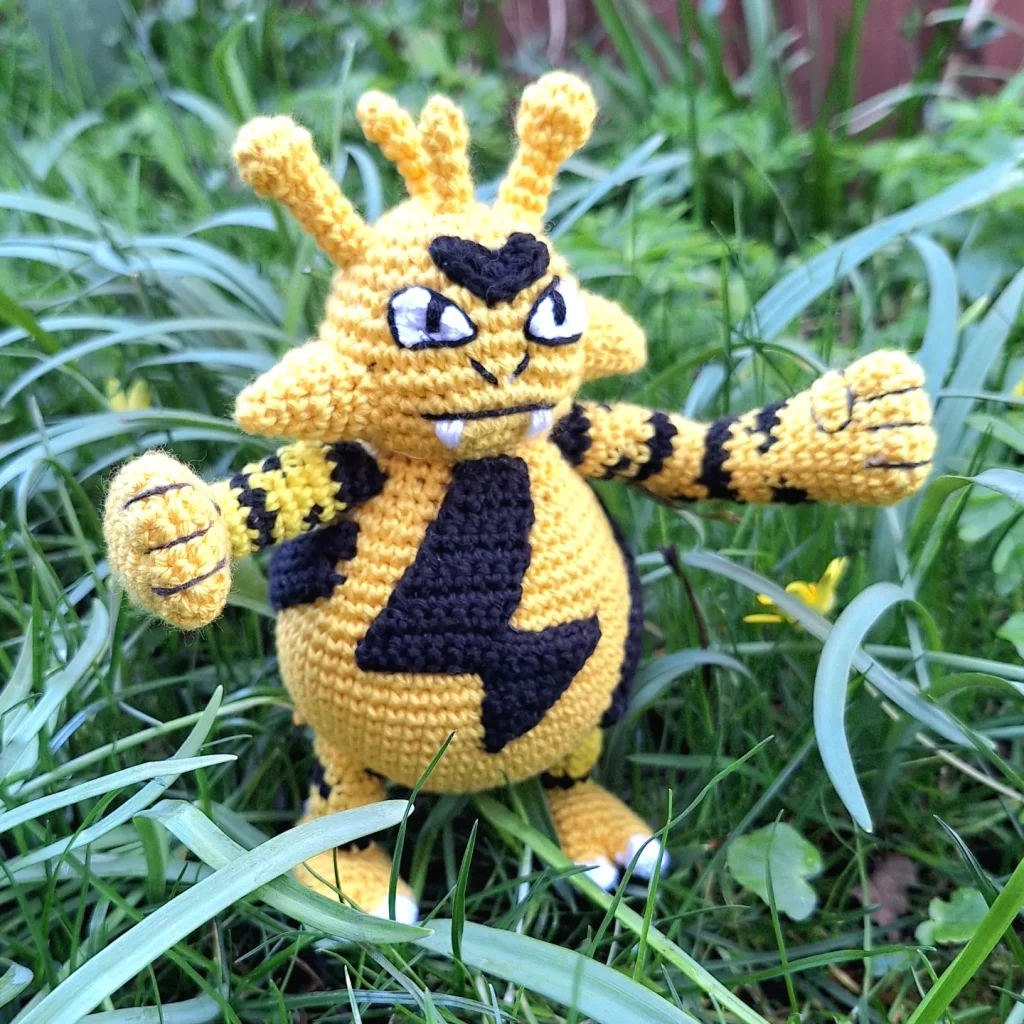
Electabuzz, the Thunderbolt Pokémon! Get ready to bring this powerful Electric-type Pokémon to life with this free crochet pattern. Electabuzz’s striking yellow and black design, complete with fierce electric energy, will make a standout addition to your amigurumi Pokémon collection.
Your future crochet Electabuzz will have a humanoid appearance with a predominantly yellow body covered in black stripes. It has distinctively shaped antennae on its head and large, electrified fists. Its fierce expression and imposing stature reflect its formidable nature.
This crochet pattern is perfect for intermediate-advanced crocheters looking for a fun and challenging amigurumi project. With detailed instructions you’ll be guided through creating Electabuzz’s iconic features, including its distinctive zigzag patterns and energetic stance.
Whether you’re a Pokémon enthusiast or simply love crafting, a crochet Electabuzz will spark excitement and creativity. Embrace the thrill of crafting your own amigurumi Pokémon companion and let Electabuzz light up your crochet adventures!
Supplies you'll need to crochet Electabuzz
General supplies:
- Crochet hook 2,5 mm, I always use clover amour hooks for my projects!
- Sewing needle
- Stuffing
- Stitch marker
With Amigurumi you guage doesn’t matter much. Using smaller hook and yarn will make you finished Electabuzz smaller, and bigger hook and yarn will make him bigger. Just make sure that your yarn and hook fits together and makes a tight fabric so the stuffing won’t show through!
Electabuzz is about 15 cm/6inches using the following yarn.
I reccomend Hobbii Rainbow cotton 8/4. This yarn is a 100% cotton and very nice to work with! With this yarn, I use a 2,5 mm hook (or a B-1 or C-2 should work too!). If Rainbow cotton is sold out, I can also recommend Friends cotton from Hobbii as a direct substitute.
- 1 x yellow (54)
- 1 x black (09)
- A bit of white for the eyes and teeth.
Abbreviations in this crochet pattern
Rnd = round
mr = magic ring
sc = single crochet
inc = increase, 2 sc in the same stitch
dec = decrease, make 2 stitches into 1
ss = slip stitch
FLO = Front Loop Only
ch = chain
CC = Color change (this is also explained in the pattern when in use)
FO = Finish Off
Electabuzz crochet pattern
Head
In yellow
Rnd 1: 6 sc in mr (6)
Rnd 2: inc x 6 (12)
Rnd 3: (sc, inc) x 6 (18)
Rnd 4: (sc, inc, sc) x 6 (24)
Rnd 5: (5sc, inc) x 4 (28)
Rnd 6: (3sc, inc, 3sc) x 4 (32)
Rnd 7: (7sc, inc) x 4 (36)
Rnd 8: 14sc, (inc, sc) x 4, 14sc (40)
Rnd 9-12: sc around (40)
Rnd 13: (3sc, dec) x 8 (32)
Rnd 14: (sc, dec, sc) x 8 (24)
Rnd 15: (sc, dec) x 8 (16)
Rnd 16: dec x 8 (8)
Antenna
In yellow
Rnd 1: 5sc in mr (5)
Rnd 2: inc x 5 (10)
Rnd 3: sc around (10)
Rnd 4: dec x 5 (5)
Stuff the ball of the antenna.
Rnd 5: in FLO sc around (5)
Rnd 6: inc, 4sc (6)
Rnd 7-8: sc around (6)
ss and FO.
Make 2.
Spike for head – front
In yellow
Rnd 1: 4sc in mr (4)
Rnd 2-5: sc around (4)
ss and FO. Stuff if possible.
Spike for head – back
In yellow
Rnd 1: 4sc in mr (4)
Rnd 2-6: sc around (4)
ss and FO. Stuff if possible.
Black detail for head
In black
Start by chaining 6. You will start working in the 2nd ch from the hook.
Row 1: 2sc, 3-in-1-inc, 2sc (7)
FO with tail for sewing.
Cheek-piece
In yellow
Rnd 1: 4sc in mr (4)
Rnd 2: (sc, inc) x 2 (6)
Rnd 3: (sc, inc, sc) x 2 (8)
Rnd 4: (3sc, inc) x 2 (10)
Rnd 5: (2sc, inc, 2sc) x 2 (12)
Rnd 6: (5sc, inc) x 2 (14)
ss and FO. Make 2.
Body
In yellow
Rnd 1: 6 sc in mr (6)
Rnd 2: inc x 6 (12)
Rnd 3: (sc, inc) x 6 (18)
Rnd 4: (sc, inc, sc) x 6 (24)
Rnd 5: (3sc, inc) x 6 (30)
Rnd 6: (2sc, inc, 2sc) x 6 (36)
Rnd 7: (5sc, inc) x 6 (42)
Rnd 8: (3sc, inc, 3sc) x 6 (48)
Rnd 9: (7sc, inc) x 6 (54)
Rnd 10: (17sc, inc) x 3 (57)
Rnd 11-19: sc around (57)
Rnd 20: (17sc, dec) x 3 (54)
Rnd 21: (8sc, dec, 8sc) x 3 (51)
Rnd 22: (15sc, dec) x 3 (48)
Rnd 23: (7sc, dec, 7sc) x 3 (45)
Rnd 24: (13sc, dec) x 3 (42)
Rnd 25: (5sc, dec) x 6 (36)
Rnd 26: (2sc, dec, 2sc) x 6 (30)
Rnd 27: (dec, 3sc) x 6 (24)
ss and FO leaving tail for sewing.
Tail
Start in yellow
Rnd 1: 8sc in mr (8)
Rnd 2-3: sc around (8)
Change to black in the last stitch.
Rnd 4-5: sc around (8)
Change to yellow in the last stitch.
Rnd 6-7: sc around (8)
Repeat rounds 4-7 4 more times. Remember to change color every two rounds. When you are done you will have 5 black stripes and end with yellow.
Rnd 24: (in yellow) sc around (8)
ss and FO with tail for sewing. Add wiring and/or stuffing to the tail. I used a pipecleaner.
Feet
The feet are worked in 1 piece starting from the front of the foot with the 2 claws and worked backwards. We start by making the 2 front claws.
Claws
In white
Rnd 1: 4sc in mr (4)
Rnd 2: sc around (4)
Change color to yellow in the last stitch.
Rnd 3: (sc, inc) x 2 (6)
Cut the yarn on the first piece. Make another claw piece by repeating rounds 1-3 again. Leave the working yarn on the second piece. In the next round we will connect the 2 pieces to start forming the foot. The first piece is the piece you made first and therefore is the piece without the yarn attached.
Rnd 4: 6sc around the first piece, continue to make 6 sc around the second piece (12)
The pieces are now attached and you can crochet around like normal.
Rnd 5: (inc, 5sc) x 2 (14)
Rnd 6-10: sc around (14)
Make extra sc until you reach the middle of the foot (about 1-2 sc depending on you tension)
Rnd 11: 2sc, dec, 5sc, dec, 3sc (12)
Rnd 12: sc around (12)
Rnd 13: 2sc, dec, 4sc, dec, 2sc (10)
Stuff the foot lightly.
Rnd 14: dec x 5 (5)
Change color to white in the last st.
Rnd 15-16: sc around (5)
FO the last claw by sewing through the front loops of the 5 stitches and pulling tight. weave in or hide the ends inside the foot.
Make 2 feet.
Legs
The legs can be made by either starting with a chain connected in the round or by using surface slipstitches directly on the foot. The last option will end with less sewing later on.
Additionally we will be changing color between yellow and black to make the stripes. The colorchanges go from yellow to black or from black to yellow. This is indicated to CC. When you see CC, change color in the last stitch you just made. Additionally the black parts will be in a bold font.
Start in yellow
Start by either chaining 10 and connecting in the round or make 10 surface ss in a circle towards the back of the foot. If you choose to surface slipstitch, start your circle towards the back of the foot.
Rnd 1: sc around (10)
Rnd 2: sc, CC, 8sc, CC, sc (10)
Rnd 3: dec, CC, 4sc, inc, sc, CC, 2sc (10)
Rnd 4: dec, 3sc, inc, 4sc (10)
Rnd 5: 4sc, inc, 3sc, dec (10)
Rnd 6: 7sc, CC, 3sc (10)
Rnd 7: inc, 3sc, CC, sc, dec, sc, CC, 2sc (10)
Rnd 8: 2inc, 4sc, CC, 4sc (12)
Rnd 9: sc around (12)
Rnd 10: 3sc, ss, FO.
If you started with the chain-start, sew the end with the chain start to the foot. The leg is attached toward the back of the foot.
Make 2.
Underarm
For the arm pieces we will be using the same terminology for color changes (CC) as explained in the leg pieces.
For the underarm, we are starting by working around a chain. We work from the hand towards the elbow.
Start in yellow and chain 6. The first round starts in the 2nd chain from the hook.
Rnd 1: 4sc, 3sc in the last stitch, turn to work on the other side of the chain, 3sc, inc (10)
Rnd 2: (sc, inc, 2sc, inc, sc) x 2 (16)
Rnd 3-7: sc around (16)
Rnd 8: (dec, 6sc) x 2 (14)
Rnd 9: CC, 12sc, CC, 2sc (14)
Rnd 10: CC, 11sc, CC, 3sc (14)
Rnd 11: (sc, dec, 4sc) x 2 (12)
Rnd 12: 6sc, CC, 6sc (12)
Rnd 13: 4sc, CC, 3sc, CC, 5sc (12)
Rnd 14: sc, dec, CC, 4sc, dec, 3sc (10)
Rnd 15: sc around (10)
Rnd 16: sc, CC, 8sc, CC, sc (10)
Stuff firmly.
Rnd 17: (sc, dec, 2sc) x 2 (8)
Rnd 18: (sc, dec, sc) x 2 (6)
FO and hide the tail.
Make 2.
Upper arm
For the upper arm you again have the choice between starting with a chain connected in the round and surface slipstitches like with the legs.
For the upper arm we are also using the color change (CC) terminology explained with the legs.
Start in yellow
Start by either chaining 10 and connecting in the round or make 10 surface ss in a circle towards the back of the arm. If you choose to surface slipstitch, start your circle towards the elbow of the underarm.
Rnd 1: sc around (10)
Rnd 2: inc, 4sc, dec, 3sc (10)
Rnd 3: 2sc, CC, 8sc, CC (10)
Rnd 4: sc, inc, 3sc, dec (10)
Rnd 5: 8sc, CC, 2sc (10)
Rnd 6: 6sc, CC, 4sc (10)
Rnd 7: sc around (10)
Rnd 8: 2sc, CC, 8sc (10)
Rnd 9: sc around (10)
Rnd 10: 3sc, ss, FO.
Make 2.
Lightning bolt for stomach
In black. The piece is worked in rounds. Start by chaining 2.
Row 1: in the 2nd st from hook make an inc, ch, turn (2)
Row 2: inc, sc, ch, turn (3)
Row 3: 2sc, inc, ch, turn (4)
Row 4: inc, 3sc, ch 8, turn (5 + 8 chain stitches)
Row 5: start in 2nd ch from hook. 11sc, inc, ch, turn (13)
Row 6: inc, 10sc, dec, ch, turn (13)
Row 7: 5sc, inc, ch, turn (7) [the round end early]
Row 8: 5sc, dec, ch, turn (6)
Row 9: 6sc, ch, turn (6)
Row 10: 4sc, dec, ch, turn (5)
Row 11: 5sc, ch, turn (5)
Row 12: 3sc, dec, ch, turn (4)
Row 13: 4sc (4)
If you think the lightning bolt needs a bit more height, you can add a ch, turn to row 13 and repeat until desired height.
Black spot for side
In black
Start by chaining 18. The first row starts by using the 2nd ch from the hook.
Row 1: 17sc, 3ch, turn (17 + 3 ch)
Row 2: Start in 2nd ch from hook, 17 sc, ch, turn (17) [the row is ended early]
Row 3: 13sc, ss, FO with a long tail for sewing.
Make 2. You will need one for each side of the body
Black spike for back
In black
Start by chaining 8. The first row starts by using the 2nd ch from the hook.
Row 1-3: 7sc, ch, turn (7)
Row 4: 2sc, dec, 3sc, ch, turn (6)
Row 5-6: 6sc, ch, turn (6)
Row 7: 2sc, dec, 2sc, ch, turn (5)
Row 8-9: 5sc, ch, turn (5)
Row 10: sc, dec, 2sc, ch, turn (4)
Row 11-12: 4sc, ch, turn (4)
Row 13: dec, 2sc, ch, turn (3)
Row 14: 3sc, ch, turn (3)
Row 15: sc, dec, ch, turn (2)
Row 16: 2sc, ch, turn (2)
Row 17: dec, ch, pull yarn through to FO. Leave a long tail for sewing.
Eyes
In white.
chain 5, start in 2nd chain from the hook.
Row 1: ss, sc, hdc, dc (4)
FO with a tail for sewing.
Make 2. Flip one over so you have both a left and a right eye.
Assembly of your crochet Electabuzz
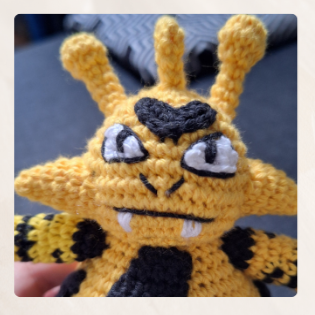
To assemble your Electabuzz start by assembling the head. Find the front of the head by locating your increases from round 8 – the increases on that round is the front. Mark this with a stitchmarker if needed. The spikes and the antennas go on the top of the head.
The spikes are centered on top of the head around the magic ring with the shortest in the front and the longest in the back. They should sit on round 2 and barely touch the magic ring.
The antennas sit on each side of the head on round 4-5. on each side of the head.
The eyes are placed on rnd 7-8 with 2-3 stitches between them.
The black piece for the face sits between the eyes with about 1 stitch between the eyes and black piece.
The cheek pieces are placed lower on the head on each side. They sit on round 8-11 of the head spaced evenly on either side.
To finish the head, embroider a mouth, nose and around the eyes to give definition with black. Also add white teeth. The mouth is between round 11-12 and the nose is over round 10.
Now attach the head to the body. The body doesn’t have a front, so you just need to make sure the body is fairly centered.
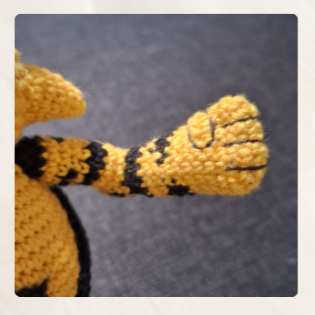
Next we attach the arms. Attach the arms to the body one round below where the head meets the body. The arms should be attached to the hands face outwards (or in a position you prefer). Remember to stuff the arm firmly before sewing it shut. You should also embroider hand-features onto the hands. Follow the pictures under the pattern for the underarm.
Attach the tail to the back of the piece around round 8-9. Make sure to center it with the head.
Now you can attach the legs. The legs should be placed evenly on either side of the body and ideally make Electabuzz able to stand on his own. Remember to stuff the arm firmly before sewing it shut. The legs on mine are placed on rounds 6-9 and slightly towards the front for balance.
Lastly attach the black pieces to the body. The lightning-bolt is placed in the front starting from the connection between head and body. The spike-piece is attached to the back pointing to the left side of the tail. The side pieces are attached on either side between an arm and a leg. Pin all the pieces on before sewing to make sure there is space for all of them without overlapping!