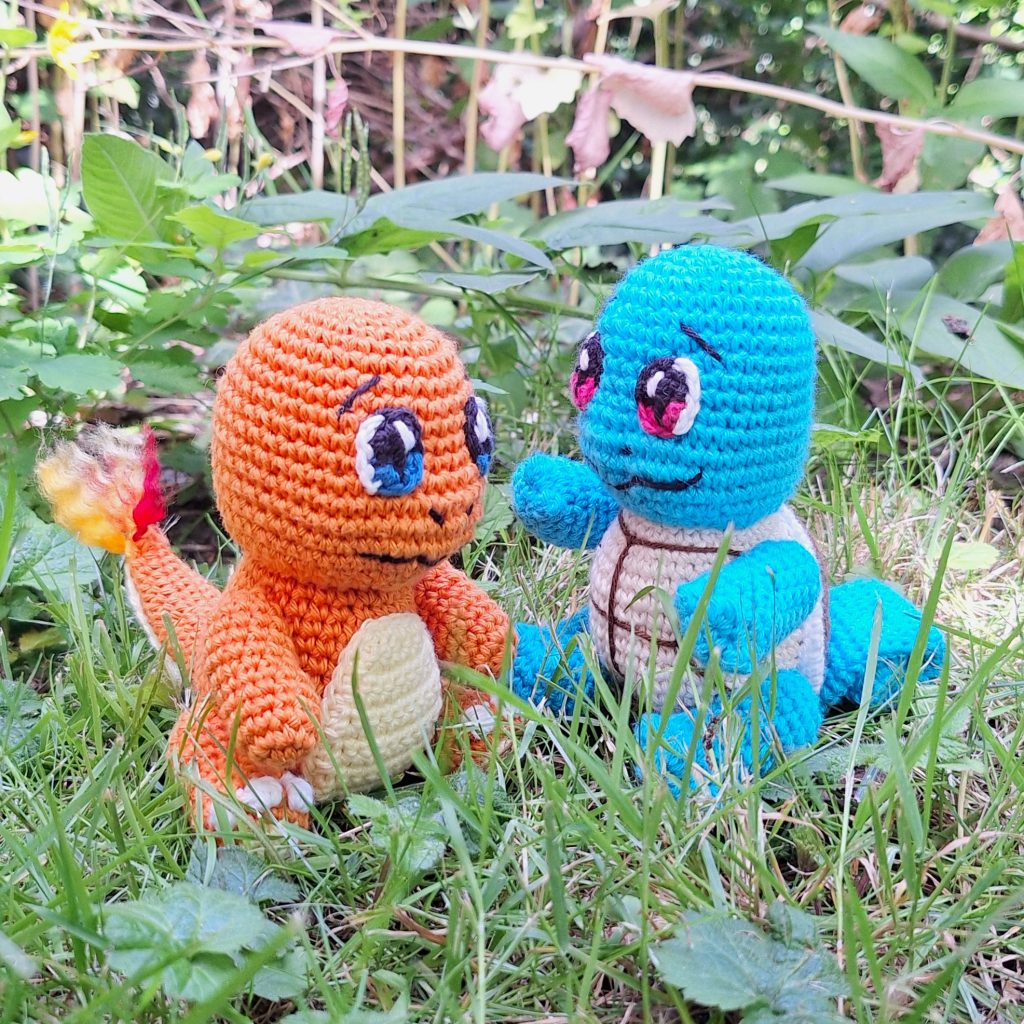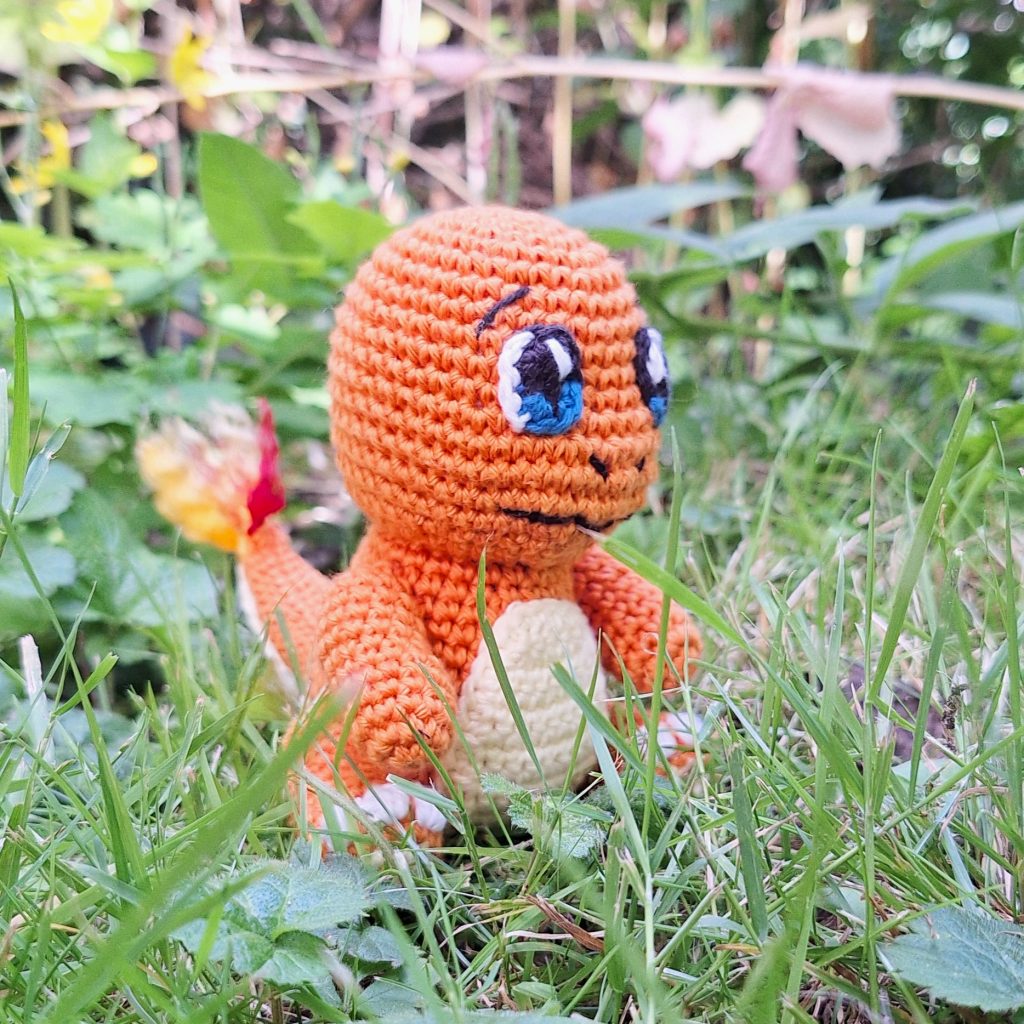
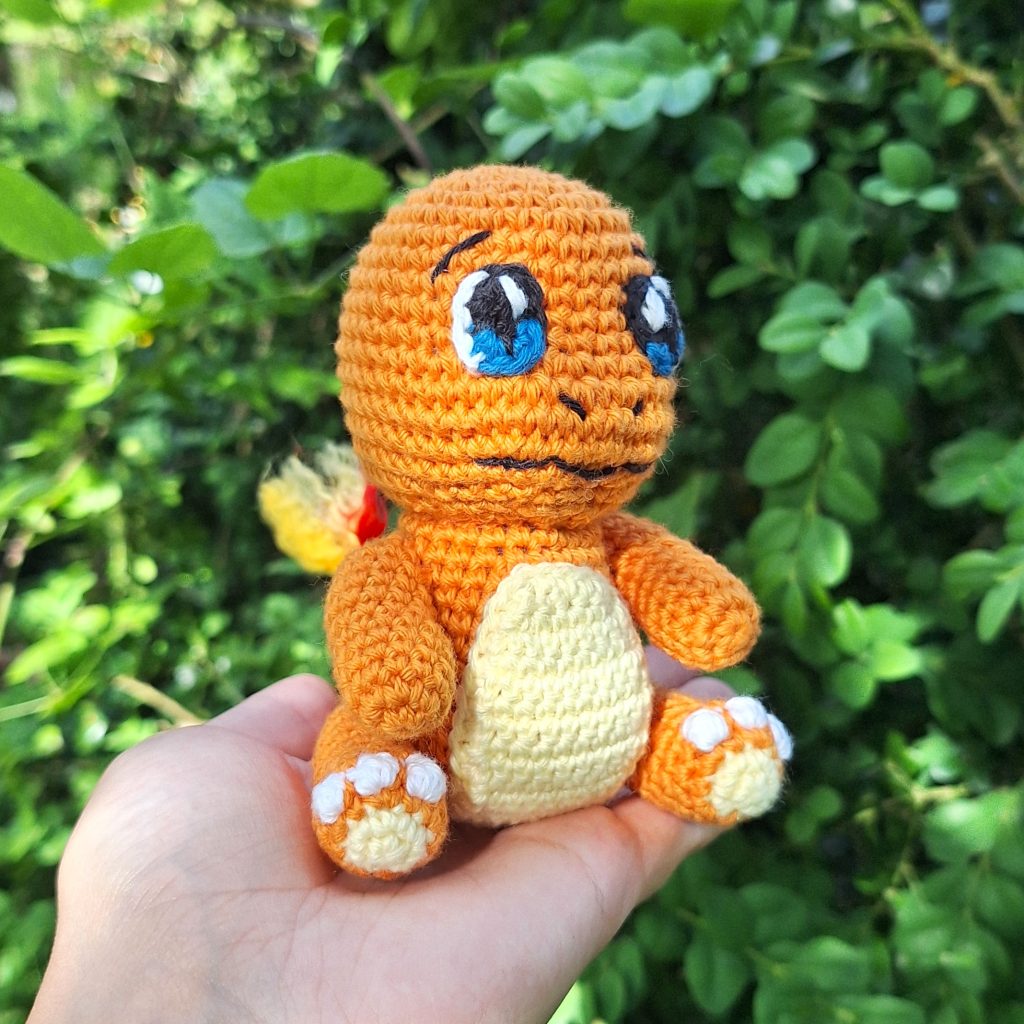
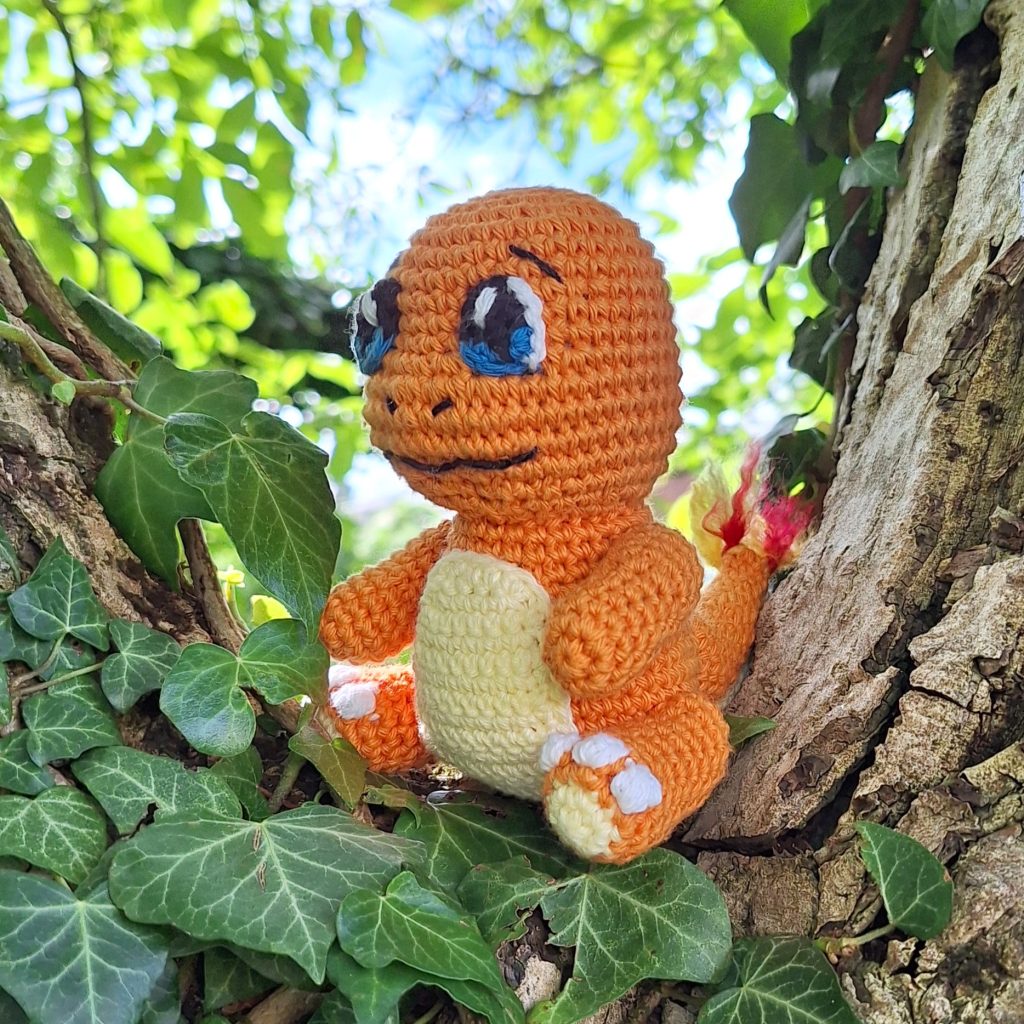
Get ready to crochet one of the most iconic Pokémon with this Charmander crochet pattern! The amigurumi pattern captures the fiery charm of Charmander, the Fire-type Pokémon known for its friendly demeanor and flame-tipped tail.
Perfect for crocheters with some experience in making amigurumi, this free crochet pattern offers a delightful challenge. It includes clear instructions to guide you through each step, ensuring a smooth and enjoyable crochet experience.
Creating Charmander is an exciting journey as you bring its adorable amigurumi form to life stitch by stitch. The pattern beautifully highlights Charmander’s signature features, from its bright orange body and cream-colored underside to its expressive eyes and fiery tail, all in one cute crochet piece!
If you wish to complete the original start Pokémon, I also have a free Squirtle pattern – Bulbasaur is coming soon!
Supplies you'll need to crochet Charmander
General supplies:
- Crochet hook 2,5 mm, I always use clover amour hooks for my projects!
- Sewing needle
- Stuffing
- Stitch marker
- (optional) a few strands of red, orange and yellow acrylic yarn for the fire-tail
With Amigurumi you guage doesn’t matter much. Using smaller hook and yarn will make you finished Piece smaller, and bigger hook and yarn will make him bigger. Just make sure that your yarn and hook fits together and makes a tight fabric so the stuffing won’t show through!
With the recommended yarn below, your Charmander will be about 12 cm/5 inches tall.
I reccomend Hobbii Rainbow cotton 8/4. This yarn is a 100% cotton and very nice to work with! With this yarn, I use a 2,5 mm hook (or a B-1 or C-2 should work too!). If Rainbow cotton is sold out, I can also recommend Friends cotton from Hobbii as a direct substitute.
- orange
- pale yellow
- A bit of black, blue and white for eyes and face-details
Abbreviations in this crochet pattern
Rnd = round
mr = magic ring
sc = single crochet
inc = increase, 2 sc in the same stitch
dec = decrease, make 2 stitches into 1
ss = slip stitch
FO = Finish Off
Charmander crochet pattern
Head
In orange
Rnd 1: 6sc in mr (6)
Rnd 2: inc x 6 (12)
Rnd 3: (sc, inc) x 6 (18)
Rnd 4: (sc, inc, sc) x 6 (24)
Rnd 5: (3sc, inc) x 6 (30)
Rnd 6: (2sc, inc, 2sc) x 6 (36)
Rnd 7-11: sc around (36)
Rnd 12: 12sc, (inc, sc) x 6, 12sc (42)
Rnd 13: 17sc, (inc, sc) x 4, 17sc (46)
Rnd 14-15: sc around (46)
Rnd 16: 17sc, (dec, sc) x 4, 17sc (42)
Rnd 17: 12sc, (dec, sc) x 6, 12sc (36)
Rnd 18: 2sc, (3sc, dec) x 6, 4sc (30)
Rnd 19: (3sc, dec) x 6 (24)
Rnd 20: (sc, dec, sc) x 6 (18)
stuff
Rnd 21: (sc, dec) x 6 (12)
Rnd 22: dec x 6 (6)
FO.
Body
In orange
Rnd 1: 6sc in mr (6)
Rnd 2: inc x 6 (12)
Rnd 3: (sc, inc) x 6 (18)
Rnd 4: (sc, inc, sc) x 6 (24)
Rnd 5: (3sc, inc) x 6 (30)
Rnd 6: (2sc, inc, 2sc) x 6 (36)
Rnd 7: (11sc, inc) x 3 (39)
Rnd 8-10: sc around (39)
Rnd 11: (dec, 11sc) x 3 (36)
Rnd 12: sc around (36)
Rnd 13: (5sc, dec, 5sc) x 3 (33)
Rnd 14: sc around (33)
Rnd 15: (9sc, dec) x 3 (30)
Rnd 16: sc around (30)
Rnd 17: (4sc, dec, 4sc) x 3 (27)
Rnd 18: sc around (27)
ss and FO with tail for sewing.
Legs
Start in pale yellow color
Rnd 1: 5sc in mr (5)
Rnd 2: inc x 5 (10)
Change color to orange in the last stitch of round 2.
Rnd 3: (inc, sc) x 5 (15)
In the next round the toes will be made. The toes are made with puff-stitches and in white. To make a puff-stitch do the following: (yarn over, hook through stitch, yarn over, hook back out of stitch, yarn over, pull through 2 loops on hook) x 3, (you will have 4 loops on hook after 3 repetitions), yarn over and pull through 4 loops.
To make the toes white, finish the stitch right before the puff-stitch with white instead of orange, and finish the last yarn over of the puff stitch with orange.
Rnd 4: 5sc, (puff-stitch, sc) x 3, 4sc (15)
Rnd 5: sc around (15)
Rnd 6: 5sc, dec, sc, dec, 5sc (13)
Rnd 7-12: sc around (13)
Rnd 13: 11sc, dec (12)
Stuff
Rnd 14: dec x 6 (6)
FO with tail for sewing. Make 2.
Arms
In orange
Rnd 1: 6sc in mr (6)
Rnd 2: inc x 6 (12)
Rnd 3-6: sc around (12)
Rnd 7: 2dec, 3sc, 2inc, 3sc (12)
Rnd 8-11: sc around (12)
Stuff
Rnd 12: dec x 6 (6)
FO with tail for sewing. Make 2.
Tail
In orange
Rnd 1: 6sc in mr (6)
Rnd 2: sc around (6)
Rnd 3: 3sc, inc, 2sc (7)
Rnd 4: sc around (7)
Rnd 5: 3sc, inc, 3sc (8)
Rnd 6: 4sc, inc 3sc (9)
Rnd 7: 4sc, inc, 4sc (10)
Rnd 8: 5sc, inc, 4sc (11)
Rnd 9: 5sc, inc, 5sc (12)
Rnd 10: 6sc, inc, 5sc (13)
Rnd 11: 6sc, inc, 6sc (14)
Rnd 12: 6sc, 2inc, 6sc (16)
Rnd 13: (inc, 7sc) x 2 (18)
Rnd 14: (sc, inc, 7sc) x 2 (20)
Rnd 15: 14sc, ss, FO with tail for sewing.
Belly-patch
In pale yellow
This piece is worked in rows. After every row you should (ch1, turn). The piece starts at the top near the head and ends along the tail. To ensure a 100% correct fit I recommend assembling the body and tail piece of your charmander first, like described further down in assembly instructions. This way you can add or take away a few rows to fit your Charmander.
Start by chaining 6. Work starts in the 2nd chain from hook.
Row 1: 5sc (5)
Row 2: inc, 3sc, inc (7)
Row 3: 6sc, inc (8)
Row 4: 7sc, inc (9)
Row 5-19: 9sc (9)
Row 20: dec, 5sc, dec (7)
Row 21: dec, 3sc, dec (5)
Row 22: dec, 3sc (4)
Row 23: dec, 2sc (3)
Row 24-29: 3sc (3)
Row 30: dec, sc (2)
Row 31-36: 2sc (2)
Row 37: dec (1)
Row 38: sc (1)
Dont ch1 and turn on the last round. Instead begin to sc around the border of the piece. Around 1 sc every row fits nicely. This part will give the piece a bit more width and will give it a nice, clean edge. When you reach back to the tip of the tail, finish off with a very long tail for sewing.
Eyes
Start in black
The eye is worked around a chain. Start by chaining 4. The work starts in the 2nd chain from the hook.
Rnd 1: 2sc, 3sc in last chain, turn and continue work on the other side of the chain, sc, change color to blue, 2inc, change color to black, 2sc, ss and FO.
Next connect white yarn to the side and make 4 slip stitches along the edge. Repeat on the other eye, but put the slip stitches on the opposite side of the eye so you have both a left and a right eye. Embroider a white highlight in the black part of the eye.
Assembly of your crochet Charmander
As mentioned above, it can be a good idea to assembly the tail and body to ensure the belly-patch gets the correct length. The tail should sit on rounds 3-8 of the body. Be sure to stuff the tail before sewing the hole shut.
The head attaches on top of the body in the center. Make sure the snout (the increases in the head on rounds 12-13 is the front) is pointing forward and opposite of the tail. Be sure to stuff the body firmly before closing the hole.
Next attach the belly-patch. Align the patch with the underside of Charmanders tail and belly and sew it on.
Then attach the arms and legs. I made Charmander in a sitting position, if you prefer him standing, simply turn the legs to make him stand instead. The legs should be attached right above the edge of the belly patch with approximately 3 stitches between the tail and leg.
For the arms, attach them 4 rounds above the legs, right below where the head meets the body.
The eyes are placed between over rounds 9-12 with 3-4 stitches between them.
Then embroider nostrils, a mouth and eyebrows.
The last step of bringing Charmander to life, is lighting his flame. Attach a few acrylic yarn strands to the tip of the tail, (I used red, orange and yellow scraps – about 10 cm/4 inches at most) and brushed them out with a wire brush – a comb will probably work just as well for such a little piece. A more in depth guide in the fire, see this Ponyta pattern.