
Find the ad-free pdf on ravelry!
Every Pokémon trainer stands in front of one very important decision in life; which starter Pokémon should i choose? I vote for a Bulbasaur, and to finalize your decision, why not make your very own crochet Bulbasaur following Bulbasaur crochet pattern?
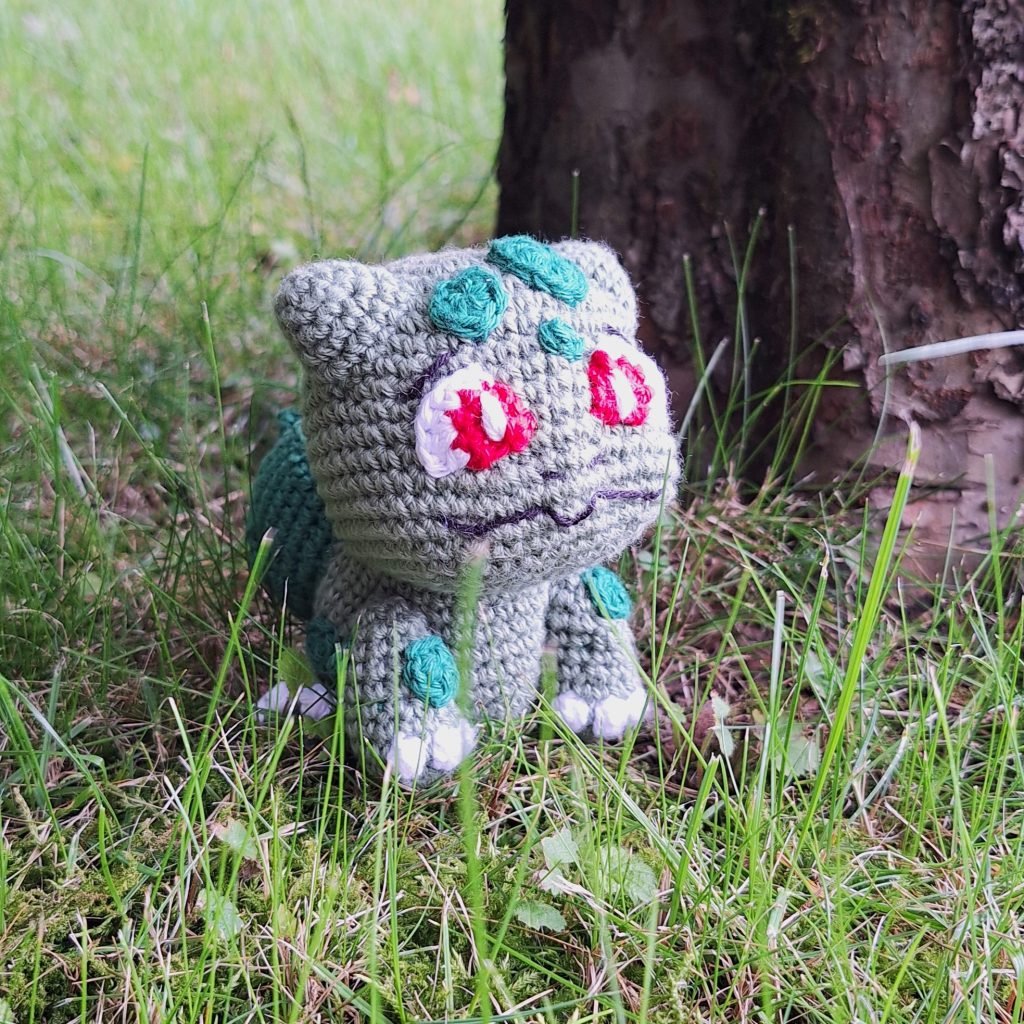
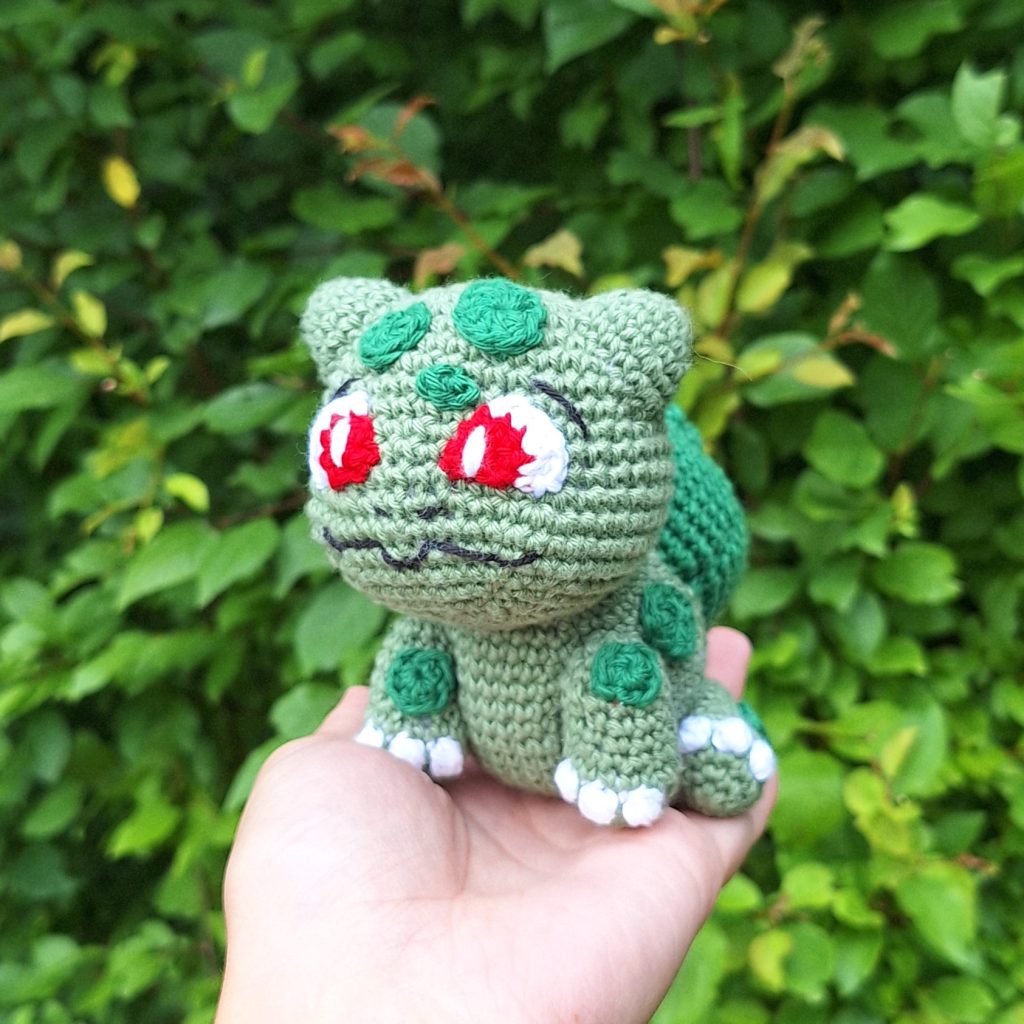
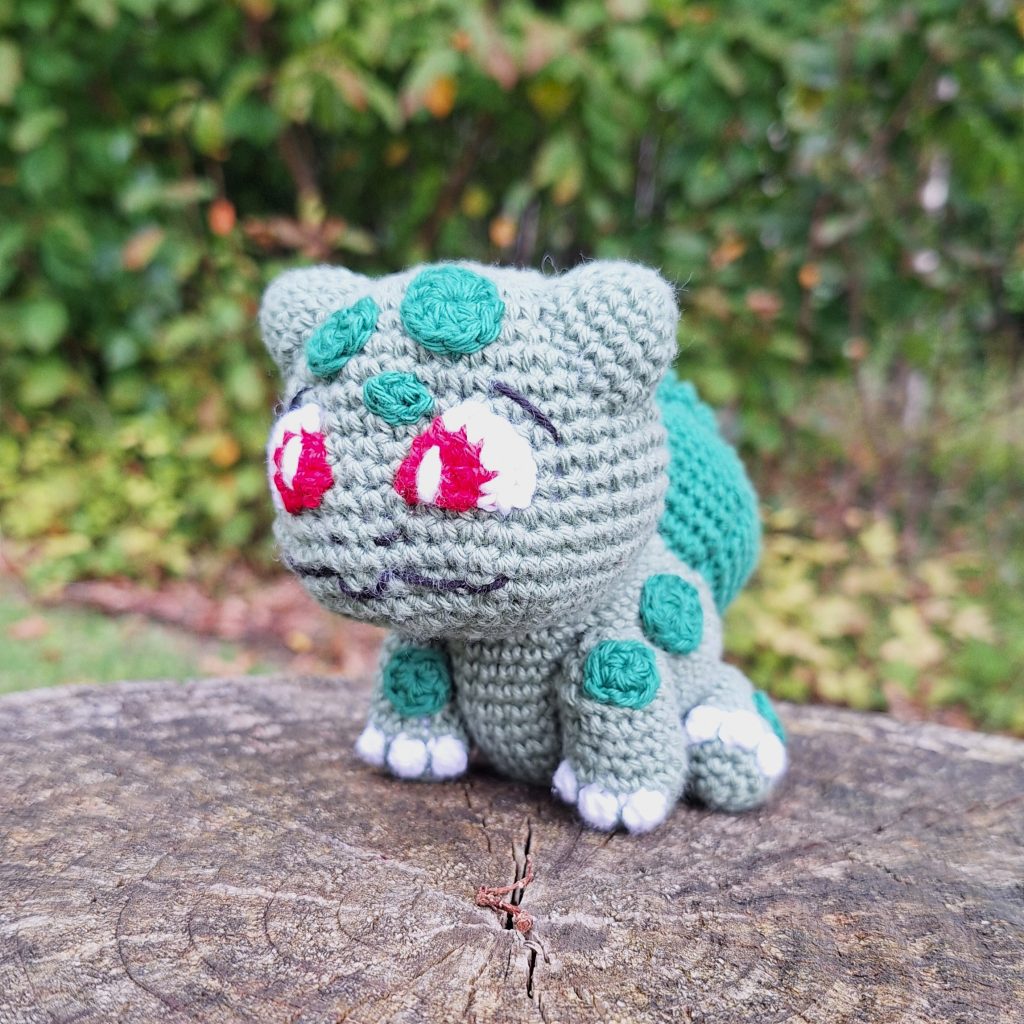
With its blue-green skin, large, expressive eyes, and the plant bulb on its back, Bulbasaur exudes a unique and captivating charm. This bulb, which contains seeds that eventually grow into a large plant, is a key feature that sets Bulbasaur apart from other Pokémon. However, what truly sets Bulbasaur apart is its gentle and friendly nature. Known for its loyalty, kindness, and willingness to help others, Bulbasaur forms strong bonds with its trainers and companions
The goal of this crochet pattern was to create a cute looking crochet Bulbasaur sitting down, and that is exactly what you get! Bulbasaurs chunky appearence will charm anyone who as much as looks in his direction, so of course he is an obvious choice for your starter Pokémon, and an even more obvious choice for you next amigurumi project! If you would rather choose another starter, or parhaps make all the original starters, matching patterns for Squirtle and Charmander are also available!
Supplies you'll need to crochet Bulbasaur
General supplies:
- Crochet hook 2,5 mm, I always use clover amour hooks for my projects!
- Sewing needle
- Stuffing
- Stitch marker
With Amigurumi you guage doesn’t matter much. Using smaller hook and yarn will make you finished Bulbasaur smaller, and bigger hook and yarn will make him bigger. Just make sure that your yarn and hook fits together and makes a tight fabric so the stuffing won’t show through!
Bulbasaur will be around 12 cm (4 inches) tall with the recommended yarn.
I reccomend Hobbii Rainbow cotton 8/4. This yarn is a 100% cotton and very nice to work with! With this yarn, I use a 2,5 mm hook (or a B-1 or C-2 should work too!). If Rainbow cotton is sold out, I can also recommend Friends cotton from Hobbii as a direct substitute.
- 1 x light green
- 1 x darker green
- A bit of black, white and red for face details
Abbreviations in this crochet pattern
Rnd = round
mr = magic ring
sc = single crochet
hdc = half double crochet
inc = increase, 2 sc in the same stitch
dec = decrease, make 2 stitches into 1
3-in-1-inc = 3 sc in 1 stitch
3-in-1-dec = 3 stitches made into one. Continue your preferred decrease method into an extra stitch before finishing the stitch.
hdc-inc = 2 hdc in 1 stitch
ss = slip stitch
ch = chain
BLO = Back Loop Only
FLO = Front Loop Only
FO = Finish Off chain
Bulbasaur crochet pattern
In light green
Rnd 1: 8sc in mr (8)
Rnd 2: inc x 8 (16)
Rnd 3: (3sc, 3-in-1-inc) x 4 (24)
Rnd 4: (4sc, 3-in-1-inc, sc) x 4 (32)
Rnd 5: 6sc, inc, 5sc, inc, 9sc, inc, 5sc, inc, 3sc (36)
Rnd 6: 7sc, inc, 5sc, inc, 11sc, inc, 5sc, inc, 4sc (40)
Rnd 7: 7sc, inc, 7sc, inc, 11sc, inc, 7sc, inc, 4sc (44)
Rnd 8-12: sc around (44)
Rnd 13: 19sc, 2inc, 8sc, 2inc, 13 sc (48)
Rnd 14: 21sc, 2inc, 8sc, 2inc, 15sc (52)
Rnd 15-16: sc around (52)
Rnd 17: 18sc, dec, sc, dec, 12sc, dec, sc, dec, 12sc (48)
Rnd 18: 6sc, dec, sc, dec, 6sc, dec, sc, dec, 9sc, dec, sc, dec, 6sc, dec, sc, dec, sc (40)
Rnd 19: 6sc, dec, sc, dec, 4sc, dec, sc, dec, 6sc, dec, sc, dec, 4sc, dec, sc, dec (32)
Rnd 20: (sc, dec, sc) x 8 (24)
Rnd 21: (sc, dec, sc) x 6 (18)
Stuff firmly
Rnd 22: (dec, sc) x 6 (12)
Rnd 23: dec x 6 (6)
FO.
Ears
In light green
Rnd 1: 6sc in mr (6)
Rnd 2: (inc, sc) x 3 (9)
Rnd 3: (sc, inc, sc) x 3 (12)
Rnd 4: (inc, 3sc) x 3 (15)
Rnd 5: (2sc, inc, 2sc) x 3 (18)
ss and FO with tail for sewing
Body
In light green
Rnd 1: 6sc in mr (6)
Rnd 2: inc x 6 (12)
Rnd 3: (sc, inc) x 6 (18)
Rnd 4: (sc, inc, sc) x 6 (24)
Rnd 5: (4sc, inc, sc) x 4 (28)
Rnd 6: (5sc, inc, sc) x 4 (32)
Rnd 7: (5sc, inc, 2sc) x 4 (36)
Rnd 8: (6sc, inc, 2sc) x 4 (40)
Rnd 9-11: sc around (40)
Rnd 12: (6sc, dec, 2sc) x 4 (36)
Rnd 13: sc around (36)
Rnd 14: (7sc, dec) x 4 (32)
Rnd 15: sc around (32)
Rnd 16: (6sc, dec) x 4 (28)
Rnd 17: sc around (28)
ss and FO with tail for sewing
Legs
In light green
Rnd 1: 5sc in mr (5)
Rnd 2: inc x 5 (10)
Rnd 3: (inc, sc) x 5 (15)
In the next round the toes will be made. The toes are made with puff-stitches and in white. To make a puff-stitch do the following: (yarn over, hook through stitch, yarn over, hook back out of stitch, yarn over, pull through 2 loops on hook) x 3, (you will have 4 loops on hook after 3 repetitions), yarn over and pull through 4 loops.
To make the toes white, finish the stitch right before the puff-stitch with white instead of green, and finish the last yarn over of the puff stitch with light green.
Rnd 4: 5sc, (puff-stitch, sc) x 3, 4sc (15)
Rnd 5: sc around (15)
Rnd 6: 5sc, dec, sc, dec, 5sc (13)
Rnd 7-9: sc around (13)
Rnd 10: 11sc, dec (12)
Stuff
Rnd 11: dec x 6 (6)
FO with tail for sewing. Make 4.
Leaves
For the plant on Bulbasaurs back, we are making 6 individual leaves, these will be sewed together to form the plant on his back.
Make the leaves in a dark green
Rnd 1: 6sc in mr (6)
Rnd 2: (2sc, inc) x 2 (8)
Rnd 3: (3sc, inc) x 2 (10)
Rnd 4: (4sc, inc) x 2 (12)
Rnd 5: (5sc, inc) x 2 (14)
Rnd 6-11: sc around (14)
Rnd 12: (dec, 5sc) x 2 (12)
Rnd 13: (dec, 4sc) x 2 (10)
Rnd 14: (dec, 3sc) x 2 (8)
Rnd 15: sc around (8)
Rnd 16: (dec, 2sc) x 2 (6)
Rnd 17: sc around (6)
Make 6 petal-leaves.
To assemble the plant, sew the sides of the leaves together to form a ball. The bottom doesn’t need to be completely closed as it is sewed onto the body anyway. Focus on getting the top looking the best – the top parts of the leaves are round 17.
Eyes
Worked in rows. Start with red.
Row 1: 2sc in mr, ch1, turn (2)
Row 2: inc, sc, ch1, turn (3)
Row 3: sc, inc, sc, change color to white in last stitch, ch1, turn (4)
Row 4: 2sc, hdc-inc, hdc (5)
FO
For the second eye, reverse row 4 like so: hdc, hdc-inc, 2sc, FO
Spots
The green spots on his body are made freehanded and placed randomly. I added spots as I saw fit, and I advise you to do the same as no Bulbasaur is the same.
I will give a few suggestions for spots. All of mine are made in a magic ring, with various stitches and numbers of stitches.
Big spot
in a mr: sc, hdc, 2dc, hdc, sc, 2hdc, dc, hdc pull the ring tight and ss to close the shape.
Medium spot
in a mr: 2sc, hdc, 2sc, hdc pull the ring tight and ss to close the shape.
Small spot
In a mr: 3sc pull the ring tight and ss to close the shape.
Assembly of your crochet Bulbasaur
The assembly of Bulbasaur can be the hardest thing to get just right. My version is in a sitting position, so the assembly guide is made to fit that. If you want your bulbasaur to stand instead, adjustments to the placement of legs and head should be made.
Before you start assembling Bulbasaur, I strongly recommend pinning everything in place first and testing the balance of the piece. Make sure it can sit in the correct position before actually sewing pieces in place.
When the desired position is acquired, start sewing the pieces on, in the following order: Head, plant, legs, facial features and spots.
Below is a rough guide on where my pieces are placed.
The body is connected to the back of the head from round 15 to 22. The front of Bulbasaurs head is where we added increases in rnd 13-14. Be sure to stuff the body firmly before sewing shut. If you want more stability in the finished piece, add weighted stuffing, like plastic pellets, in the bottom of the body.
The plant is placed on the back starting at round 7 of the body and all the way up to the head. Be sure to stuff the plant before sewing it shut.
The back legs are placed flush with the ground starting the back of the leg at round 4.
The front legs start at round 16 and are placed roughly 7 stitches apart.
The placement of the ears starts at round 5 of the head and goes down to round 10. They are placed on either side of the head, slightly towards the front of the head.
The eyes are placed between round 9-13 with 3 stitches apart where they are the closest.
Spots are placed randomly. I used 10 spots total in different sizes. For the head I used one of each spot mentioned in the pattern.
Finally embroider a mouth, nostrils and eyebrows to finish your Bulbasaur.