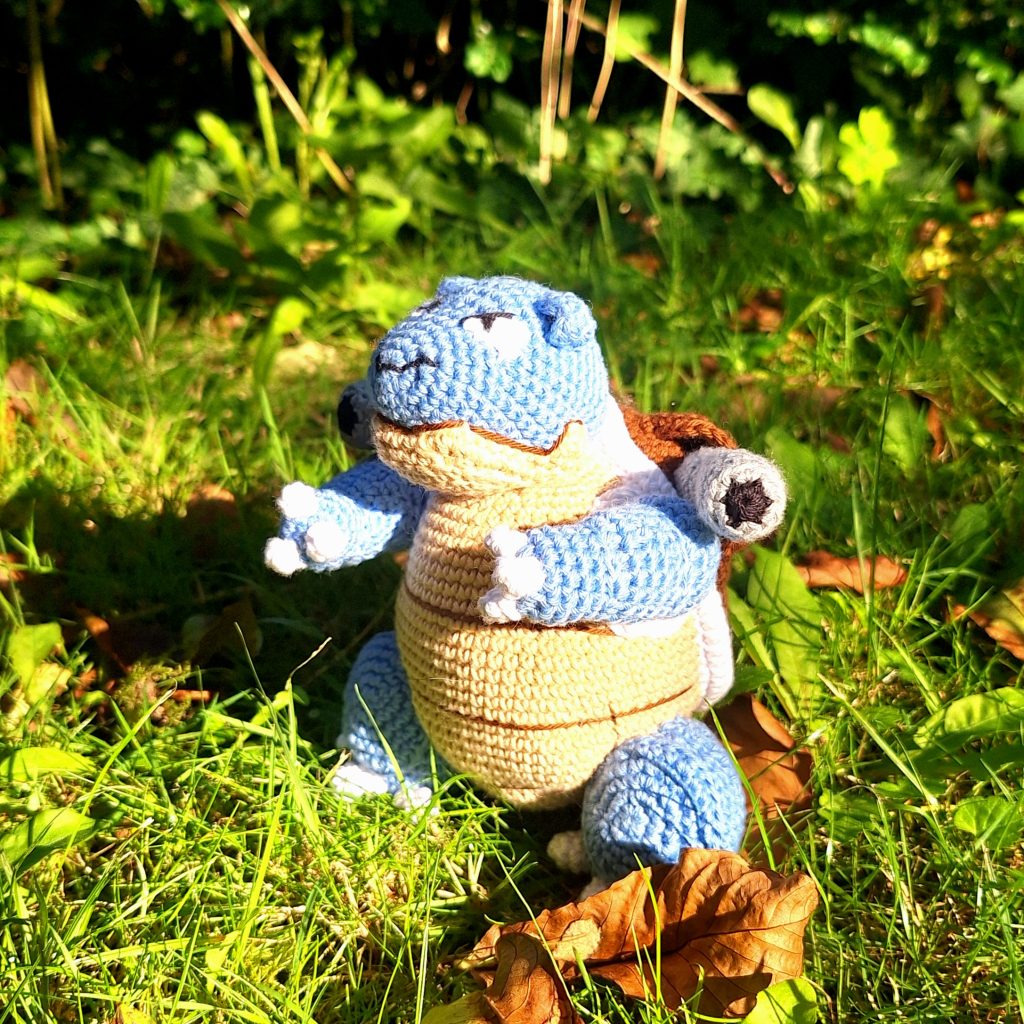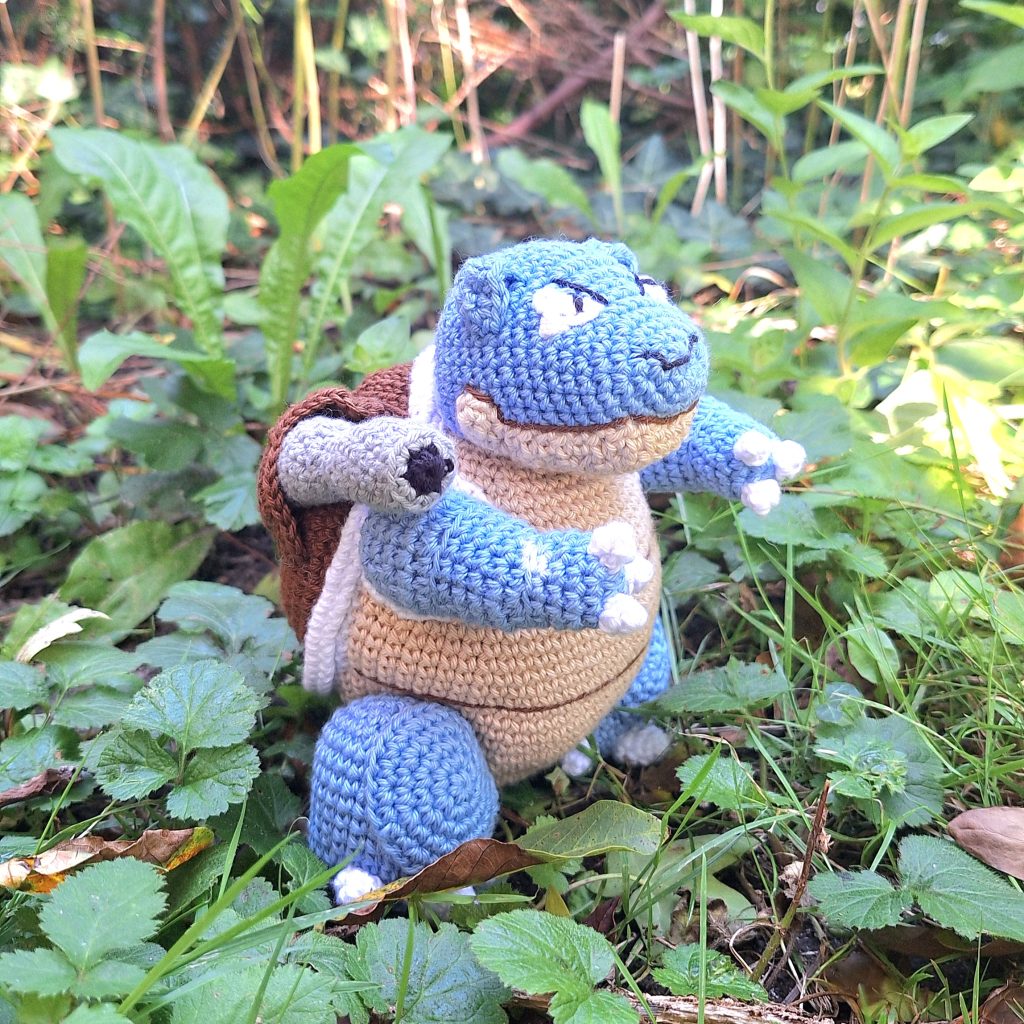
Get ready to craft the ultimate Water-type Pokémon with this Blastoise crochet pattern! Known for its immense power and defensive capabilities, Blastoise is the final evolution of Squirtle and stands as a true powerhouse in any Pokémon team. With its massive water cannons and durable shell, Blastoise can blast water with enough force to punch through thick steel, making it a formidable ally in any battle.
This pattern perfectly captures Blastoise’s iconic features, from its rugged shell to the powerful water cannons that define its strength. Perfect for intermediate-advanced crocheters, this pattern offers a satisfying challenge, with detailed instructions to guide you through each step. You’ll enjoy watching Blastoise’s impressive form take shape, from its sturdy legs to its commanding presence.
Whether you’re a Pokémon fan or simply enjoy a challenging crochet project, this Blastoise pattern is sure to be a rewarding experience. So, grab your blue, brown, and gray yarn, and embark on a crafting journey to create this legendary Water-type Pokémon with your crochet hook!
Supplies you'll need to crochet Blastoise
General supplies:
- Crochet hook 2,5 mm, I always use clover amour hooks for my projects!
- Sewing needle
- Stuffing
- Stitch marker
With Amigurumi you guage doesn’t matter much. Using smaller hook and yarn will make you finished Blastoise smaller, and bigger hook and yarn will make him bigger. Just make sure that your yarn and hook fits together and makes a tight fabric so the stuffing won’t show through!
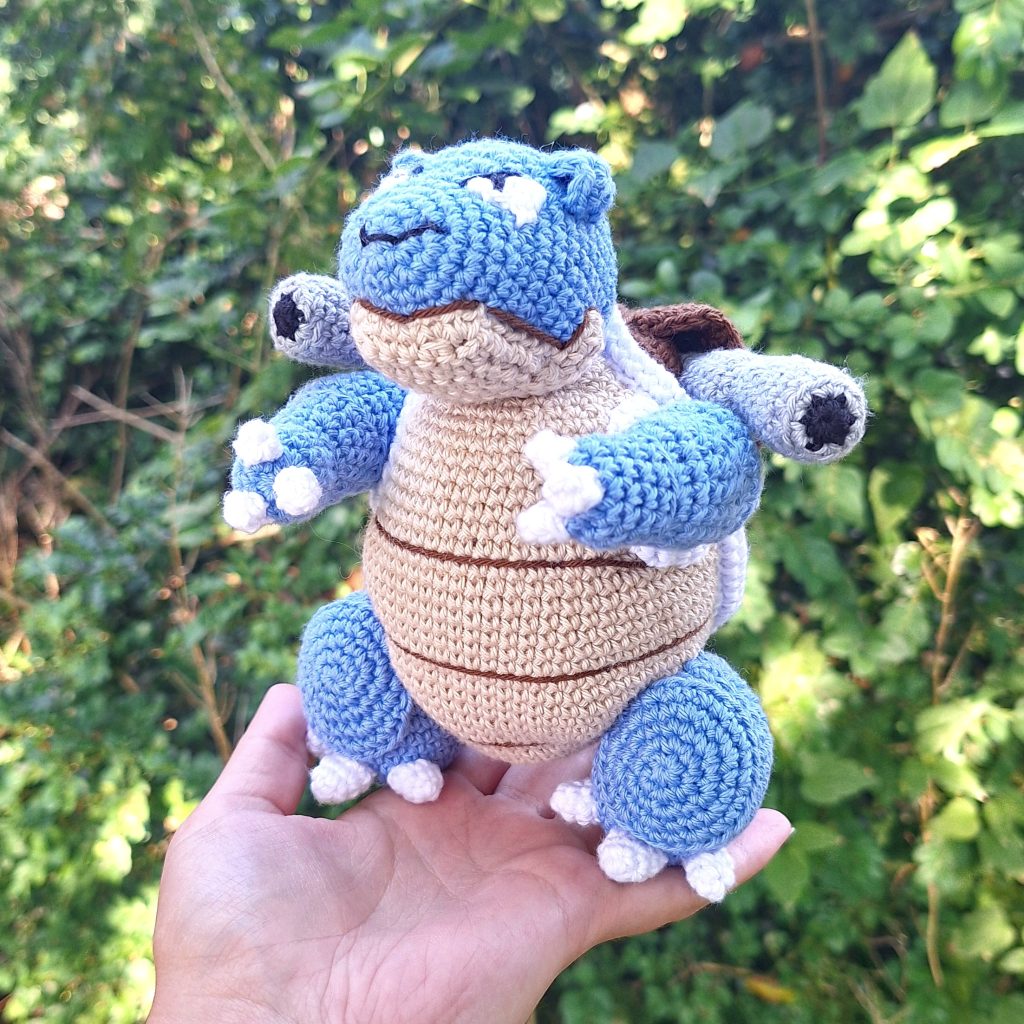
With the recommended yarn, Blastoise will be about 16 cm/6 inches tall.
I reccomend Hobbii Rainbow cotton 8/4. This yarn is a 100% cotton and very nice to work with! With this yarn, I use a 2,5 mm hook (or a B-1 or C-2 should work too!). If Rainbow cotton is sold out, I can also recommend Friends cotton from Hobbii as a direct substitute.
- blue
- brown
- beige
- white
- a bit of black
Abbreviations in this crochet pattern
Rnd = round
mr = magic ring
sc = single crochet
inc = increase, 2 sc in the same stitch
dec = decrease, make 2 stitches into 1
ss = slip stitch
3-in-1-inc = 3sc in the same stitch
BLO = Back Loop Only
FLO = Front Loops Only
ch = chain
FO = Finish Off
Blastoise crochet pattern
Body
In beige
Rnd 1: 6 sc in mr (6)
Rnd 2: inc x 6 (12)
Rnd 3: (sc, inc) x 6 (18)
Rnd 4: (sc, inc, sc) x 6 (24)
Rnd 5: (3sc, inc) x 6 (30)
Rnd 6: (2sc, inc, 2sc) x 6 (36)
Rnd 7: (5sc, inc) x 6 (42)
Rnd 8: 12sc, (sc, inc, sc) x 3, 12sc, (sc, inc, sc) x 3 (48)
Rnd 9: 12sc, (inc, 3sc) x 3, 12sc, (inc, 3sc) x 3 (54)
Rnd 10: 12sc, (2sc, inc, 2sc) x 3, 12sc, (2sc, inc, 2sc) x 3 (60)
Rnd 11-24: sc around (60)
Rnd 25: 12sc, (2sc, dec, 2sc) x 3, 12sc, (2sc, dec, 2sc) x 3 (54)
Rnd 26: sc around (54)
Rnd 27: 12sc, (dec, 3sc) x 3, 12sc, (dec, 3sc) x 3 (48)
Rnd 28: sc around (48)
Rnd 29: 12sc, (sc, dec, sc) x 3, 12sc, (sc, dec, sc) x 3 (42)
Rnd 30: sc around (42)
Rnd 31: (5sc, dec) x 6 (36)
Rnd 32: (2sc, dec, 2sc) x 6 (30)
Rnd 33: (3sc, dec) x 6 (24)
Rnd 34: (sc, dec, sc) x 6 (18)
Rnd 35: sc around (18)
ss and FO. Stuff firmly before assembly.
Shell
In brown
Rnd 1: 6sc in mr (6)
Rnd 2: inc x 6 (12)
Rnd 3: (sc, inc) x 6 (18)
Rnd 4: (2sc, inc) x 6 (24)
Rnd 5: (3sc, inc) x 6 (30)
Rnd 6: (4sc, inc) x 6 (36)
Rnd 7: (5sc, inc) x 6 (42)
Rnd 8: in BLO, (3sc, inc, 3sc) x 6 (48)
Rnd 9: (7sc, inc) x 6 (54)
Rnd 10: (4sc, inc, 4sc) x 6 (60)
Rnd 11: 10sc, (2sc, inc, 3sc) x 3, 12sc, (2sc, inc, 3sc) x 3, 2sc (66)
Rnd 12: 10sc, (3sc, inc, 3sc) x 3, 12sc, (3sc, inc, 3sc) x 3, 2sc (72)
Rnd 13-15: sc around (72)
ss and FO the brown.
Attach white yarn in a front loop.
Rnd 16: in FLO, sc around in white (72)
Rnd 17-18: sc around (72)
Rnd 19: ss around going through the normal white stitch and the brown back loop left from when you started the white edge. This will curl the white edge and give it a rounded look (72)
FO the white.
Cannon covers
In brown
The piece is made in rows. Start by chaining 11. The work starts in the 2nd chain from hook.
Row 1: 10sc, ch1, turn (10)
Row 2: sc, 3-in-1-inc, 6sc, 3-in-1-inc, sc, ch1, turn (14)
Row 3-4: 14sc, ch1, turn (14)
Row 5: 2sc, 3-in-1-inc, 8sc, 3-in-1-inc, 2sc, ch1, turn (18)
Row 6-7: 18sc, ch1, turn (18)
- Make 2.
The shaping of the covers is done while sewing them on.
Cannons
In black
Rnd 1: 6sc in mr (6)
change color to grey
Rnd 2: inc x 6 (12)
Rnd 3: in BLO, sc around (12)
Rnd 4-8: sc around (12)
Stuff.
Rnd 9: (dec, sc) x 4 (8)
Rnd 10-11: sc around (8)
Rnd 12: (inc, sc) x 4 (12)
Rnd 13-19: sc around (12)
Stuff the rest of the piece.
Fold the piece and make 6 sc through both layers. FO with tail for sewing.
Make 2
Head
In blue
Rnd 1: 6sc in mr (6)
Rnd 2: inc x 6 (12)
Rnd 3: (3sc, 3inc) x 2 (18)
Rnd 4: (4sc, inc, 2sc, inc, sc) x 2 (22)
Rnd 5: (7sc, inc, 3sc) x 2 (24)
Rnd 6-7: sc around (24)
Rnd 8: 10sc, inc, sc, 4inc, sc, inc, 6sc (30)
Rnd 9: 13sc, inc, 6sc, inc, 9sc (32)
Rnd 10: sc around (32)
Rnd 11: inc, 4sc, inc, 26sc (34)
Rnd 12-17: sc around (34)
Rnd 18: 12sc, dec, 6sc, dec, 2sc, dec, 6sc, dec (30)
Rnd 19: (3sc, dec) x 6 (24)
Rnd 20: (sc, dec, sc) x 6 (18)
Rnd 21: (sc, dec) x 6 (12)
Rnd 22: dec x 6 (6)
FO.
Chin patch
In beige
This piece is made in rows going back and forth. Be sure to (ch 1, turn) between rows. To make sure the piece looks good, don’t use invisible decreases, instead use the sc2tog method for decreases.
Chain 17. Work starts in the 2nd chain from the hook.
Row 1: 16sc (16)
Row 2: 2ss, ch1, 12sc (row ends short!)
Row 3: dec, 8sc, dec (10)
Row 4-5: 10sc (10)
Row 6: dec, 6sc, dec (8)
Row 7-8: 8sc (8)
Row 9: dec, 4sc, dec (6)
Row 10: dec, 2sc, dec (4)
continue and sc around the entire piece to give it a nice edge. Make approximately 1 sc pr row. Be sure to add an increase around the corners of the mouth around row 1.
Ears
In blue
The ears are made in rows and formed when sewing them on.
Row 1: 3sc in mr, ch1, turn (3)
Row 2: inc, sc, inc, ch1, turn (5)
Row 3: inc, 3sc, inc (7)
Add an extra sc in the corner and sc along the edge where the rows turned and FO leaving tail for sewing. Fold the ear. Row 3 is the part that is sewed onto the head in a triangular shape.
Make 2.
Eyes
In white
Chain 5, start in 2nd chain from hook.
Row 1: ss, sc, hdc, dc.
Make 2.
Tail
In blue
Rnd 1: 4sc in mr (4)
Rnd 2: (sc, inc) x 2 (6)
Rnd 3: (sc, inc, sc) x 2 (8)
Rnd 4: (3sc, inc) x 2 (10)
Rnd 5: (2sc, inc, 2sc) x 2 (12)
Rnd 6: (5sc, inc) x 2 (14)
Rnd 7: (3sc, inc, 3sc) x 2 (16)
Rnd 8: (7sc, inc) x 2 (18)
Rnd 9: 3sc, (2sc, inc, 3sc) x 2, 3sc (20)
Rnd 10: 3sc, (3sc, inc, 3sc) x 2, 3sc (22)
Rnd 11: 3sc, (4sc, inc, 3sc) x 2, 3sc (24)
ss and FO. Stuff before sewing on the tail.
Arms
In blue
Rnd 1: 6sc in mr (6)
Rnd 2: inc x 6 (12)
Rnd 3-6: sc around (12)
Rnd 7: in BLO, 3sc, (sc, inc, sc) x 3 (15)
Rnd 8: sc around (15)
Rnd 9: inc, 6sc, dec, 6sc (15)
Rnd 10: sc around (15)
Rnd 11: inc, 6sc, dec, 6sc (15)
Rnd 12: in BLO, 4sc, (sc, inc, sc) x 3, 2sc (18)
Rnd 13: sc around (18)
Rnd 14-15: inc, 8sc, dec, 7sc (18)
Rnd 16: sc around (18)
Stuff firmly.
Rnd 17: (sc, dec) x 6 (12)
Rnd 18: dec x 6 (6)
FO leaving tail for sewing. Make 2.
Claws for arms
In white
Rnd 1: 3sc in mr (make the stitches very loose) (3)
Rnd 2: sc around (3)
ss and FO. Make 6 claws in total – 3 for each hand.
Straps around arms
In white
Blastoise has small white straps from his shell that goes around his arms (like a backpack). I recommend you make these straps after having assembled some of Blastoise, but before attaching the arms. Pin the arm in place, test if your chain is long enough to go around the arm, if it is, continue with the pattern. If the chain doesn’t reach fully, extend the strap to make it reach – to extend it, simply start with a few extra chains.
Chain 17. Start work in 3rd chain from the hook.
Row 1: 15 hdc (15)
FO with tail for sewing. Make 2.
Legs
In blue
Rnd 1: 8sc in mr (8)
Rnd 2: inc x 8 (16)
Rnd 3: (inc, sc) x 8 (24)
Rnd 4: in BLO, sc around (24)
Rnd 5: sc around (24)
Rnd 6: 6sc, inc, 4sc, inc, 5sc, inc, 6sc (27)
Rnd 7: sc around (27)
Rnd 8: sc, dec, 8sc, inc, 2sc, inc, 9sc, dec, sc (27)
Rnd 9-10: sc around (27)
Rnd 11: sc, inc, 8sc, dec, 2sc, dec, 9sc, inc, sc (27)
Rnd 12-13: sc around (27)
Rnd 14: 6sc, dec, 4sc, dec, 5sc, dec, 6sc (24)
Rnd 15: (sc, dec, sc) x 6 (18)
stuff firmly.
Rnd 16: (dec, sc) x 6 (12)
Rnd 17: dec x 6 (6)
FO leaving tail for sewing. Make 2.
Knee patch
In blue
Rnd 1: 6 sc in mr (6)
Rnd 2: inc x 6 (12)
Rnd 3: (sc, inc) x 6 (18)
Rnd 4: (sc, inc, sc) x 6 (24)
Rnd 5: (3sc, inc) x 6 (30)
ss and FO leaving tail for sewing. Make 2.
Big claw for feet
In white
Rnd 1: 4sc in mr (4)
Rnd 2: (inc, sc) x 2 (6)
Rnd 3: (sc, inc, sc) x 2 (8)
Rnd 4: sc around (8)
ss and FO leaving tail for sewing. Make 2, one for each foot.
Small claw for feet
In white
Rnd 1: 4sc in mr (4)
Rnd 2: (inc, sc) x 2 (6)
Rnd 3: sc around (6)
ss and FO leaving tail for sewing. Make 6, 3 for each foot.
Assembly of your crochet Blastoise
I always recommend pinning the pieces together first to get the best idea of how the result will look. Use the following as a guide, and adjust if needed!
Start by attaching the chin patch to the head. The top of the head is where you made the increases in rounds 8-9. Attach the chin on the bottom of the head, starting with the smaller end at round 5 of the head. Be sure the piece is centered.
The head can now be placed on the body. Be aware that the body will stand at an angle. Towards the back of the head, the last round of the head should be right above the edge of the body. The body attaches in the front at about the 2nd row of the chin patch.
Attach the tail in the middle of the back between rounds 4-10.
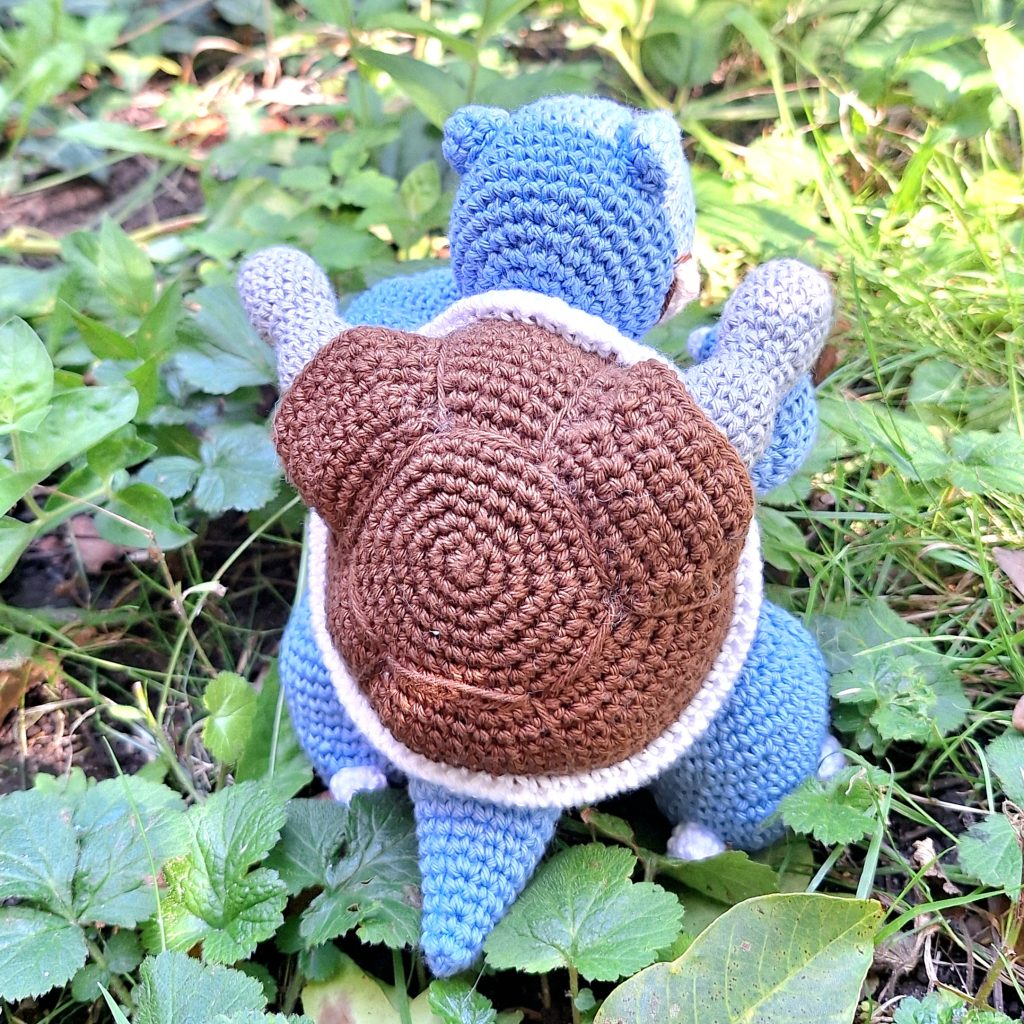
Now the shell can be attached. The widest part of the shell goes to either side. Be sure to angle the shell so the hexagon formed by the remaining loops sits correctly (flat edged going directly toward the head and tail). The top of the shell just covers the last round of the head, so you will cover up the part where you FO the head. The bottom of the shell will sit on top of round 10 of the tail. Stretch the shell towards the sides to make it a bit wider. Stuff the shell before sewing it shut.
The arms go on between rounds 22-29 of the body. Be sure to attach the claws to the arms before sewing them on. The claws go on in a triangular formation around the starting mr. Attach the strap around the arms afterward (Read instructions on these pieces first to ensure the correct fit for your Blastoise!)
Next attach the knee covers to the feet. The front of the legs has a slight curve outward, attach the knee patches to the front. The patches sit over rounds 7-15 of the legs. Also attach the claws. The big claw sits in the middle in the front. 2 smaller ones sit on either side with about 1 sc in between, and the last small claw sits in the back of the foot. All claws sit right above where the edge of the front loops from round 3. Finally attach the legs between rounds 7-13 of the body. Adjust if needed to make your Blastoise stand.
Attach the back (smaller side) of the cannon covers along the edge of unused loops of round 8 of the shell. Use the edge on either side of the, leaving 1 “edge” of the hexagon between the patches. To ensure the covers have the correct shape, align the sides of the cover to be close to parallel. This will lift the remaining cover over the shell to make room for the cannons. To make attaching the cannons a bit easier, attach the back and 1 side of the cover, then attach the cannon inside, and lastly attach the other side of the cover. If needed sew the cover to the cannon at the top for stability. Photo of the shell can be found at the top of this page.
Attach the cannon inside the cannon cover towards the back. Be sure to get the correct angle when sewing them on.
Fold the ears and attach them at round 11-14. The corner of the eye starts between rounds 5-6 and ends between rounds 9-10 of the head. Be sure the angle of the eyes are the same before sewing them.
Add nostrils, eyebrows and pupils in black. Add lines in the shell with brown (my lines are at rounds 9, 16 and 23 of the body, but be sure your lines fit with the placement of the limbs on your Blastoise – it may differ a bit) and embroider around the chin patch for more definition. Embroider extra lines along the shell. Use the hexagon shape from the remaining loops and make lines from that to the edge of the shell.