
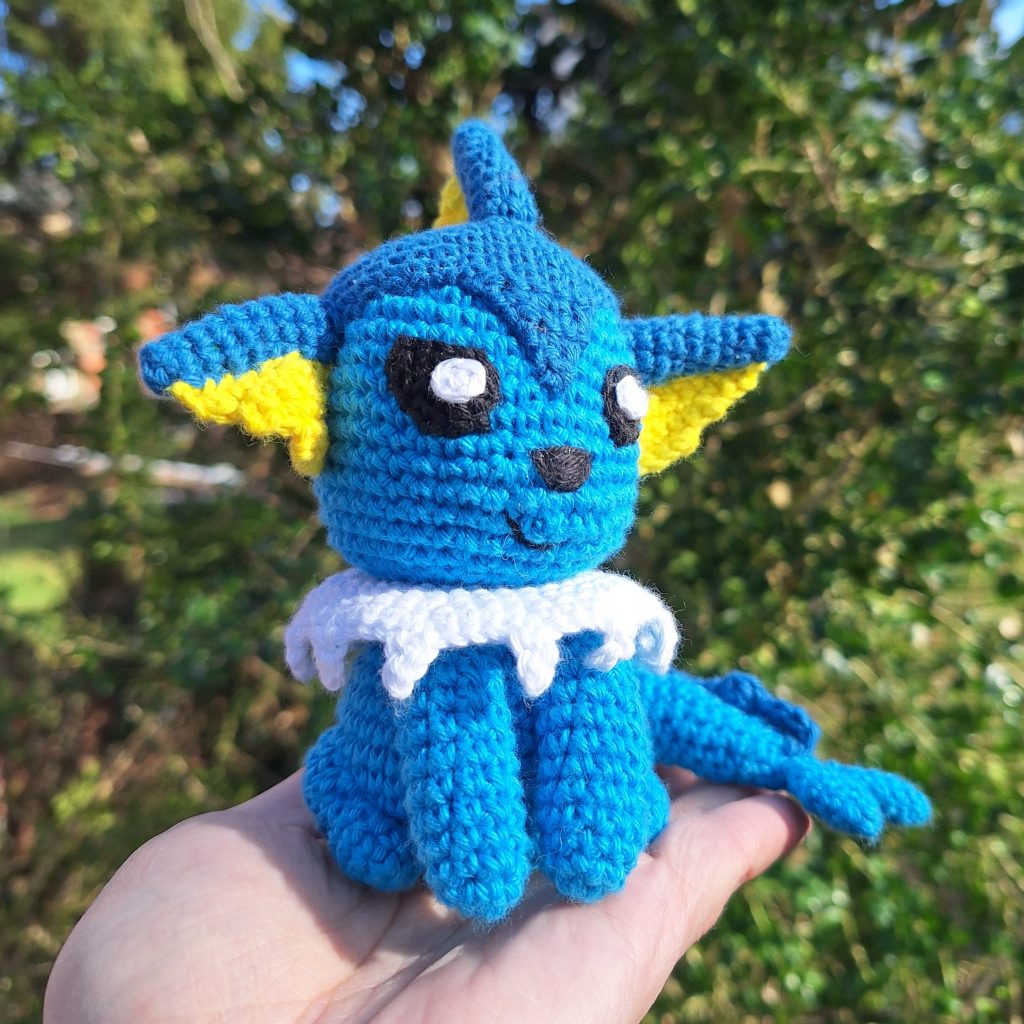
Here at Loops by Kat I present the adorable Vaporeon crochet pattern! Vaporeon’s combination of stunning beauty, formidable strength, and unwavering loyalty has earned it a special place in the hearts of Pokémon enthusiasts. Whether admired for its elegance, relied upon for its battling prowess, or cherished for its companionship, Vaporeon continues to captivate fans with its enchanting presence and aquatic grace.
This pattern is perfect for creating a cuddly and charming Vaporeon amigurumi. This is not, however, a beginner friendly crochet pattern. It includes many pieces and some more difficult techniques. But if you have made other amigurumi before and feel comfortable you can for sure create your own crochet Vaporeon and add to you collection of Eeveelutions!
Get ready to crochet, create, and cherish your handmade Vaporeon masterpiece. Let’s embark on a journey of imagination and craftsmanship – your next Pokémon crochet project awaits!
Supplies you'll need to crochet Vaporeon
General supplies:
- Crochet hook 2,5 mm, I always use clover amour hooks for my projects!
- Sewing needle
- Stuffing
- Stitch marker
With Amigurumi you guage doesn’t matter much. Using smaller hook and yarn will make you finished Vaporeon smaller, and bigger hook and yarn will make him bigger. Just make sure that your yarn and hook fits together and makes a tight fabric so the stuffing won’t show through!
Vaporeon is about 15 cm/6 inches tall
I reccomend Hobbii Rainbow cotton 8/4. This yarn is a 100% cotton and very nice to work with! With this yarn, I use a 2,5 mm hook (or a B-1 or C-2 should work too!). If Rainbow cotton is sold out, I can also recommend Friends cotton from Hobbii as a direct substitute.
- 1 x blue, I recommend Blue (31)
- 1 x dark blue, I recommend Royal Blue (76)
- 1 x white for neck-piece and highlights in eyes
- A bit of yellow for fins
- A bit of black for eyes and facial features
Abbreviations in this crochet pattern
Rnd = round
mr = magic ring
ch = chain
sc = single crochet
hdc = half double crochet
inc = increase, 2 sc in the same stitch
dec = decrease, make 2 stitches into 1. Here the invisible decrease method gives the best result
reg-dec = a regular decrease should be used here. Hook thorugh first stitch, pull up a loop, hook through next stitch, pull up a loop. This leaves 3 stitches on your hook, yarn around hook and pull through.
hdc-inc = 2 hdc in one stitch
ss = slip stitch
FLO = Front Loop Only
FO = Finish Off chain
Vaporeon crochet pattern
Head (in light blue)
Rnd 1: 6 sc in mr (6)
Rnd 2: inc x 6 (12)
Rnd 3: (sc, inc) x 6 (18)
Rnd 4: (sc, inc, sc) x 6 (24)
Rnd 5: (3sc, inc) x 6 (30)
Rnd 6: (2sc, inc, 2 sc) x 6 (36)
Rnd 7: (5sc, inc) x 6 (42)
Rnd 8-13: sc around (42)
Rnd 14: 6sc, 4 inc, 32sc (46)
Rnd 15: sc around (46)
Rnd 16: 8sc, 2 dec, 34sc (44)
Rnd 17: 6sc, dec, 2sc, dec, 32sc (42)
Rnd 18: (5sc, dec) x 6 (36)
Rnd 19: (2sc, dec, 2sc) x 6 (30)
Rnd 20: (3sc, dec) x 6 (24)
Rnd 21: (sc, dec, sc) x 6 (18)
Stuff firmly and continue stuffing as you go.
Rnd 22: (sc, dec) x 6 (12)
Rnd 23: dec x 6 (6)
Cut yarn, close the head and hide tail.
Colored detail for top of head (dark blue)
Rnd 1: 6 sc in mr (6)
Rnd 2: inc x 6 (12)
Rnd 3: (sc, inc) x 6 (18)
Rnd 4: (sc, inc, sc) x 6 (24)
Rnd 5: (3sc, inc) x 6 (30
Rnd 6: (2sc, inc, 2 sc) x 6 (36)
Rnd 7: (5sc, inc) x 6 (42)
Rnd 8-10: sc around (42)
ss, pull yarn through and FO.
On the opposite side of the piece, connect dark blue yarn to create the point for the front. This part is worked in rows.
Row 1: 6 sc, ch1, turn
Row 2: 4sc, reg-dec, ch1, turn
Row 3: 3 sc, reg-dec, ch1, turn
Row 4: 2 sc, reg-dec, ch1, turn
Row 5: sc, reg-dec, ch1, turn
Row 6: reg-dec, pull yarn through and leave a long tail for sewing.
Horns (in dark blue)
Rnd 1: 6 sc in mr (6)
Rnd 2-4: sc around (6)
Rnd 5: inc, 5sc (7)
Rnd 6-7: sc around (7)
Rnd 8: inc, 6sc (8)
Rnd 9-10: sc around (8)
Make 3 horns and leave a tail for sewing on each.
Fins for side-horns (in yellow)
These are made crocheted back and forth.
For the first row, the no-foundation-chain sc method is used. Alternatively, ch 8 and sc across from 2nd chain from hook (7 stitches) and continue to row 2.
Row 1: 7 foundation-chain sc, ch1, turn
Row 2: 6sc, turn (no chain!)
Row 3: ss in first st, 5sc, ch1, turn
Row 4: 4sc, turn (no chain!)
Row 5: ss in first st, 3 sc, pull yarn through and FO.
Make 2 and sew them to the horn with flat side towards the hole of the horn. Leave the yellow tail to attach the side of the fin to the head.
Fin for top-horn (in yellow)
The piece is made in rows.
For the first row, the no-foundation-chain sc method is used. Alternatively, ch 8 and sc across from 2nd chain from hook (7 stitches) and continue to row 2.
Row 1: 7 foundation-chain sc, ch1, turn
Row 2: ss in first st, 5sc, turn
Row 3: ss, 4sc, turn
Row 4: ss, 3sc, turn
Row 5: ss, sc, ss, pull yarn through and FO.
Sew the fin to the remaining horn with row 1 going towards the horn. This horn is supposed to lean a little backwards and not stand straight up. Leave the yellow tail to attach the side of the fin to the head.
Body (in light blue)
Rnd 1: 6 sc in mr (6)
Rnd 2: inc x 6 (12)
Rnd 3: (sc, inc) x 6 (18)
Rnd 4: (sc, inc, sc) x 6 (24)
Rnd 5: (3sc, inc) x 6 (30)
Rnd 6: sc around (30)
Rnd 7: (2sc, inc, 2sc) x 6 (36)
Rnd 8-12: sc around (36)
Rnd 13: (5sc, dec, 5sc) x 3 (33)
Rnd 14: (9sc, dec) x 3 (30)
Rnd 15: (4sc, dec, 4sc) x 3 (27)
Rnd 16: sc around (27)
Rnd 17: (7sc, dec) x 3 (24)
Ss and finish off with a long tail for sewing.
The white collar is crocheted onto the body in front loops only. I continued around the body in the same direction, this will leave the “wrong”-side of the stitches exposed and give another texture.
Connect the white yarn in FLO away from where you finished with the blue yarn.
Rnd 1: (in FLO) (3sc, inc) x 6 (30)
Rnd 2: (2sc, inc, 2sc) x 6 (36)
Rnd 3: (5sc, inc) x 6 (42)
Rnd 4: (3sc, inc, 3sc) x 6 (48)
The next round will be forming the spikes.
A spike is formed by doing the following: sc, ch3, ss in 2nd chain, sc in next ch, sc in base stitch. Both the first and last sc is in the same base-stitch. This will be noted as “spike-stitch”.
Rnd 5: (“spike-stitch”, 3sc) x 11, “spike-stitch”, ss, FO. (12 spikes around the collar)
Front leg (in light blue)
Rnd 1: 6 sc in mr (6)
Rnd 2: (inc, 2sc) x 2 (8)
Rnd 3: (3sc, inc) x 2 (10)
Rnd 4-12: sc around (10)
Stuff the leg firmly at the bottom and light at the top. Flatten the piece and crochet 5 sc through both layers to close the piece. Leave tail for sewing.
Make 2.
Thighs (in light blue)
Rnd 1: 6 sc in mr (6)
Rnd 2: inc x 6 (12)
Rnd 3: (sc, inc) x 6 (18)
Rnd 4: sc around (18), ss and FO leaving tail for sewing.
Make 2
Back feet (in light blue)
Rnd 1: 6 sc in mr (6)
Rnd 2: (inc, 2 sc) x 2 (8)
Rnd 3-4: sc around (8), ss and FO leaving tail for sewing.
Fins for tail (in light blue)
Rnd 1: 4 sc in mr (4)
Rnd 2: (sc, inc) x 2 (6)
Rnd 3: (2sc, inc) x 2 (8)
Rnd 4: (3sc, inc) x 2 (10)
Rnd 5: (3sc, dec) x 2 (8)
Rnd 6: (2sc, dec) x 2 (6)
Rnd 7: 2 sc, ss, FO leaving tail for sewing
Make 2
Tail (in light blue)
As the tail curves, there will be unusual inc and dec in the following part.
Rnd 1: 4 sc in mr (4)
Rnd 2: (sc, inc) x 2 (6)
Rnd 3: 2sc, dec, sc, inc (6)
Rnd 4: 4sc, 2 inc (8)
Rnd 5: 2sc, dec, sc, hdc, hdc-inc, hdc (8)
Rnd 6: sc, dec, 2sc, 3 hdc-inc (10)
Rnd 7: sc, dec, 3sc, hdc, hdc-inc, hdc, sc (10)
Rnd 8: sc, dec, 3sc, 3 hdc-inc, sc (12)
Rnd 9: sc, dec, 4sc, hdc, hdc-inc, hdc, 2sc (12)
Rnd 10: dec, 4sc, 3 hdc-inc, 3 sc (14)
Rnd 11: dec, 5sc, hdc, hdc-inc, hdc, 4sc (14)
Rnd 12: dec, 5sc, 3hdc-inc, 4sc (16)
Rnd 13: dec, 5sc, hdc, hdc-inc, hdc (16)
We’re now moving the starting point.
The last stich of the round is the last hdc you made.
Rnd 14: 5sc, dec, 6sc, 3 hdc-inc (18)
Rnd 15: 5sc, dec, 7sc, hdc, hdc-inc, hdc, sc (18)
Rnd 16: 5sc, dec, 7sc, 3 hdc-inc, sc (20)
Rnd 17: 4sc, dec, 8sc, hdc, hdc-inc, hdc, 3sc (20)
Rnd 18: 4sc, dec, 8sc, 3 hdc-inc, 3sc (22)
Rnd 19: 4sc, dec, 8sc, 2 hdc, hdc-inc, 2 hdc, 3sc (22)
Rnd 20: 3sc, dec, 9sc, 3 hdc-inc, 5sc (24)
Rnd 21: 3sc, dec, 8sc, 2 hdc, hdc-inc, 2 hdc, 6sc (24)
Rnd 22: 3sc, dec, 9sc, 3 hdc-inc, 7sc (26)
Rnd 23: 2sc, 3 inc, 8sc, 3 dec, 6sc, ss, FO leaving tail for sewing
Scales for the back/tail (in dark blue)
Make a ch that fits along the back and tail. The number of chains must be a multiple of 3 + 2 extra stitches. For my Vaporeon I make 41 chains, or 39 chains + 2 extra.
Start by making a sc in the 2nd stitch. To make up the scales repeat the following along the rest of the chain:
(sc, 3 dc in same stitch, sc)
When at the end of the chain, pull yarn through and leave a long tail for sewing.
Eyes (in black)
There are made both a left and a right eye.
Vaporeons left eye:
Rnd 1: 6 sc in mr
Rnd 2: sc, (hdc, ch2, sc in 2nd stitch, hdc in base-stitch) all in one stitch, sc, inc, sc, hdc, pull yarn through and leave tail for sewing.
Vaporeons right eye:
Rnd 1: 6 sc in mr
Rnd 2: hdc, sc, inc, sc, (hdc, ch2, sc in 2nd stitch, hdc in base-stitch) all in one stitch, sc, ss, pull yarn through and leave tail for sewing.
Highlight for both eyes (in white)
Use thinner yarn or split withe yarn in half and use a smaller hook.
Rnd 1: 5 sc in mr, ss and FO.
Sew the highlights to the black part of the eyes. I did this after the black parts were sown onto the head for better placement.