

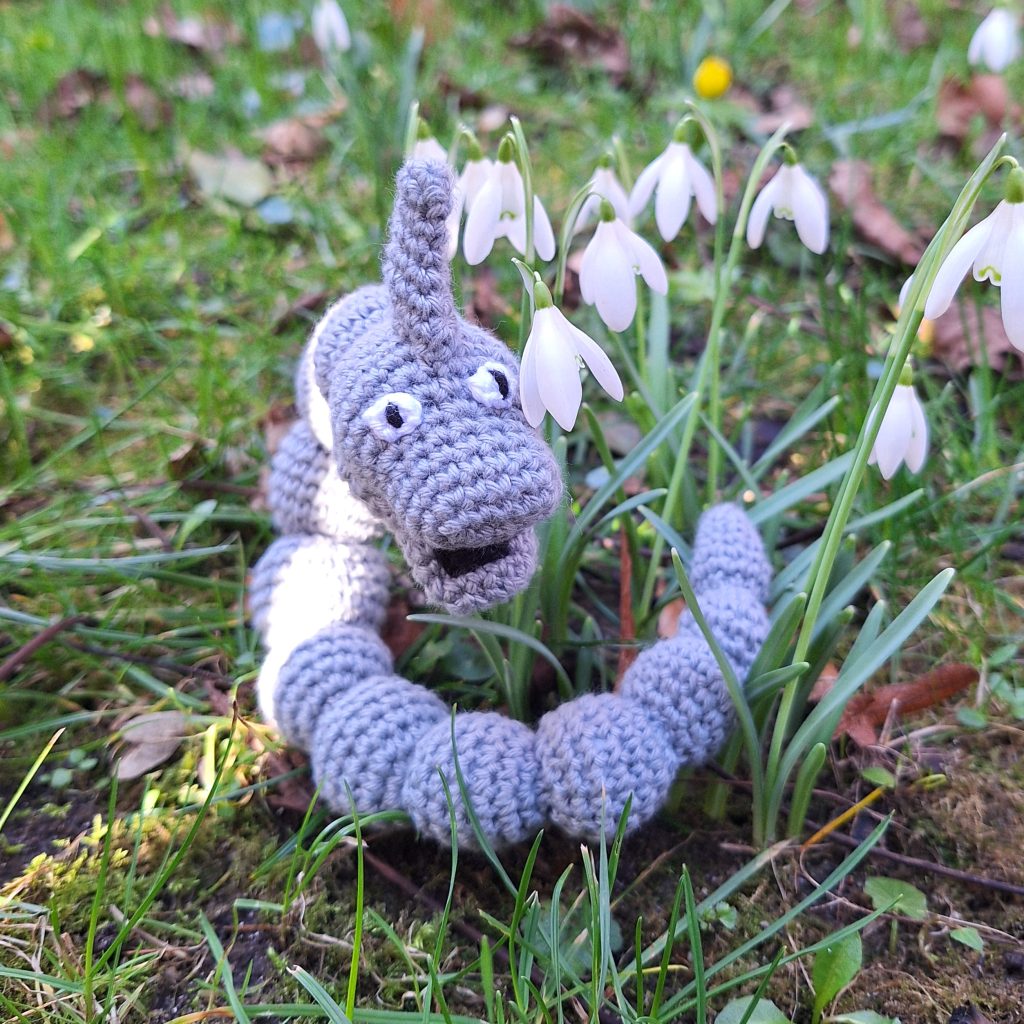
Get ready to embark on an extraordinary crafting journey with our latest pattern – the awe-inspiring Onix crochet pattern! Whether you’re a seasoned crafter or a crochet enthusiast eager for a new challenge, this pattern invites you to bring the majestic Rock Snake Pokémon to life through the art of crochet.
This pattern is very suitable for personal adaptation as each individual rock is crocheted seperately and then connected in the desired pose. This means you can go for whatever position you’d like for your Onix! You might even use wiring to make Onix even more poseable.
Whether you’re a seasoned crocheter or a daring beginner, this pattern invites you to sculpt the mighty Onix from yarn and bring a touch of Pokémon grandeur into your crafting repertoire. Let the adventure begin!
Supplies you'll need to crochet Onix
General supplies:
- Crochet hook 2,5 mm , I always use clover amour hooks for my projects!
- Sewing needle
- Stuffing
- Stitch marker
With Amigurumi you guage doesn’t matter much. Using smaller hook and yarn will make you finished Onix smaller, and bigger hook and yarn will make him bigger. Just make sure that your yarn and hook fits together and makes a tight fabric so the stuffing won’t show through!
For this version, about 10 cm tall, or 4 inches, you will need the following yarn.
I reccomend Hobbii Rainbow cotton 8/4. This yarn is a 100% cotton and very nice to work with! With this yarn, I use a 2,5 mm hook (or a B-1 or C-2 should work too!). If Rainbow cotton is sold out, I can also recommend Friends cotton from Hobbii as a direct substitute.
- 1 x grey, I recommend silver grey (14)
- A bit of black for inside of mouth and pupils
- A bit of white for the eyes
Abbreviations in this crochet pattern
Rnd = round
mr = magic ring
sc = single crochet
inc = increase, 2 sc in the same stitch
dec = decrease, make 2 stitches into 1
3-in-1 dec = a decrease where you make 3 stitches into 1. Use you regular method for dec, but use ad an extra stitch before finishing the stitch
ss = slip stitch
FO = Finish Off chain
Onix crochet pattern
Head
The head is worked in 2 pieces. The top of the head being the main part, and the bottom being the jaw.
Top of head
This piece is worked around a chain. Start by ch 6
Rnd 1: sc in 2nd st, 3sc, 3sc in last stitch, cont. on other side of starting chain, 3sc, inc (12)
Rnd 2: (inc, 3sc, inc, sc) x 2 (16)
Rnd 3-5: sc around (16)
Rnd 6: sc, inc, 2sc, inc, 2sc, inc, 8sc (19)
Rnd 7: sc, inc, 2sc, inc, 2sc, inc, 2sc, inc, 8sc (23)
Rnd 8: 5sc, inc, 4sc, inc, 12sc (25)
Rnd 9-12: sc around (25)
Rnd 13: sc, dec, 3sc, dec, 6sc, dec, 3sc, dec, 4sc (21)
Rnd 14: sc, dec, 2sc, 3-in-1-dec, 3sc, 3-in-1-dec, 2sc, dec, 3sc (15)
Rnd 15: (sc, dec) x 5 (10)
Rnd 16: 4 dec, FO (6)
Bottom of head/jaw
The piece is worked around a chain. Start by ch 5
Rnd 1: sc in 2nd st, 2sc, 3 sc in last st, turn and work on other side of chain, 2 sc, inc (10)
Rnd 2: (4sc, inc) x 2 (12)
Rnd 3: sc around (12)
Rnd 4: (5sc, inc) x 2 (14)
Rnd 5: sc around (14)
Rnd 6: (6sc, inc) x 2 (16)
Rnd 7: (inc, 6sc, inc) x 2 (20)
Rnd 8: (inc, 8sc, inc) x 2 (24)
Rnd 9: (11sc, inc) x 2 (26)
Rnd 10: sc around (26)
Rnd 11: (dec, sc, dec, 3sc, dec, sc, dec) x 2 (18)
Rnd 12: (sc, dec) x 6 (12)
Rnd 13: dec x 6 (6)
Sow the 2 head pieces together to form the head. The starting chain is the front of the face in both pieces.
XL stone (make 2)
Rnd 1: 6sc in mr (6)
Rnd 2: inc x 6 (12)
Rnd 3: (sc, inc) x 6 (18)
Rnd 4: (5sc, inc) x 3 (21)
Rnd 5-8: sc around (21)
Rnd 9 (5sc, dec) x 3 (18)
Rnd 10: (sc, dec) x 6 (12)
Rnd 11: dec x 6 (6)
FO
Large stone (make 2)
Rnd 1: 5sc in mr (5)
Rnd 2: inc x 5 (10)
Rnd 3: (sc, inc) x 5 (15)
Rnd 4: (sc, inc, sc) x 5 (20)
Rnd 5-8: sc around (20)
Rnd 9: (sc, dec, sc) x 5 (15)
Rnd 10: (sc, dec) x 5 (10)
Rnd 11: dec x 5 (5)
FO
Medium stone (make 2)
Rnd 1: 6sc in mr (6)
Rnd 2: inc x 6 (12)
Rnd 3: (sc, inc) x 6 (18)
Rnd 4-7: sc around (18)
Rnd 8: (dec, sc) x 6 (12)
Rnd 9: dec x 6 (6)
Small stone (make 2)
Rnd 1: 5sc in mr (5)
Rnd 2: inc x 5 (10)
Rnd 3: (sc, inc) x 5 (15)
Rnd 4-7: sc around (15)
Rnd 8: (dec, sc) x 5 (10)
Rnd 9: dec x 5 (5)
FO
X-small stone (make 1)
Rnd 1: 6sc in mr (6)
Rnd 2: inc x 6 (12)
Rnd 3: (5sc, inc) x 2 (14)
Rnd 4-6: sc around (14)
Rnd 7: (dec, 5sc) x 2 (12)
Rnd 8: dec x 6 (6)
Xx-small stone (make 1)
Rnd 1: 4sc in mr (4)
Rnd 2: inc x 4 (8)
Rnd 3: (sc, inc) x 4 (12)
Rnd 4-5: sc around (12)
Rnd 6: (dec, sc) x 4 (8)
Rnd 7: dec x 4 (4)
FO
Tail
Rnd 1: 4sc in mr (4)
Rnd 2: (inc, sc) x 2 (6)
Rnd 3: sc around (6)
Rnd 4: (inc, 2sc) x 2 (8)
Rnd 5: sc around (8)
Rnd 6: (inc, 3sc) x 2 (10)
Rnd 7: (2sc, inc, 2sc) x 2 (12)
Rnd 8: sc around (12)
Rnd 9: dec x 6 (6)
FO
Horn
Rnd 1: 4sc in mr (4)
Rnd 2: inc, 3sc (5)
Rnd 3: sc around (5)
Rnd 4: sc, inc, 3sc (6)
Rnd 5: sc around (6)
Rnd 6: sc, inc x 2, 3sc (8)
Rnd 7: 2sc, inc x 2, 4sc (10)
Rnd 8: 4sc, inc, 5sc (11)
FO
Eyes (make 2)
Rnd 1: 3sc in mr (3)
Pull ring closed. This will give you a half-circle. Embroider pupils.
Assembly of your crochet Onix
Start by assembling the head. Sew the jaw piece under the head to form his head. Attach his horn at the top. Next add one rock at the time. I went from largest to smallest, but you can mix up the order if you like that look more. End with the tail piece. Be sure to position the rocks so he will be able to stand on his own in the end. You can also add wire through him to stabilize him.
Add the eyes and embroider the inside of the mouth to make it more dimensional.