
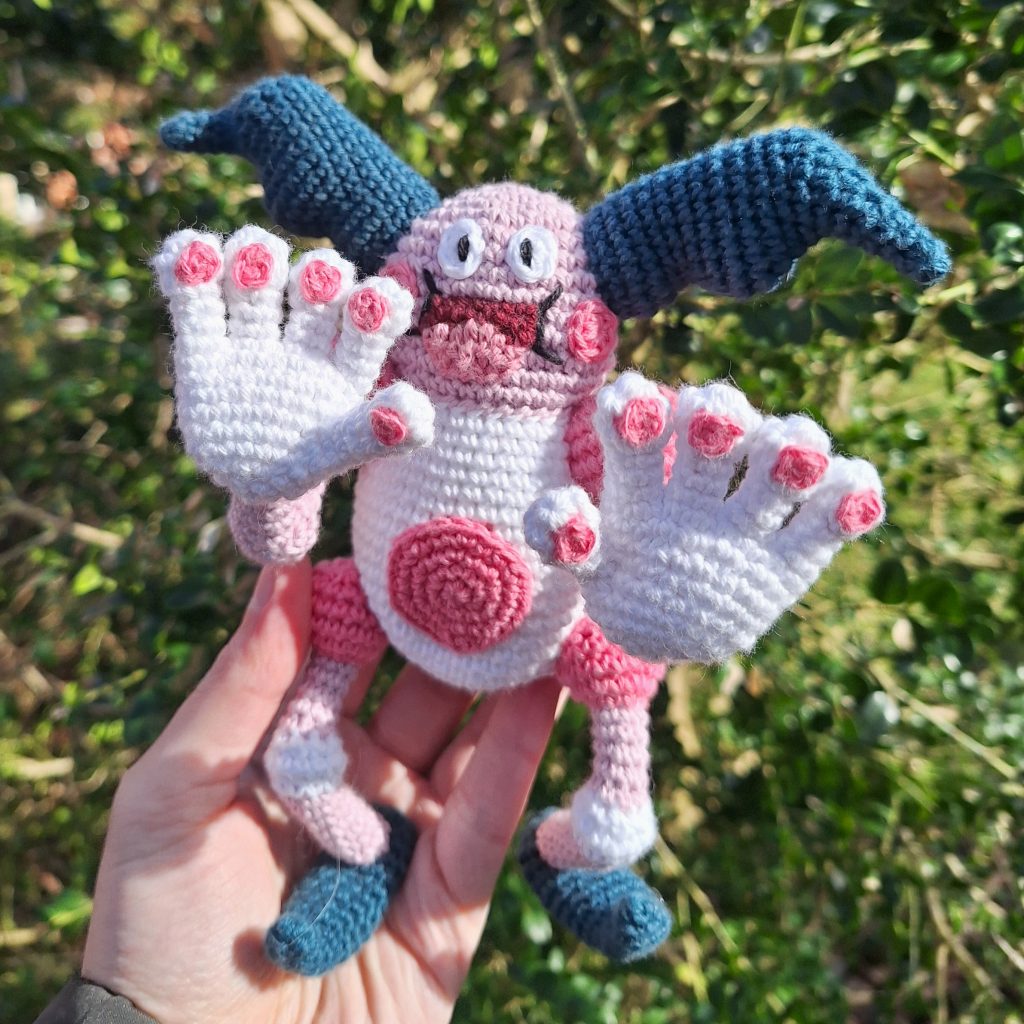
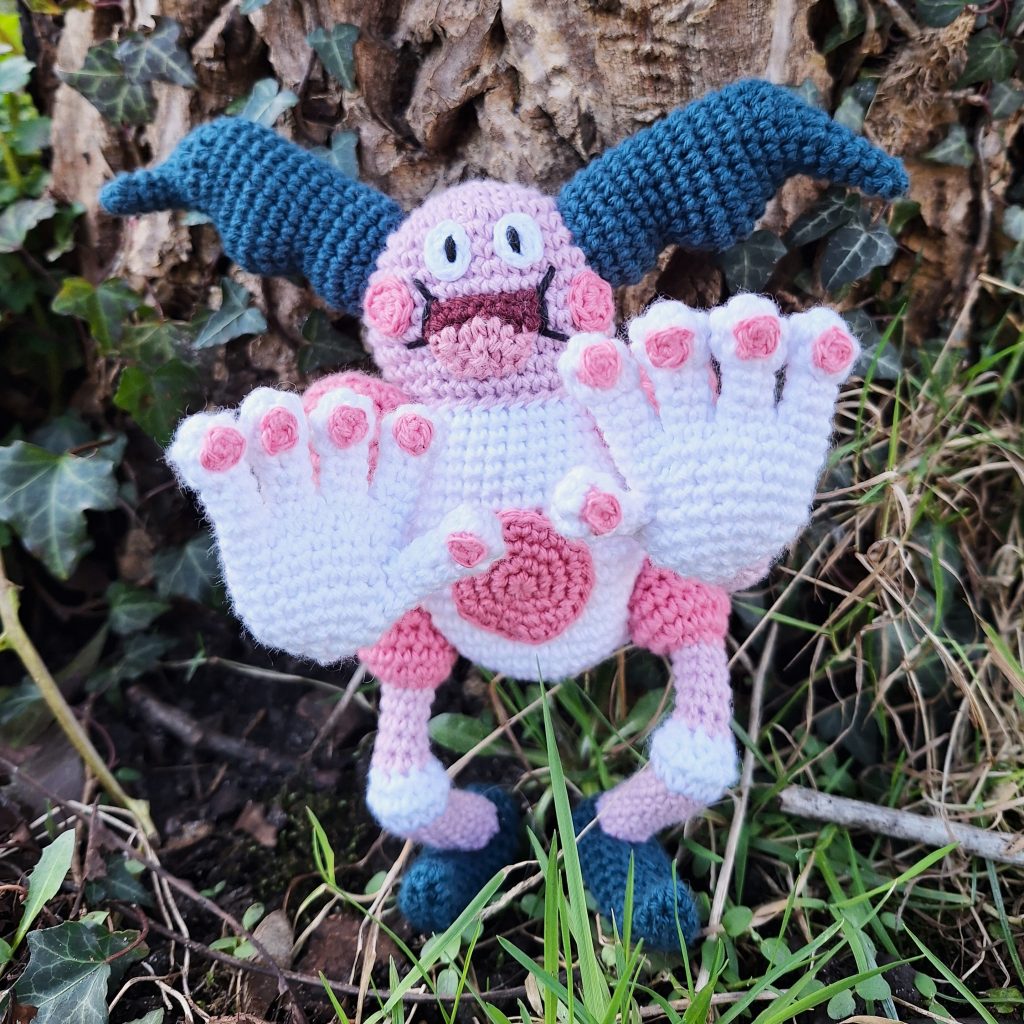
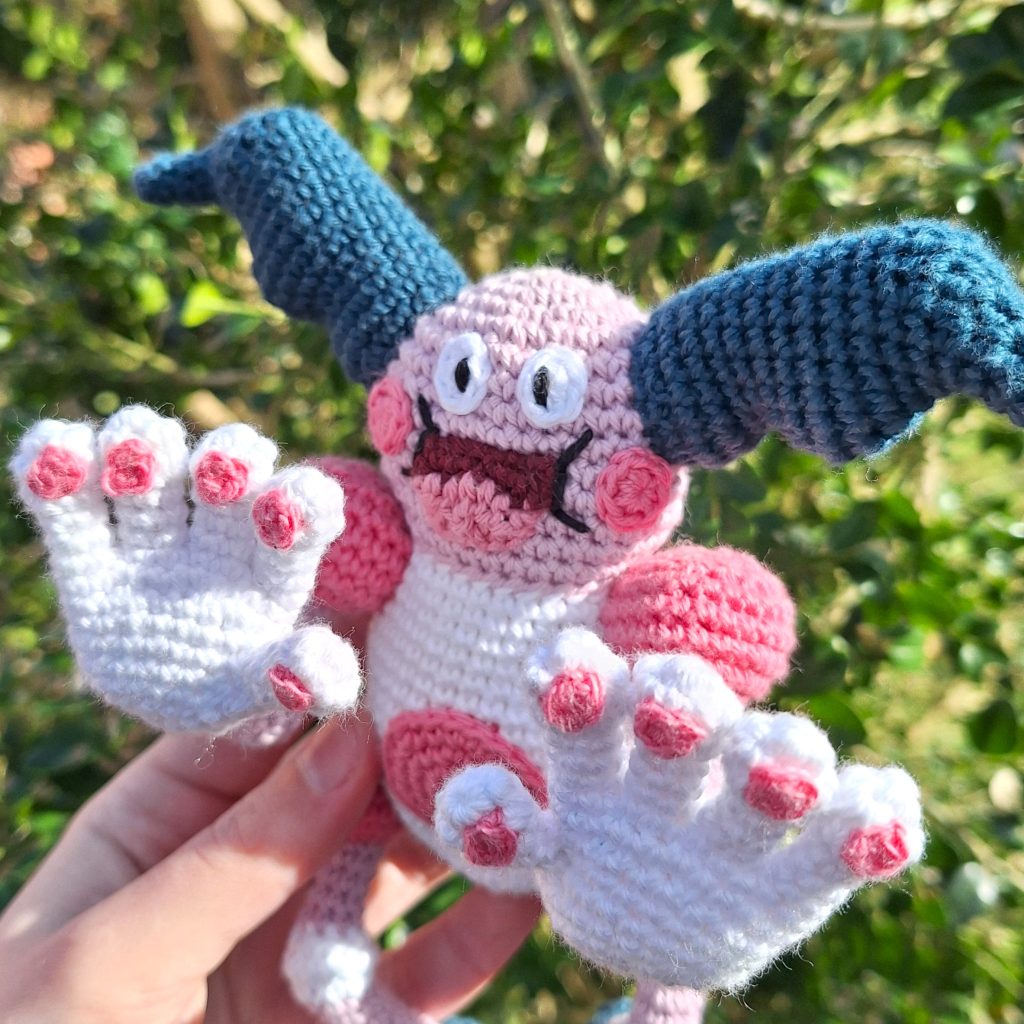
Hey there creative souls! Ready to immerse yourself in a crochet project that’s a delightful blend of details and maybe a little horror? Well, get ready to meet this amigurumi sensation – Mr. Mime crochet pattern! And here’s the exciting news – this crochet pattern is yours for the taking, absolutely free!
The free Mr. Mime crochet pattern is written out below, but beware that this pattern is rather advanced. It is not beginner friendly, but definitely a project that will keep anyone busy.
Picture this: diving deep into intricate stitches, conquering the world of advanced crochet, and creating your very own show-stopping Mr. Mime masterpiece. Whether you’re a seasoned crochet pro or someone seeking a challenge, this free crochet pattern is tailored for those who crave complexity and creativity.
Worried about navigating the intricate steps? Fear not! While this pattern is a bit more advanced, I’ve curated detailed instructions to guide you through every intricate stitch. So, dust off your premium yarn, grab your favorite set of advanced crochet hooks, and let’s embark on this captivating journey into the sophisticated world of Mr. Mime. Get ready to elevate your crochet game and craft a Mr. Mime that will leave everyone in awe!
Supplies you'll need for crochet Mr. Mime
General supplies:
- Crochet hook 2,5 mm, I always use clover amour hooks for my projects!
- Sewing needle
- Stuffing
- Stitch marker
- wiring for the limbs. I used pipecleaners, but any wiring will do.
With Amigurumi you guage doesn’t matter much. Using smaller hook and yarn will make you finished Mr. Mime smaller, and bigger hook and yarn will make him bigger. Just make sure that your yarn and hook fits together and makes a tight fabric so the stuffing won’t show through!
For my version, about 15cm tall, or 6 inches, you will need the following yarn.
I reccomend Hobbii Rainbow cotton 8/4. This yarn is a 100% cotton and very nice to work with! With this yarn, I use a 2,5 mm hook (or a B-1 or C-2 should work too!). If Rainbow cotton is sold out, I can also recommend Friends cotton as a direct substitute.
- 1 x of a light pink shade. I recommend pastel purple (41) or pastel pink (42)
- 1 x darker pink shade. I recommend Light Pink (62)
- 1 x white. I recommend White (01) or Neutral White (02)
- 1 x navy blue. I recommend Navy blue (30) or Prussian Blue (92)
- A bit of a coral type color and dark red for the mouth
- A bit of black or embroidery thread
Abbreviations in this crochet pattern
Rnd = round
mr = magic ring
sc = single crochet
inc = increase, 2 sc in the same stitch
dec = decrease, make 2 stitches into 1
hdc = half double crochet
hdc-inc = increase with hdc, 2 hdc in the same stitch
ss = slip stitch
FO = Finish Off chain
Mr. Mime Crochet Pattern
Hands
In white
The hands are built by first making the fingers and connecting them to continue to form the palm of the hand.
Fingers
Rnd 1: 6sc in mr (6)
Rnd 2: inc x 6 (12)
Rnd 3: dec x 6 (6)
Rnd 4-6: sc around (6)
FO. Make 5, leave the yarn on the last finger.
To connect the fingers, we label each finger with either A, B, C, D and E.
E will be the thumb and the last to be connected. A is the finger with the yarn still attached and where you start the following round.
Rnd 7: 3sc in A, 3sc in B, 3sc in C, 6sc in D, 3sc in remaining st of C, 3sc in remaining st of B, 3sc in remaining st of A (24)
The first 4 fingers are now connected.
Rnd 8: sc around (24)
Rnd 9: (3sc, dec, 2sc, dec, 3sc) x 2 (20)
In the next round the thumb will be attached.
Rnd 10: 8sc, place the thumb against the hand and make 2sc through the thumb and the st of the hand, 10sc in the remaining st of the hand (20 st made)
Rnd 11: 8sc, 4sc in the remaining st of the hand, 10sc as normal (22)
Rnd 12: (9sc, dec) x 2 (20)
Rnd 13: (8sc, dec) x 2 (18)
Rnd 14: (sc, dec) x 6 (12)
Stuff firmly.
Rnd 15: dec x 6 (6)
FO.
Make 2 hands. On the second hand, replace rnd X with “…” to make both a left and right hand.
Spots for fingers
In darkest pink.
Split the yarn in half or use yarn of around half thickness for the spots. You can use a smaller hook if you want, but it’s not necessary.
Rnd 1: 5sc in mr (5)
FO.
Sew a spot to every finger of both hands.
Arms
Start in light pink.
Rnd 1: 8sc in mr (8)
Rnd 2-8: sc around (8)
Rnd 9: (sc, inc) x 4 (12)
Rnd 10: sc around (12)
Rnd 11: (dec, sc) x 4 (8)
Stuff firmly and optionally add wiring/pipe cleaners to the insides of the arm. Wiring will make sure that the arms can hold the weight of the hands when Mr. Mime is standing. It will also allow you to position the arms much better. Make sure the wiring is long enough to extend through the rest of the arm (about 6 rounds extra length).
Rnd 12-16: sc around (8)
Change to the darker pink color.
Rnd 17: inc x 8 (16)
Rnd 18: (sc, inc) x 8 (24)
Rnd 19-22: sc around (24)
Rnd 23: (dec, sc) x 8 (18)
Finish stuffing. Secure the wiring if necessary.
Rnd 24: dec x 8 (8)
FO.
Make 2 arms.
Feet
In dark blue.
Rnd 1: 4sc in mr (4)
Rnd 2: 2sc, inc, sc (5)
Rnd 3: 2sc, inc, 2sc (6)
Rnd 4: 3sc, inc, 2sc (7)
Rnd 5: 3sc, inc, 3sc (8)
Rnd 6: 3sc, 2 x inc, 3sc (10)
Rnd 7: 4sc, 2 x inc, 4sc (12)
Rnd 8: dec, 5sc, inc, 4sc (12)
Rnd 9-16: sc around (12)
Rnd 17: dec x 6
Make a few stitches in the tip of the toe to make the bend more prominent.
Make 2
Legs
Start in light pink.
Rnd 1: 8sc in mr (8)
Rnd 2-9: sc around (8)
Ss and change color to white. Move start to the first white stitch.
Rnd 10: (inc, sc) x 4 (12)
Rnd 11: sc around (12)
Rnd 12: (dec, sc) x 4 (8)
Ss and change back to light pink color. Move start of the round to the first pink stitch.
Stuff and add wiring like in the arms.
Rnd 13-17: sc around (8)
Change color to the dark pink color.
Rnd 18: (sc, inc) x 4 (12)
Rnd 19: (sc, inc) x 6 (18)
Rnd 20-22: sc around (18)
Rnd 23: (sc, dec) x 6 (12)
Finish stuffing. Secure wiring if necessary.
Rnd 24: dec x 6 (6)
FO leaving tail for sewing.


Body
In white.
Rnd 1: 6sc in mr (6)
Rnd 2: inc x 6 (12)
Rnd 3: (sc, inc) x (18)
Rnd 4: 3sc, 3 inc, 6sc, 3 inc, 3sc (24)
Rnd 5: 3sc, (sc, inc) x 3, 6sc, (sc, inc) x 3, 3sc (30)
Rnd 6: 3sc, (sc, inc, sc) x 3, 6sc, (sc, inc, sc) x 3, 3sc (36)
Rnd 7: 9sc, inc, 17sc, inc, 8sc (38)
Rnd 8-15: sc around (38)
Make 1 or 2 additional sc to reach the center of the back again.
Rnd 16: 9sc, dec, 17sc, dec, 8sc (36)
Rnd 17: 8sc, dec, 16sc, dec, 8sc (34)
Rnd 18: 8sc, dec, 15sc, dec, 7sc (32)
Rnd 19: 7sc, dec, 14sc, dec, 7sc (30)
Rnd 20: sc around (30)
FO with tail for sewing.
Belly-patch
In dark pink
Rnd 1: 6sc in mr (6)
Rnd 2: inc x 6 (12)
Rnd 3: (sc, inc) x (18)
Rnd 4: (sc, inc, sc) x 6 (24)
Ss and FO. Leave tail for sewing.
Head
In light pink.
Rnd 1: 6sc in mr (6)
Rnd 2: inc x 6 (12)
Rnd 3: (sc, inc) x (18)
Rnd 4: (sc, inc, sc) x 6 (24)
Rnd 5: (3sc, inc) x 6 (30)
Rnd 6: 3sc, (sc, inc, sc) x 3, 6sc, (sc, inc, sc) x 3, 3sc (36)
Rnd 7-13: sc around (36)
Rnd 14: 6sc, (sc, dec) x 3, 9sc, (sc, dec) x 3, 3sc (30)
Ss and FO.
Horns
In dark blue
Rnd 1: 4sc in mr (4)
Rnd 2: sc around (4)
Rnd 3: 3sc, inc, sc (5)
Rnd 4: 2sc, inc, 2sc (6)
Rnd 5: 2sc, 2hdc, 2sc (6)
Rnd 6: 2sc, 2hdc-inc, 2sc (8)
Rnd 7: 2sc, 4hdc-inc, 2sc (12)
Rnd 8: 3sc, 2hdc, 2hdc-inc, 2hdc, 3sc (14)
Make 8 sc. This moves the beginning of the round, meaning the next stitch is the beginning of round 9.
Rnd 9: 6sc, 2 x inc, 6sc (16)
Rnd 10: 7sc, 2 x inc, 7sc (18)
Rnd 11: 8sc, 2 x inc, 8sc (20)
Rnd 12: sc around (20)
Make 1 additional sc. The beginning of round 13 is in the next stitch.
Rnd 13: 8sc, 2 x dec, 8sc (18)
Rnd 14: 7sc, 2 x dec, 7sc (16)
Rnd 15: 6sc, 2 x dec, 6sc (14)
Rnd 16: 6sc, 3 x inc, 5sc (17)
Rnd 17: 7sc, 3 x inc, 7sc (20)
Rnd 18: sc around (20)
Rnd 19: 4sc, (sc, dec) x 4, 4sc (16)
Make 2.

Face details
I have crocheted all of the pieces to the face, and instructions for these are down below. You can of course use felt or a type of fabric if you wish to do this instead.
Mouth
You need a dark red color and a coral or pinkish color for his tongue.
Start in dark red. Chain 8.
Hdc in 2nd chain from the hook, 5sc, hdc (7)
Change color to the coral/pink in the last loop of the hdc.
ch 1 and turn the work.
sc, 2hdc, dc, 2hdc, sc (7)
ch 1 and turn your work. Now make 7 ss along you work to make a nice edge.
FO.
Cheeks
In the dark pink color.
8 sc in mr.
ss and FO. Make 2 cheeks.
Eyes
In white.
Do the following in a mr. sc, hdc, 2c, hdc, sc.
Pull the magic ring tight and FO. Embroider long pupils in the eye. This might be easier to do when the eyes are attached so you get the placement right.
Make 2
Assembly
Start by attaching the head and body. Both pieces ended with 30 sc, so they can easily be sown together by using one stitch from head and one stitch from the body all around. Stuff firmly before you close up the head-body piece.
Attach the hand to the arms and the feet to the legs.
I recommend pinning all the pieces roughly in shape before you start sewing the rest. This will give you a good idea of where the pieces go and how much space they take up. Be sure to note where the body is widest. The widest part will be seen from the front/back.
Attach the horns between rnd 4-10 on each side of the head.
Attach the arms right below the connection between head and body with them being attached to the body.
The belly piece is attached in the center of the body. Mine is placed between rnd 7-14.
The legs are attached at the sides of the body between rnd 5-9. When placing the legs, try to make the piece balance, this way the finished piece should be able to balance on his own – although he might fall over if a wind hits him!
Lastly pin on the face details and sew them in place. Make sure to add in a bit of black embroidery around the mouth/cheek area to make his face pop!


