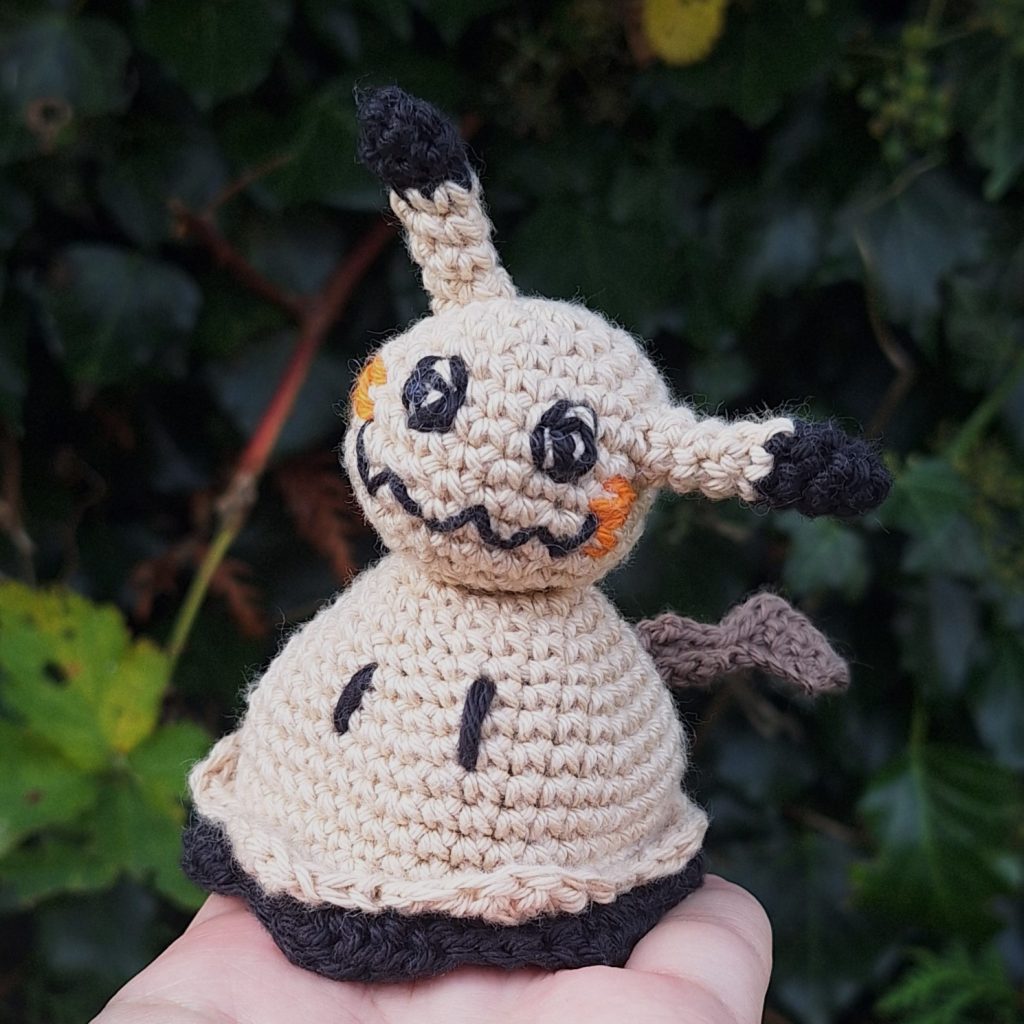
Get ready to crochet the mysterious and lovable Mimikyu! This crochet pattern captures the eerie yet endearing essence of Mimikyu, the Ghost/Fairy-type Pokémon that hides beneath a ragged Pikachu disguise. Known for its hauntingly cute appearance and tragic backstory, Mimikyu is a fan favorite—and now available as a free amigurumi pattern!
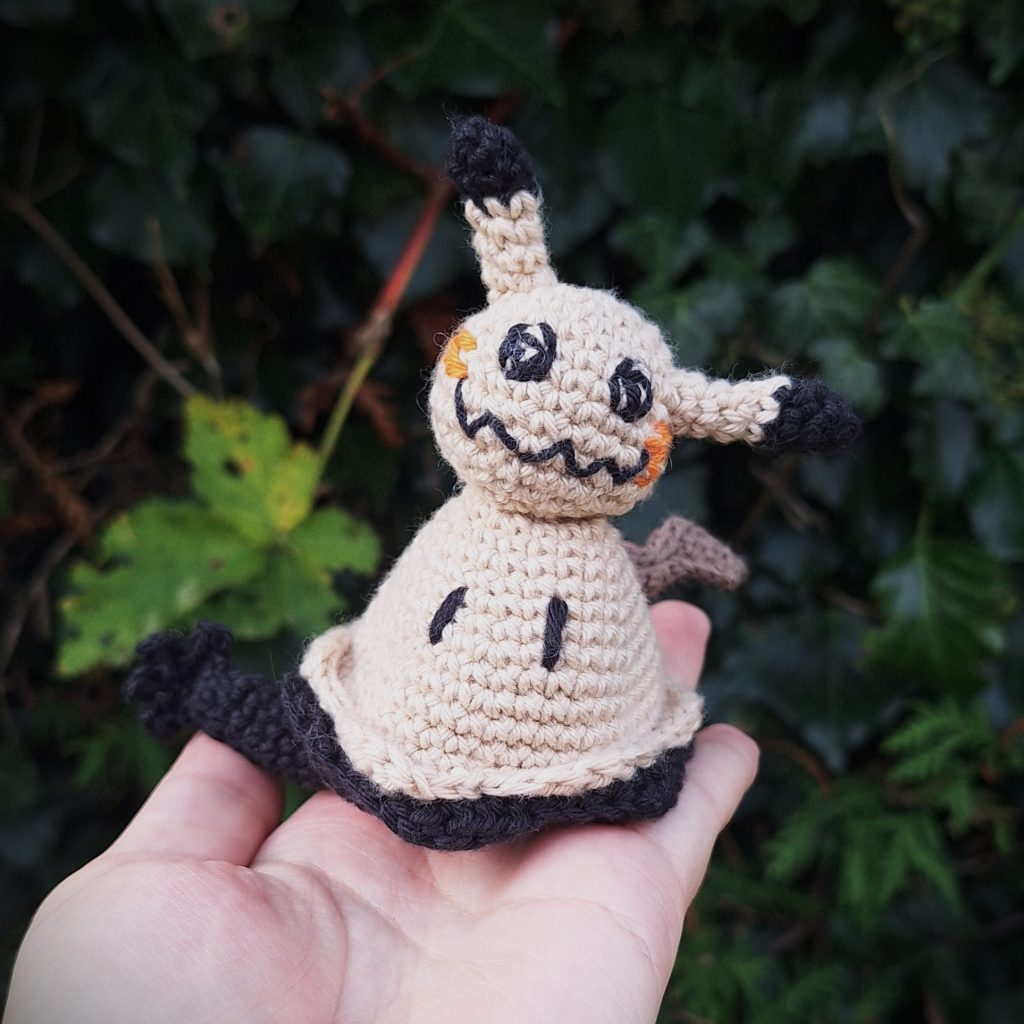
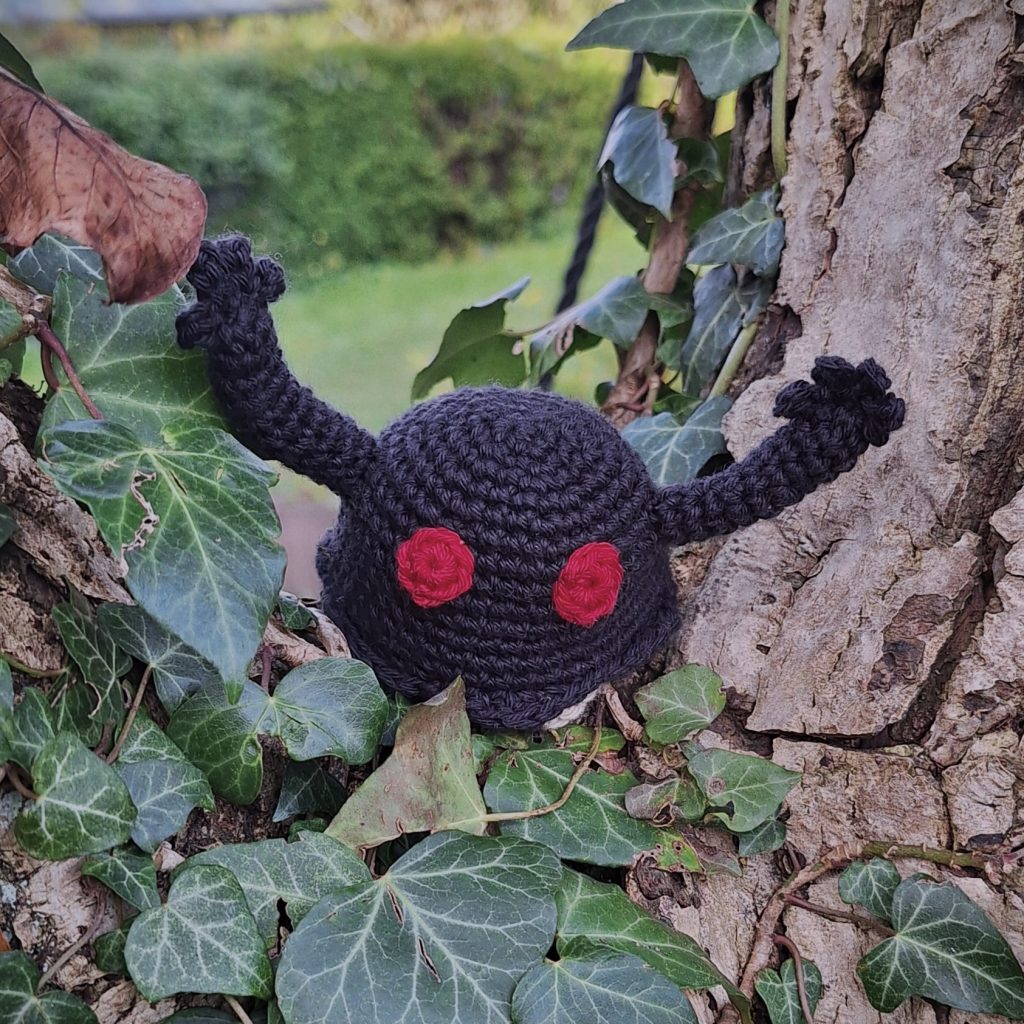
Perfect for crocheters of all skill levels, this pattern includes clear instructions to create Mimikyu’s signature tattered cloak, hand-drawn eyes, and adorable floppy ears. But there’s more! For an added twist, you can make a special flip-able version of Mimikyu to reveal its true, terrifying form beneath the disguise. But beware, Mimikyu’s true form is so terrifying that seeing it can cause severe shock or even harm, so be careful with this dangerous crochet Pokémon!
Despite its spooky nature, Mimikyu is actually shy and lonely, longing for friendship and acceptance. So why not give Mimikyu the company it craves by crafting your own version? Add it to your collection alongside other Pokémon friends, and together they can keep Mimikyu from feeling alone!
Supplies you'll need to crochet Mimikyu
General supplies:
- Crochet hook 2,5 mm, I always use clover amour hooks for my projects!
- Sewing needle
- Stuffing
- Stitch marker
With Amigurumi you guage doesn’t matter much. Using smaller hook and yarn will make you finished Mimikyu smaller, and bigger hook and yarn will make him bigger. Just make sure that your yarn and hook fits together and makes a tight fabric so the stuffing won’t show through!
With the recommended yarn below, Mimikyu will be about 10 cm tall.
I reccomend Hobbii Rainbow cotton 8/4. This yarn is a 100% cotton and very nice to work with! With this yarn, I use a 2,5 mm hook (or a B-1 or C-2 should work too!). If Rainbow cotton is sold out, I can also recommend Friends cotton from Hobbii as a direct substitute.
- Beige
- Black
- A bit of orange for the cheeks
- A bit of red (or purple if you prefer) for the eyes
Abbreviations in this crochet pattern
Rnd = round
mr = magic ring
sc = single crochet
hdc = half double crochet
dc = double crochet
inc = increase, 2 sc in the same stitch
dc-inc = 2 dc in the same stitch
dec = decrease, make 2 stitches into 1
ss = slip stitch
ch = chain
FLO = Front Loop Only
FO = Finish Off
Mimikyu crochet pattern
Main body
In beige
Rnd 1: 6sc in mr (6)
Rnd 2: inc x 6 (12)
Rnd 3: (3sc, inc) x 3 (15)
Rnd 4: (2sc, inc, 2sc) x 3 (18)
Rnd 5: (5sc, inc) x 3 (21)
Rnd 6: (3sc, inc, 3sc) x 3 (24)
Rnd 7: (7sc, inc) x 3 (27)
Rnd 8: (4sc, inc, 4sc) x 3 (30)
Rnd 9: (9sc, inc) x 3 (33)
Rnd 10: (5sc, inc, 5sc) x 3 (36)
Rnd 11: (11sc, inc) x 3 (39)
Rnd 12: (6sc, inc, 6sc) x 3 (42)
Rnd 13-14: sc around (42)
Rnd 15: in FLO, (ss, sc, hdc, dc-inc, hdc, sc, ss) x 6, FO.
Head
In beige
Rnd 1: 6 sc in mr (6)
Rnd 2: inc x 6 (12)
Rnd 3: (sc, inc) x 6 (18)
Rnd 4: (3sc, inc, 4sc, inc) x 2 (22)
Rnd 5: (3sc, inc, 6sc, inc) x 2 (26)
Rnd 6-7: sc around (26)
Rnd 8: (4sc, 2inc) x 2, 14sc (30)
Rnd 9: sc around (30)
Rnd 10: (3sc, dec) x 6 (24)
Rnd 11: (sc, dec, sc) x 6 (18)
Rnd 12: (sc, dec) x 6 (12)
ss and FO. Stuff the piece a bit to keep the shape, but stuff lightly to make the flipping of the piece easier.
Ears
Start in black
Rnd 1: 4sc in mr (4)
Rnd 2: (inc, sc) x 2 (6)
Rnd 3: sc around (6)
Change color to beige in the last stitch of round 3.
Rnd 4: sc around (6)
Rnd 5: inc, sc, dec, 2sc (6)
Rnd 6-7: sc around (6)
ss and FO. Make 2. Don’t stuff.
Tail
In brown
This piece is worked in rows. Start by chaining 3. Always start working in the 2nd chain from your hook. Be aware that not all rows use up all available stitches!
Row 1: 2sc, ch1, turn
Row 2: 2sc, ch3, turn
Row 3: 3sc, ch1, turn
Row 4: 3sc, ch4, turn
Row 5: 4sc, ch1, turn
Row 6: 4sc, ch1, turn
Continue by ss along the edge of the piece until you reach the start of the piece. Then FO with tail for sewing.
Instructions for true-form Mimikyu
If you wish to make a flip-able Mimikyu, continue with the following pieces. If you don’t want your Mimikyu to have two sides, continue to the bottom for the pattern for a flat bottom instead.
Alternate body
In black
This is the black inside of Mimikyu.
Rnd 1: 6 sc in mr (6)
Rnd 2: inc x 6 (12)
Rnd 3: (sc, inc) x 6 (18)
Rnd 4: (sc, inc, sc) x 6 (24)
Rnd 5: (3sc, inc) x 6 (30)
Rnd 6: (2sc, inc, 2sc) x 6 (36)
Rnd 7: (11sc, inc) x 3 (39)
Rnd 8: (6sc, inc, 6sc) x 3 (42)
Rnd 9-14: sc around (42)
Rnd 15: in FLO, (ss, sc, hdc, dc-inc, hdc, sc, ss) x 6, FO.
Arms
In black
Rnd 1: 6sc in mr (6)
Rnd 2: (sc, inc, sc) x 2 (8)
Rnd 3-11: sc around (8)
ss and FO. Make 2.
Fingers
In black
Start by chaining 5, this is your base chain. The work starts in the 2nd chain from the hook.
Row 1: ss, (ch3, ss in 3rd chain from hook, ss in next base chain) x 3, ch3, ss in 3rd chain from hook, ss in the same base st to FO.
Cut the yarn. Make 2 sets of fingers.
Eyes
In red
Rnd 1: 8sc in mr (8)
ss and FO. Make 2.
Non-flipable version (bottom)
Flat bottom for Mimikyu
Only make this piece if you don’t want your piece to be flip-able!
In black
Rnd 1: 6 sc in mr (6)
Rnd 2: inc x 6 (12)
Rnd 3: (sc, inc) x 6 (18)
Rnd 4: (sc, inc, sc) x 6 (24)
Rnd 5: (3sc, inc) x 6 (30)
Rnd 6: (2sc, inc, 2sc) x 6 (36)
Rnd 7: (5sc, inc) x 6 (42)
Rnd 8: in FLO, (ss, sc, hdc, dc-inc, hdc, sc, ss) x 6, FO.
Assembly of your crochet Mimikyu
Start assembling the beige part of Mimikyu. Attach the head onto the top of the body. The opening of the head should cover the magic ring of the body piece.
Next attach the ears to the head. Find the front of the head (between the increases made in round 8 is the front) and attach ears to each side. The ears of Mimikyu tend to slant, so they don’t need to be symmetrical. My first ear is placed on round 2 and the second ear is placed on round 5 of the head.
Attach the tail to the back of your Mimikyu. Add embroidered details for eyes, cheeks and mouth. These are supposed to be scribbled on, so they are also not supposed to be perfect!
The following describes how to assemble the two body pieces but the description works for both the flip-version and the flat bottom version. Remember to stuff if you’re making non-flipable version.
Next we will attach the two body pieces. The pieces should be put wrong sides together. Use the back loops that were left on the last round of both body pieces to sew them together. Make sure the “bumps” are not aligned if you want to see some black at the bottom of your Mimikyu when it’s done. Before sewing the body together completely, try flipping the piece a few times to check if you need to stuff a little or not. If after the flip, the piece is still very crumpled together and doesn’t hold its shape, stuff it a bit and try again. When satisfied, finish sewing together the body pieces.
Next sew the finger pieces onto the black arms. The finger-piece should sit directly on top of the magic ring of the arm and reach down to each side. Stuff the arms and sew them onto the body. My arms are placed on rounds 7-9 of the black body piece but can be placed anywhere on the body.
Lastly place the eyes on the black body piece around round 6-9 with 3-4 stitches apart.