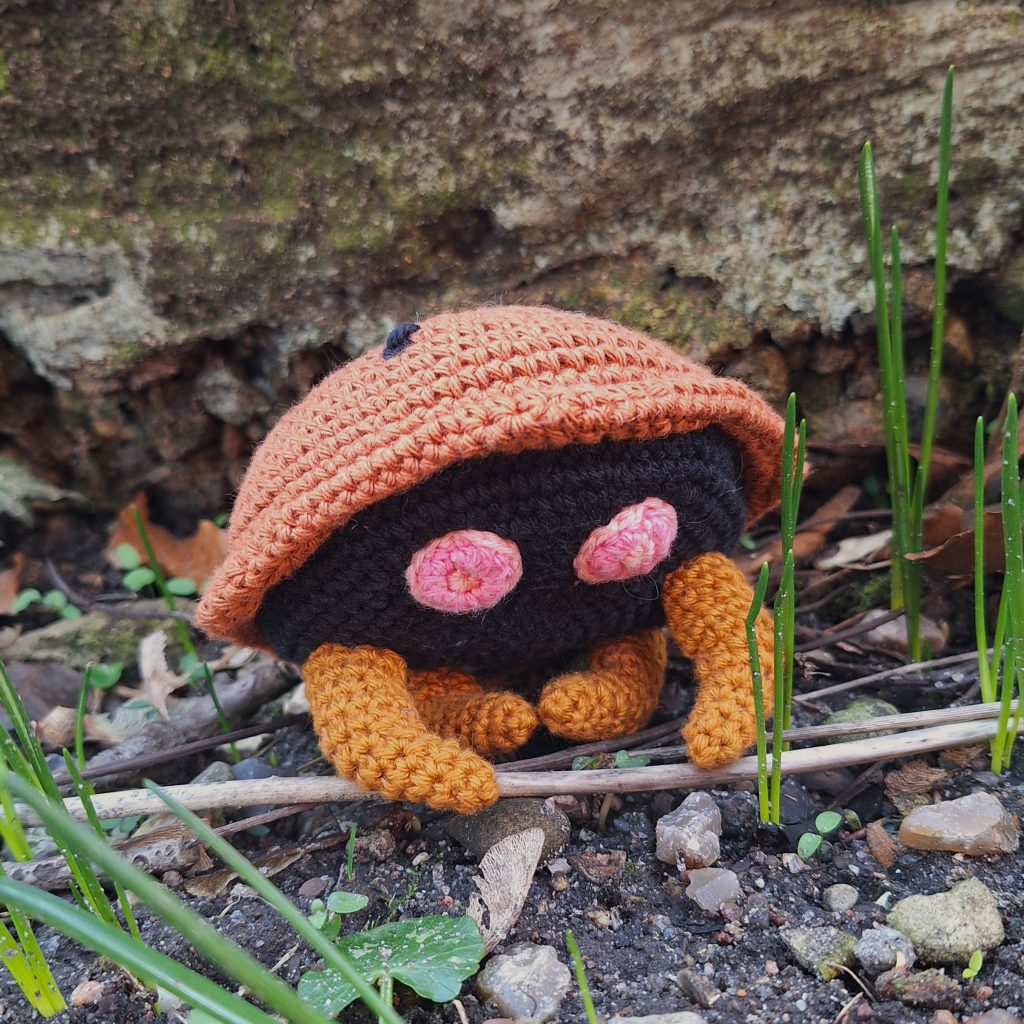
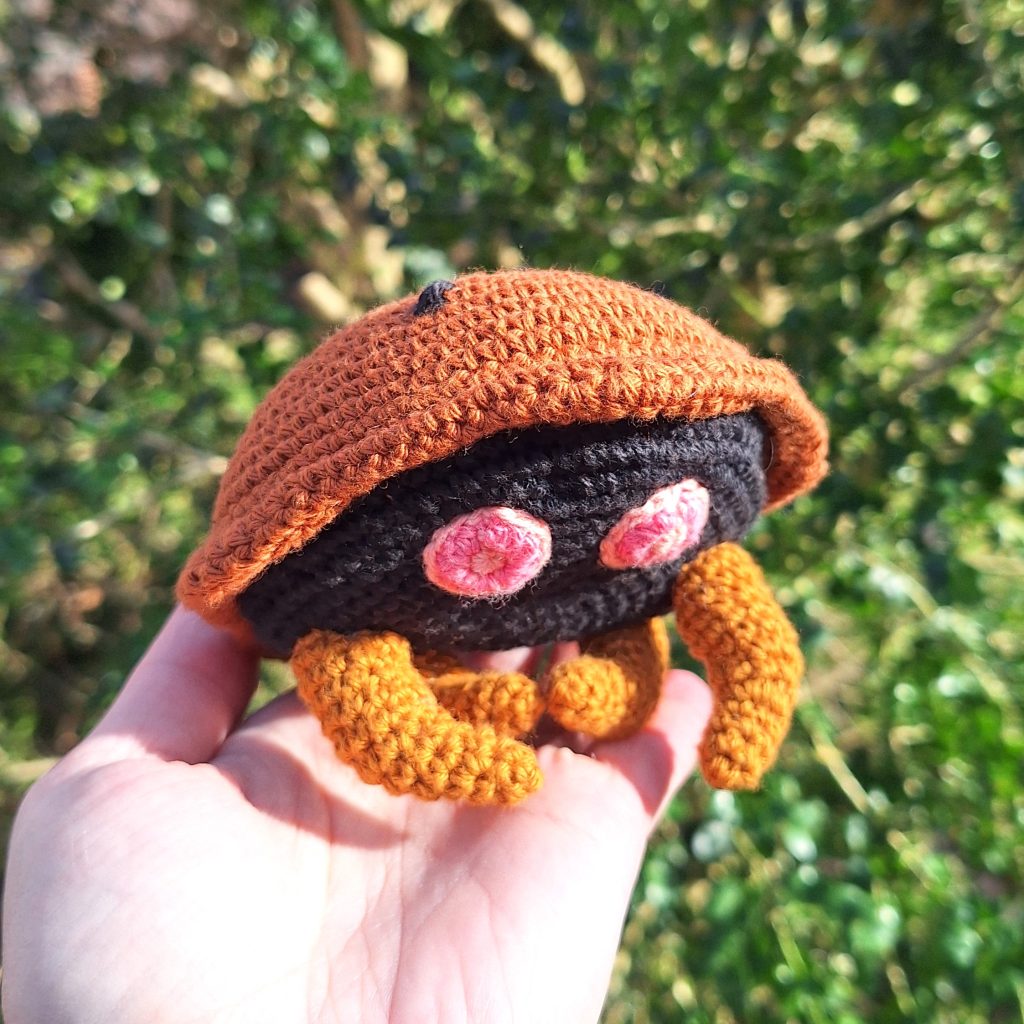
Get ready to embark on a prehistoric adventure with our Kabuto crochet pattern! This crochet pattern brings to life Kabuto, the Rock/Water-type Pokémon known for its ancient shell and fascinating design.
Perfect for crocheters of all skill levels, our Kabuto pattern is crafted to be as straightforward as possible, making it accessible to most crocheters. Clear instructions guide you through each step of the process, ensuring a smooth and satisfying crafting experience.
Crafting Kabuto is a journey back in time as you watch its shell and distinctive features take shape stitch by stitch. The pattern captures Kabuto’s unique appearance, from its sturdy shell to its intricate details.
Whether you’re adding to your Pokémon collection or exploring new crochet projects, our Kabuto amigurumi pattern promises to be a rewarding endeavor. So, grab your crochet hook, brown and black shades of yarn, and set off on a crafting expedition to create your very own crochet Kabuto masterpiece!
Supplies you'll need to crochet Kabuto
General supplies:
- Crochet hook 2,5 mm, I always use clover amour hooks for my projects!
- Sewing needle
- Stuffing
- Stitch marker
With Amigurumi you guage doesn’t matter much. Using smaller hook and yarn will make you finished Piece smaller, and bigger hook and yarn will make him bigger. Just make sure that your yarn and hook fits together and makes a tight fabric so the stuffing won’t show through!
As we want the belly of Kabuto to stay as flat as possible, even with stuffing, a yarn that is firm will give the best result.
Kabuto will be about 15 cm/6 inches wide using the recommended yarn below.
I reccomend Hobbii Rainbow cotton 8/4. This yarn is a 100% cotton and very nice to work with! With this yarn, I use a 2,5 mm hook (or a B-1 or C-2 should work too!). If Rainbow cotton is sold out, I can also recommend Friends cotton from Hobbii as a direct substitute.
- 1 x brown
- 1 x lighter brown
- 1 x black
- a bit of 2 shades of pink for the eyes, one slightly lighter than the other.
Abbreviations in this crochet pattern
Rnd = round
mr = magic ring
sc = single crochet
hdc = half double crochet
dc = double crochet
inc = increase, 2 sc in the same stitch
hdc-inc = half double crochet increase, 2 hdc in 1 stitch
dec = decrease, make 2 stitches into 1
ss = slip stitch
BLO = Back Loop Only
FLO = Front Loop Only
FO = Finish Off
Kabuto crochet pattern
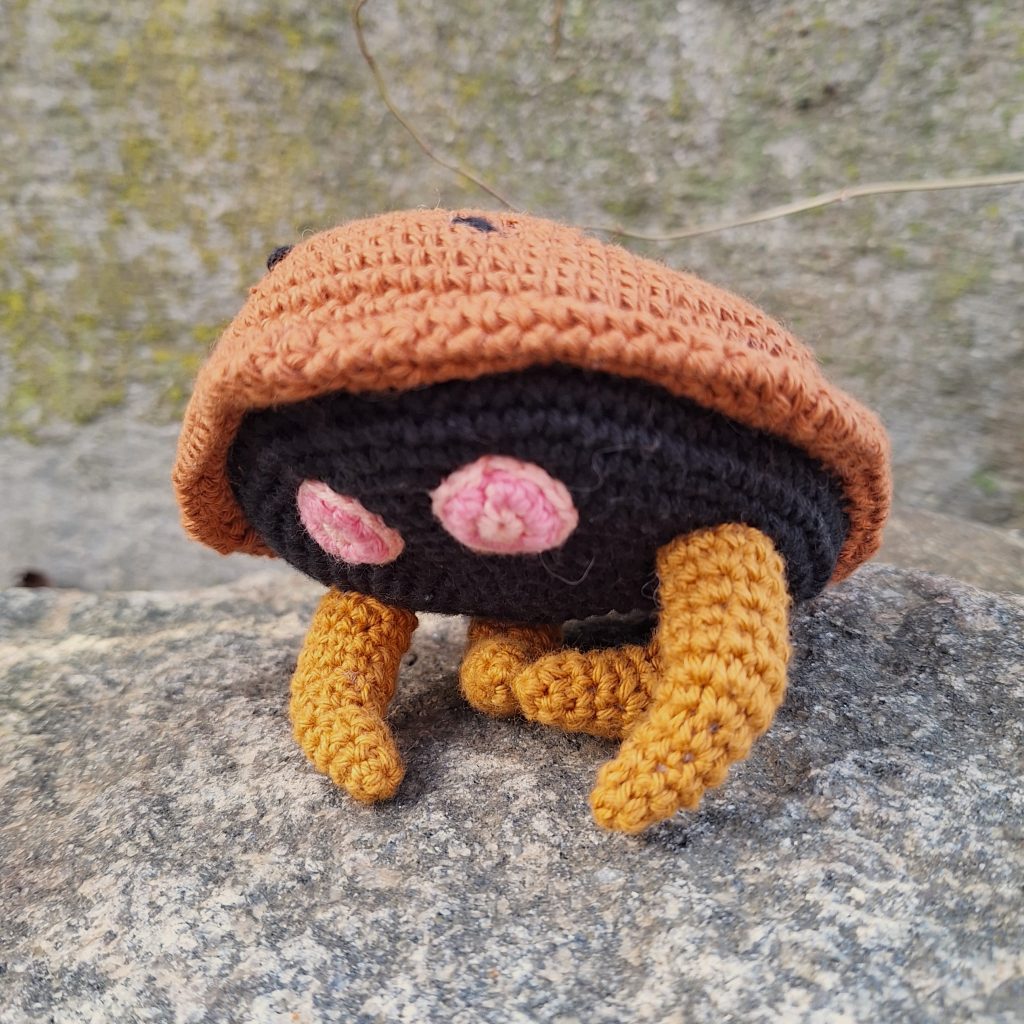
Kabuto is made up of 3 discs, 4 legs and 2 eyes.
The belly is made up of 2 pieces that are connected at the end by sc through both pieces. This gives a sturdier belly that will stay flatter in the finished piece.
If you don’t want to make the belly piece twice, simply make one and follow the pattern up until rnd 13 and make rnd 14 as normally, without the extra piece. This might make the belly rounder, as it is lacking the stability from the extra piece.
If this is just for display, you can also add a round piece of cardboard to the inside before stuffing. This will give Kabuto his flat stomach.
Belly
The belly is made up of 2 pieces that are connected at the end by sc through both pieces. One piece in black, the other piece can be made in any color yarn as it will only be inside and is only for stability. Therefore repeat rounds 1-13 twice to make the 2 pieces.
Rnd 1: 6 sc in mr (6)
Rnd 2: inc x 6 (12)
Rnd 3: (sc, inc) x 6 (18)
Rnd 4: (sc, inc, sc) x 6 (24)
Rnd 5: (3sc, inc) x 6 (30)
Rnd 6: (2sc, inc, 2sc) x 6 (36)
Rnd 7: (5sc, inc) x 6 (42)
Rnd 8: (3sc, inc, 3sc) x 6 (48)
Rnd 9: (7sc, inc) x 6 (54)
Rnd 10: (4sc, inc, 4sc) x 6 (60)
Rnd 11: (9sc, inc) x 6 (66)
Rnd 12: (5sc, inc, 5sc) x 6 (72)
Rnd 13: (11sc, inc) x 6 (78)
FO on the piece for the inside. Leave the yarn on the black piece. Rnd 14 is worked with the black yarn.
Put your 2 pieces together and make the following round working through both pieces at once.
Rnd 14: (6sc, inc, 6sc) x 6 (84)
FO leaving tail for sewing.
Top shell
In brown
Rnd 1: 6 sc in mr (6)
Rnd 2: inc x 6 (12)
Rnd 3: (sc, inc) x 6 (18)
Rnd 4: (sc, inc, sc) x 6 (24)
Rnd 5: (3sc, inc) x 6 (30)
Rnd 6: (2sc, inc, 2sc) x 6 (36)
Rnd 7: (5sc, inc) x 6 (42)
Rnd 8: (3sc, inc, 3sc) x 6 (48)
Rnd 9: (7sc, inc) x 6 (54)
Rnd 10: (4sc, inc, 4sc) x 6 (60)
Rnd 11: sc around (60)
Rnd 12: (9sc, inc) x 6 (66)
Rnd 13: sc around (66)
Rnd 14: (5sc, inc, 5sc) x 6 (72)
Rnd 15: sc around (72)
Rnd 16: (11sc, inc) x 6 (78)
Rnd 17: sc around (78)
Rnd 18: (6sc, inc, 6sc) x 6 (84)
Rnd 19: in FLO. sc around (84)
Rnd 20-22: (4sc, 3hdc, 3dc, 3hdc, 4sc) x 2, 4sc, 3hdc, 2dc, 3hdc, 4sc, (4sc, 3hdc, 3dc, 3hdc, 4sc) x 2 (84)
Rnd 23: Fold the piece so you can work through the normal stitch AND the remaining back loops of round 19. Slip stitch around.
FO
Legs
In a lighter brown
Rnd 1: 4sc in mr (4)
Rnd 2: (sc, inc) x 2 (6)
Rnd 3: sc around (6)
Rnd 4: (sc, inc, sc) x 2 (8)
Rnd 5: dec, 2sc, inc x 2, 2sc (9)
Rnd 6: 4sc, inc, 4sc (10)
Rnd 7: dec, 3sc, inc x 2, 3sc (11)
Rnd 8-9: sc around (11)
Rnd 10: dec, 3sc, inc x 2, 2sc, dec (11)
Rnd 11: 5sc, inc, 5sc (12)
Rnd 12: sc around (12)
Add a few tightening stitches inside the “bend” to make it more visible and to make the shape clearer.
Make 4.
Eyes
I used 2 similar shades of pink, a lighter and a darker shade.
Start with the lightest pink.
Rnd 1: 6sc in mr. Change to the darker pink in the last stitch. (6)
Rnd 2: (hdc-inc) x 6 (12)
Make a slip stitch in the next stitch and change back to the lighter pink.
Rnd 3: slip stitch around to create a lighter border around the eye (12)
Make 2.
Assembly of your crochet Kabuto
Sew together the belly piece and the shell. You can add safety eyes on the top of the shell or embroider them on. Stuff before you close the piece fully.
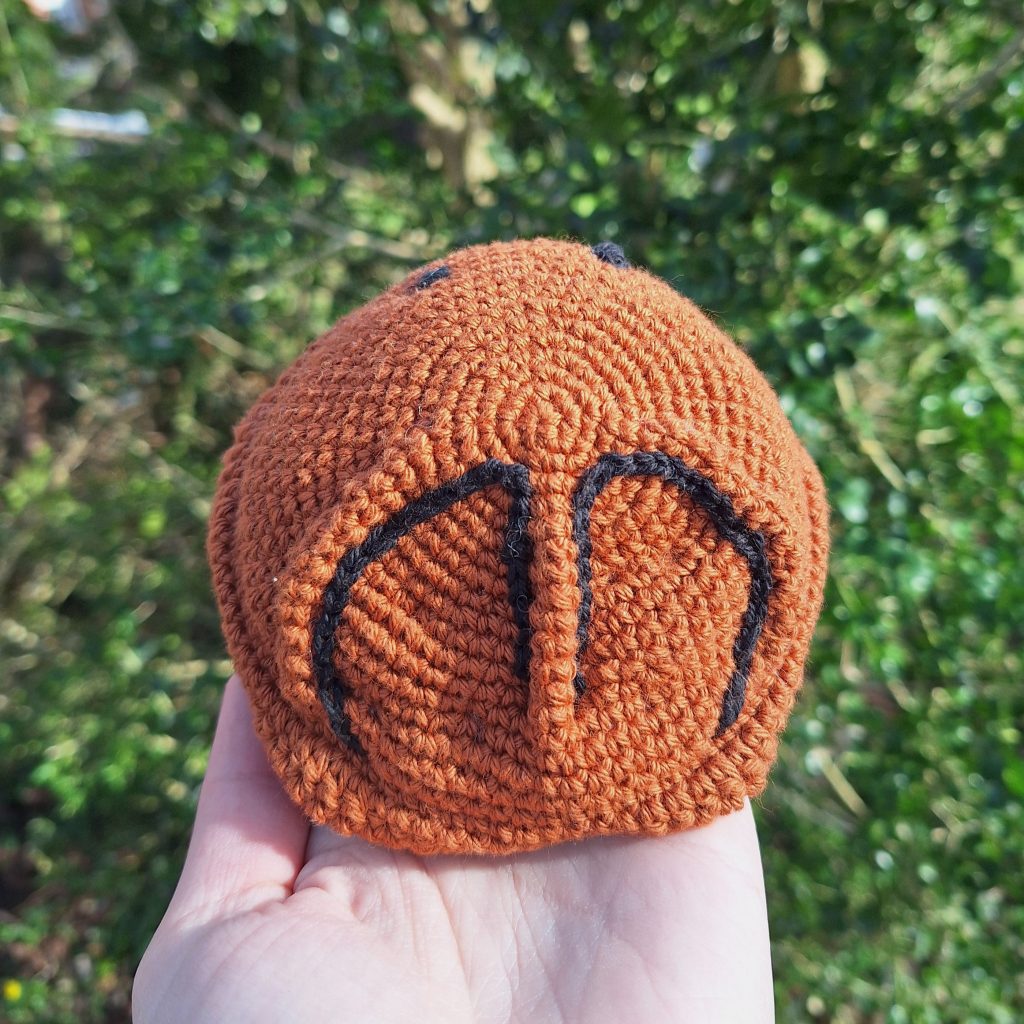
For the definition of the top shell, sinch lines throughout the back to create the “valleys” in the shell as illustrated. Afterwards you can add stitching along the lines to make it more defined. I used the embroidery technique chain stitch. You can also make a chain and sew it on instead.
Add the legs and eyes to the bottom of Kabuto. To help with placement, secure with pins first.